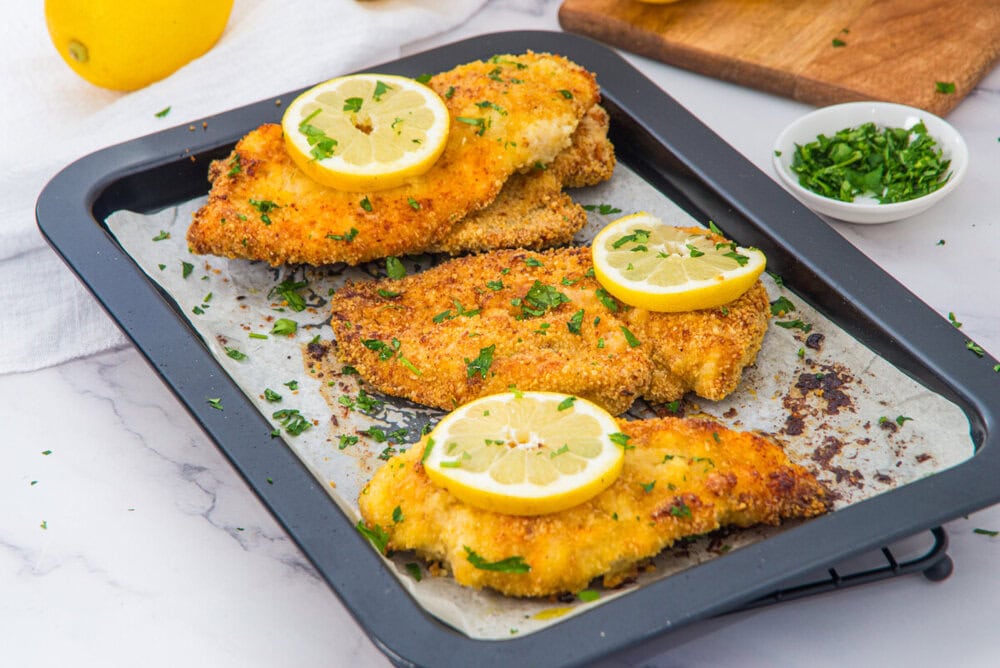
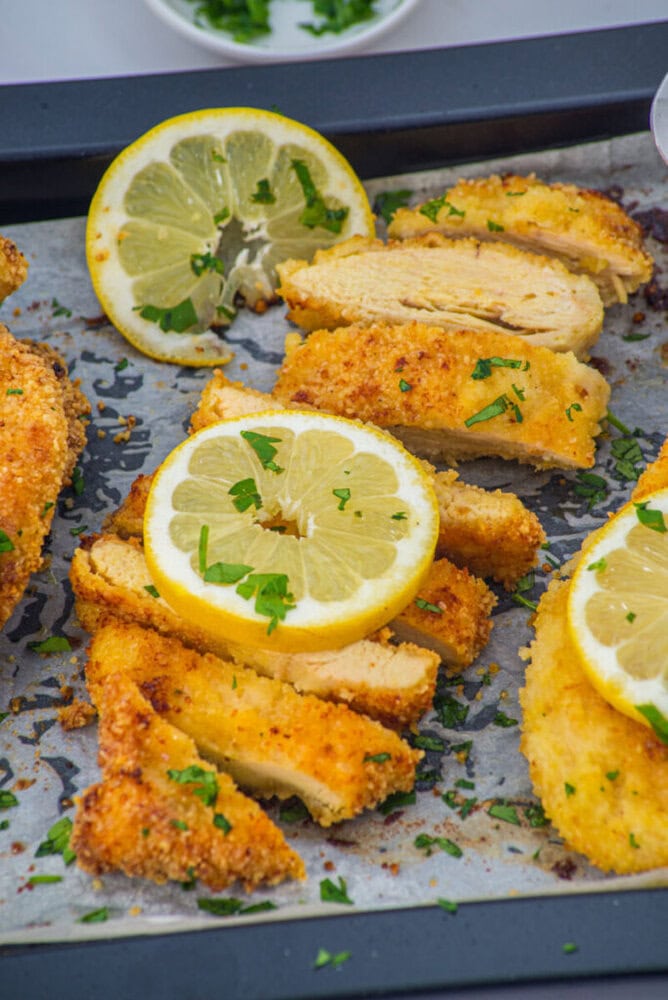
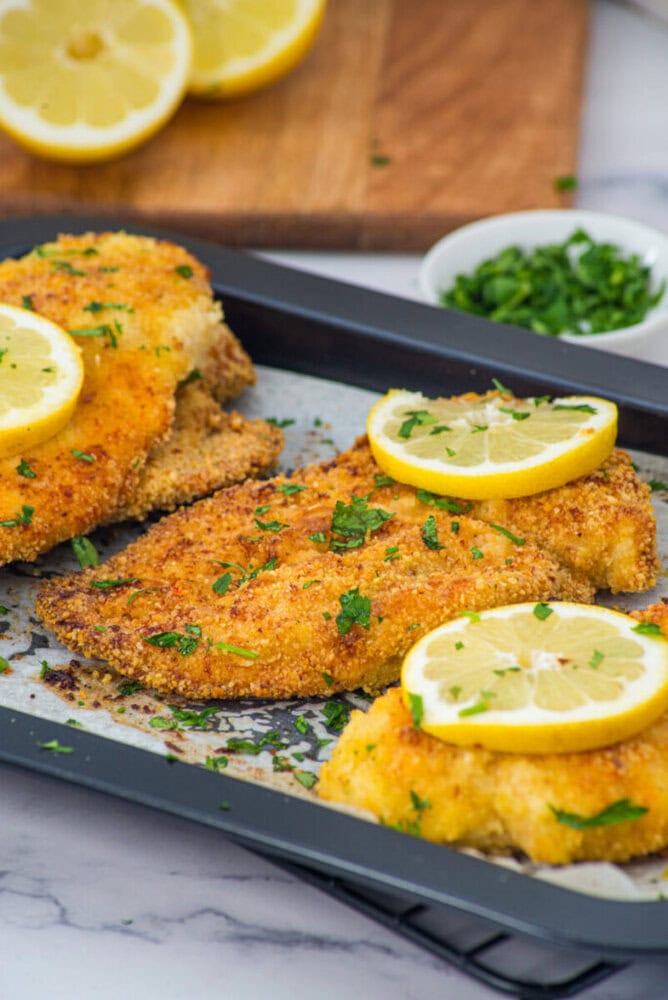
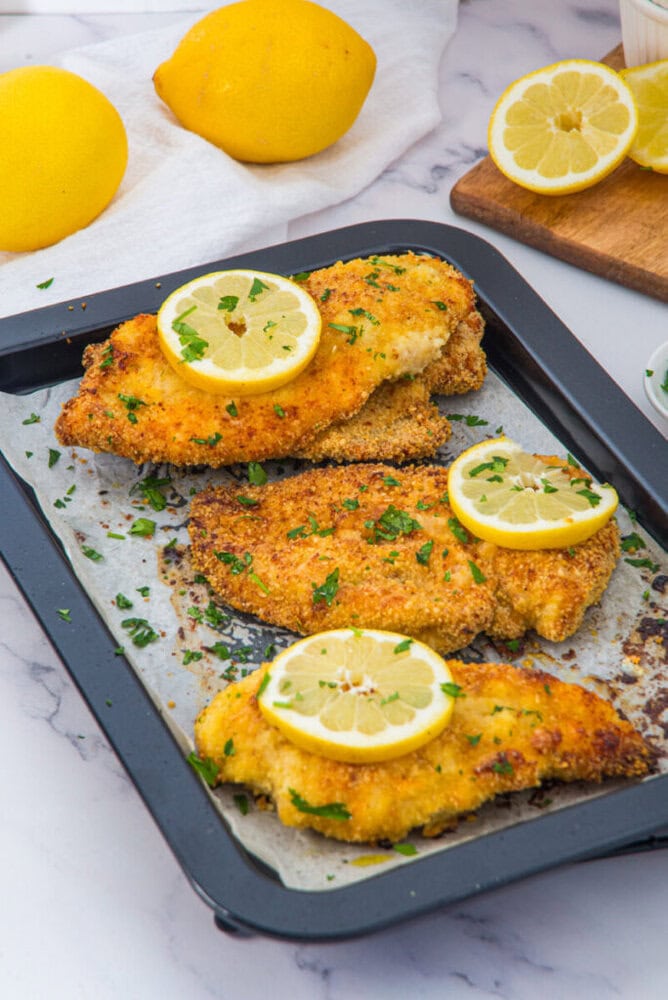
Baked Chicken Cutlets
There is something about a simple chicken dinner that just feels right, especially on those evenings when everyone drifts into the kitchen a little slower than usual. Maybe it is a school night. Maybe it is one of those long days where nothing quite went to plan. Either way, this is the kind of recipe I lean on when I want to bring everyone back to the table without making a big fuss about it.

I started making these baked chicken cutlets years ago when I was trying to cut back on frying but still wanted that crispy bite we all love. You know the kind. That golden crust that gives way to juicy, tender chicken inside. The kind that makes you sneak a piece straight off the tray before it even hits the plate. I have done that more times than I can count, and I am not even sorry about it.
What I love most about this recipe is how it fits into real life. It does not ask for anything fancy. No complicated steps. No ingredients you have to hunt down at three different shops. Just honest pantry staples, a bit of patience, and a warm oven. And somehow, it turns into something that feels a little special.
I usually make this when we want something comforting but not heavy. It is perfect on a weeknight, especially when you are trying to get dinner on the table without turning the kitchen into a disaster zone. But it is also one of those recipes you can dress up a bit. Add a fresh salad, maybe some roasted potatoes, and suddenly it feels like a proper sit down meal.
There is also something about the smell that fills the house while these bake. The Parmesan gets all toasty, the lemon zest brightens everything up, and the garlic just kind of wraps it all together. It is the kind of smell that pulls people into the kitchen without you even calling them.

And if I am being honest, this is one of those meals that makes me feel like I have things together, even on days when I absolutely do not. It is simple, reliable, and always a hit. That is the kind of recipe worth keeping close.
What Is Baked Chicken Cutlets
Baked chicken cutlets are thin slices of chicken breast that are coated in a seasoned breadcrumb mixture and baked in the oven until golden and crispy. Instead of frying, the oven does all the work, giving you a lighter version that still delivers that satisfying crunch and juicy texture.
Why You’ll Love This Recipe
- Crispy without frying: You get that golden crunchy coating without standing over a pan of oil.
- Family friendly: Even picky eaters tend to go back for seconds with this one.
- Quick and easy: From start to finish, this comes together in under 40 minutes.
- Simple ingredients: Everything you need is likely already in your kitchen.
- Light but satisfying: It feels comforting without being too heavy.
When to Serve This Recipe
- Weeknight dinners: It is quick enough to make after a long day and still feels like a proper meal.
- Casual gatherings: Easy to scale up and always a crowd pleaser.
- Meal prep days: These cutlets hold up well and can be used in different meals throughout the week.
- Comfort food cravings: When you want something warm and familiar without too much effort.
Ingredients
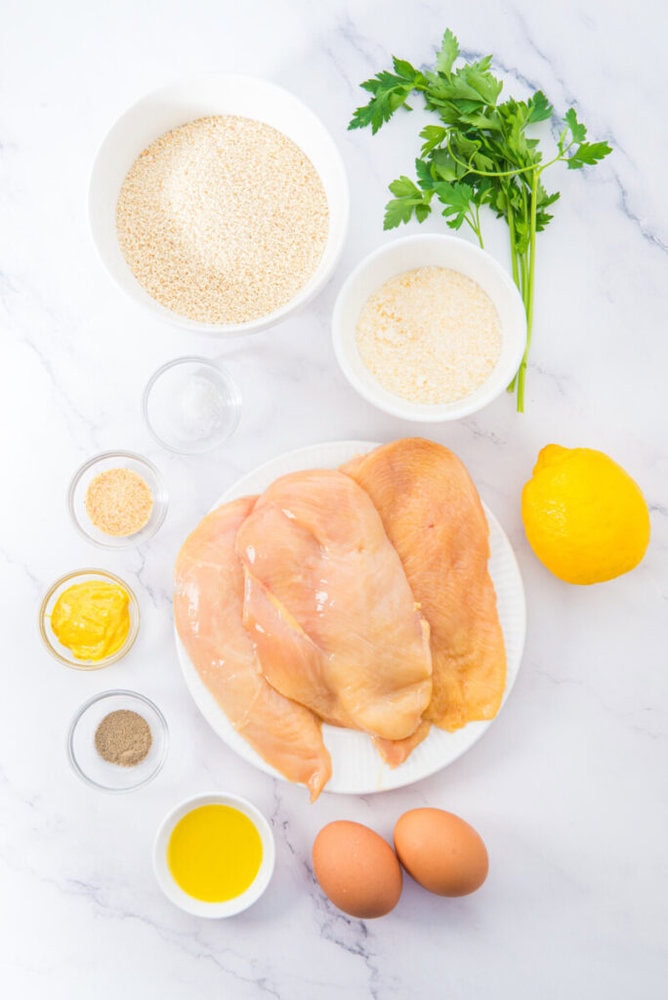
- 2 chicken breasts: Slice into thin cutlets for even cooking and better texture
- 2 eggs: Helps the coating stick and adds richness
- 1 tablespoon mustard: Adds a subtle tang that lifts the flavor
- 2 teaspoon lemon zest: Brings brightness and balances the richness
- 1 teaspoon garlic powder: Gives a mellow garlic flavor throughout
- 1 1/2 cups breadcrumbs: The base for that crispy coating, use panko for extra crunch if you like
- 1/3 cup grated Parmesan cheese: Adds salty depth and helps with browning
- 1/2 teaspoon salt: Enhances all the flavors
- 1/4 teaspoon black pepper: Adds a gentle warmth
- Olive oil: Helps the cutlets crisp up in the oven
- Fresh parsley for garnish: Adds a fresh finish and a bit of color
How to Make Baked Chicken Cutlets
Step 1: Prepare the chicken
Start by slicing each chicken breast in half lengthwise. You are aiming for thin cutlets about half an inch thick. If they are uneven, give them a light pound so they cook evenly.
Step 2: Mix the egg coating
In a bowl or shallow dish, whisk together the eggs, mustard, lemon zest, and garlic powder. Take a moment here to really combine everything well so each bite gets that flavor.
Step 3: Prepare the breadcrumb mixture
In another dish, mix the breadcrumbs with the grated Parmesan, salt, and black pepper. This is where the magic happens, so make sure it is evenly mixed.
Step 4: Bread the chicken

Dip each cutlet into the egg mixture first, letting any excess drip off. Then press it into the breadcrumb mixture, making sure both sides are well coated. Use your hands to gently press the crumbs in so they stick nicely.
Step 5: Arrange on the baking sheet
Place the coated cutlets on a baking sheet, leaving a bit of space between each one. This helps them crisp up instead of steaming.
Step 6: Add olive oil
Drizzle a little olive oil over the top of each cutlet. This helps create that golden finish in the oven.
Step 7: Bake to perfection
Bake in a preheated oven at 400 degrees for 10 minutes. Flip each cutlet and bake for another 10 minutes until golden and cooked through.
Step 8: Finish and serve
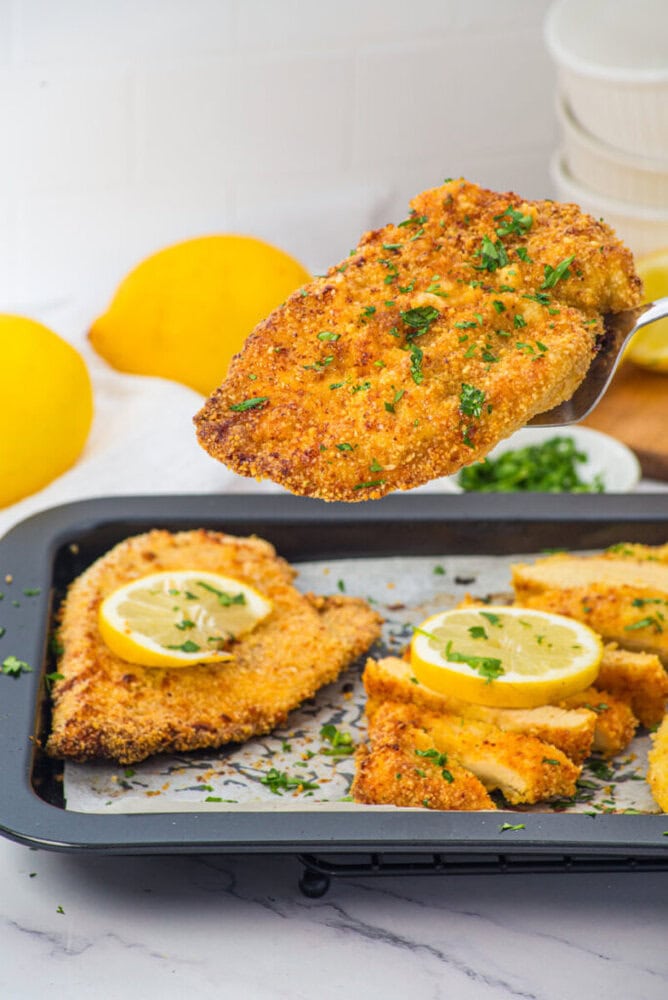
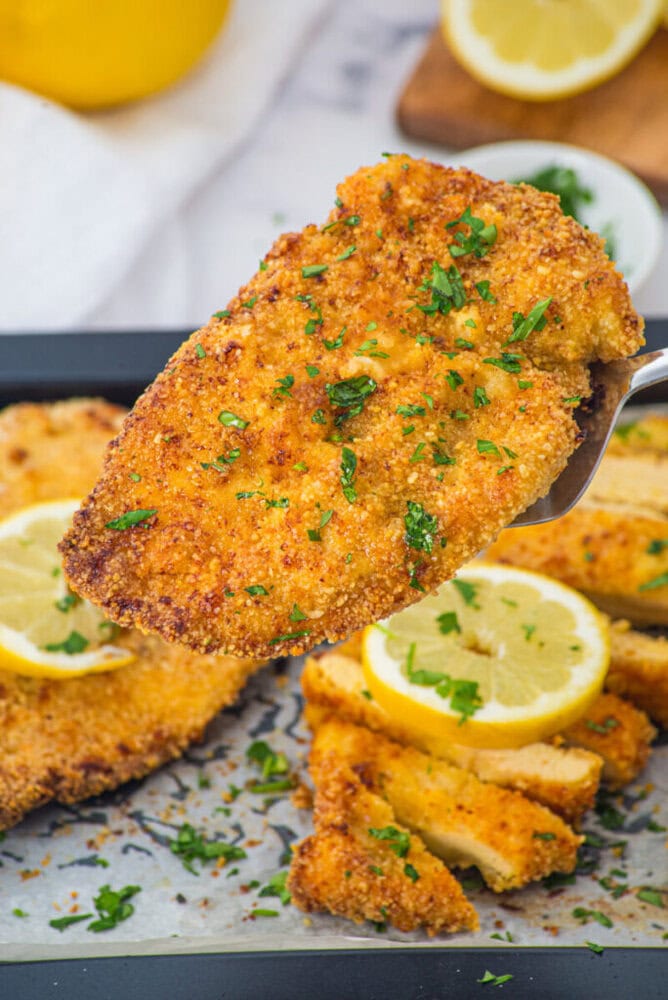
Sprinkle with fresh parsley and a little extra lemon zest if you like. Serve warm and try not to eat them all straight off the tray.
Substitutions
- Panko breadcrumbs: Use these instead of regular breadcrumbs for a crispier texture.
- Different cheese: Swap Parmesan with pecorino or grana padano for a similar salty flavor.
- Fresh garlic: Use minced garlic instead of powder for a stronger taste.
- Chicken thighs: You can use boneless thighs for a juicier option.
Variations
- Herb crusted: Add oregano, thyme, or basil to the breadcrumb mix for extra flavor.
- Spicy kick: Sprinkle in red pepper flakes for a bit of heat.
- Lemon heavy: Add a squeeze of fresh lemon juice before serving for more brightness.
- Cheesy crust: Increase the Parmesan slightly for a richer coating.
Tips and Tricks
- Even thickness: Pound the chicken lightly so it cooks evenly and stays juicy.
- Do not overcrowd: Leave space between each piece so they crisp properly.
- Press the coating: Gently pressing helps the breadcrumbs stick and prevents them from falling off.
- Use a rack if possible: Elevating the chicken allows air to circulate for better crisping.
FAQs
Can I make these ahead of time?

Yes, you can bread the chicken and store it in the fridge for a few hours before baking.
Can I freeze them?
Absolutely. You can freeze them raw or cooked for up to a few months.
How do I reheat them?
Use the oven or air fryer to keep them crispy. Avoid the microwave if you can.
How do I know they are done?
The outside should be golden and the inside should be fully cooked with no pink remaining.
Serving Ideas
- With a fresh salad: A light green salad balances the crispy texture nicely.
- Over pasta: Slice the cutlets and serve over pasta with a simple sauce.
- In a sandwich: Add to a crusty roll with lettuce and a bit of mayo or sauce.
- With roasted vegetables: Keeps things hearty and well rounded.
Storage and Make Ahead Tips
• Refrigerate leftovers: Store in an airtight container for up to 3 to 4 days.
• Freeze for later: Freeze cooked or raw cutlets for up to 2 to 3 months.
• Freeze properly: Lay them out on a tray first so they do not stick together.
• Reheat the right way: Use the oven or air fryer to bring back the crispiness.
Baked Chicken Cutlets

Ingredients
- 2 chicken breasts
- 1 ½ cups breadcrumbs
- ⅓ cup grated Parmesan cheese
- 2 eggs
- 1 tablespoon mustard
- 2 teaspoon lemon zest
- 1 teaspoon garlic powder
- ¼ teaspoon black pepper
- ½ teaspoon salt
- Fresh parsley for garnish
- Olive oil
Instructions
- Step 1: Prepare the chicken – Start by slicing each chicken breast in half lengthwise. You are aiming for thin cutlets about half an inch thick. If they are uneven, give them a light pound so they cook evenly.
- Step 2: Mix the egg coating – In a bowl or shallow dish, whisk together the eggs, mustard, lemon zest, and garlic powder. Take a moment here to really combine everything well so each bite gets that flavor.
- Step 3: Prepare the breadcrumb mixture – In another dish, mix the breadcrumbs with the grated Parmesan, salt, and black pepper. This is where the magic happens, so make sure it is evenly mixed.
- Step 4: Bread the chicken – Dip each cutlet into the egg mixture first, letting any excess drip off. Then press it into the breadcrumb mixture, making sure both sides are well coated. Use your hands to gently press the crumbs in so they stick nicely.
- Step 5: Arrange on the baking sheet – Place the coated cutlets on a baking sheet, leaving a bit of space between each one. This helps them crisp up instead of steaming.
- Step 6: Add olive oil – Drizzle a little olive oil over the top of each cutlet. This helps create that golden finish in the oven.
- Step 7: Bake to perfection – Bake in a preheated oven at 400 degrees for 10 minutes. Flip each cutlet and bake for another 10 minutes until golden and cooked through.
- Step 8: Finish and serve – Sprinkle with fresh parsley and a little extra lemon zest if you like. Serve warm and try not to eat them all straight off the tray.
Notes
Substitutions
- Panko breadcrumbs: Use these instead of regular breadcrumbs for a crispier texture.
- Different cheese: Swap Parmesan with pecorino or grana padano for a similar salty flavor.
- Fresh garlic: Use minced garlic instead of powder for a stronger taste.
- Chicken thighs: You can use boneless thighs for a juicier option.
Variations
- Herb crusted: Add oregano, thyme, or basil to the breadcrumb mix for extra flavor.
- Spicy kick: Sprinkle in red pepper flakes for a bit of heat.
- Lemon heavy: Add a squeeze of fresh lemon juice before serving for more brightness.
- Cheesy crust: Increase the Parmesan slightly for a richer coating.
Tips and Tricks
- Even thickness: Pound the chicken lightly so it cooks evenly and stays juicy.
- Do not overcrowd: Leave space between each piece so they crisp properly.
- Press the coating: Gently pressing helps the breadcrumbs stick and prevents them from falling off.
- Use a rack if possible: Elevating the chicken allows air to circulate for better crisping.
Serving Ideas
- With a fresh salad: A light green salad balances the crispy texture nicely.
- Over pasta: Slice the cutlets and serve over pasta with a simple sauce.
- In a sandwich: Add to a crusty roll with lettuce and a bit of mayo or sauce.
- With roasted vegetables: Keeps things hearty and well rounded.
Storage and Make Ahead Tips
- Refrigerate leftovers: Store in an airtight container for up to 3 to 4 days.
- Freeze for later: Freeze cooked or raw cutlets for up to 2 to 3 months.
- Freeze properly: Lay them out on a tray first so they do not stick together.
- Reheat the right way: Use the oven or air fryer to bring back the crispiness.
Private Notes
Final Thoughts
I think every home needs a recipe like this. Something simple, dependable, and just a little bit comforting. These baked chicken cutlets are exactly that. They are the kind of meal you can turn to again and again, whether you are feeding a hungry family or just trying to get something good on the table without overthinking it.
And the best part is, once you make them a couple of times, you will not even need the recipe anymore. It becomes one of those things you just know. A little bit of this, a little bit of that, and dinner is on the way.
If you give this a try, I hope it brings a bit of that same comfort into your kitchen. The kind that makes people linger at the table just a little longer.