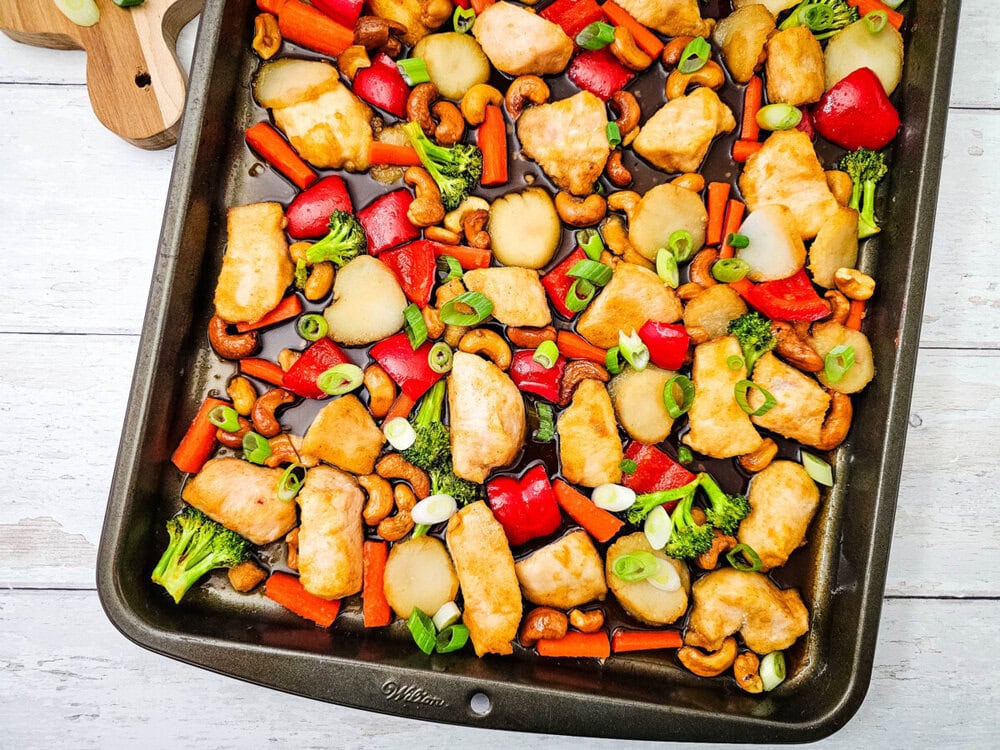
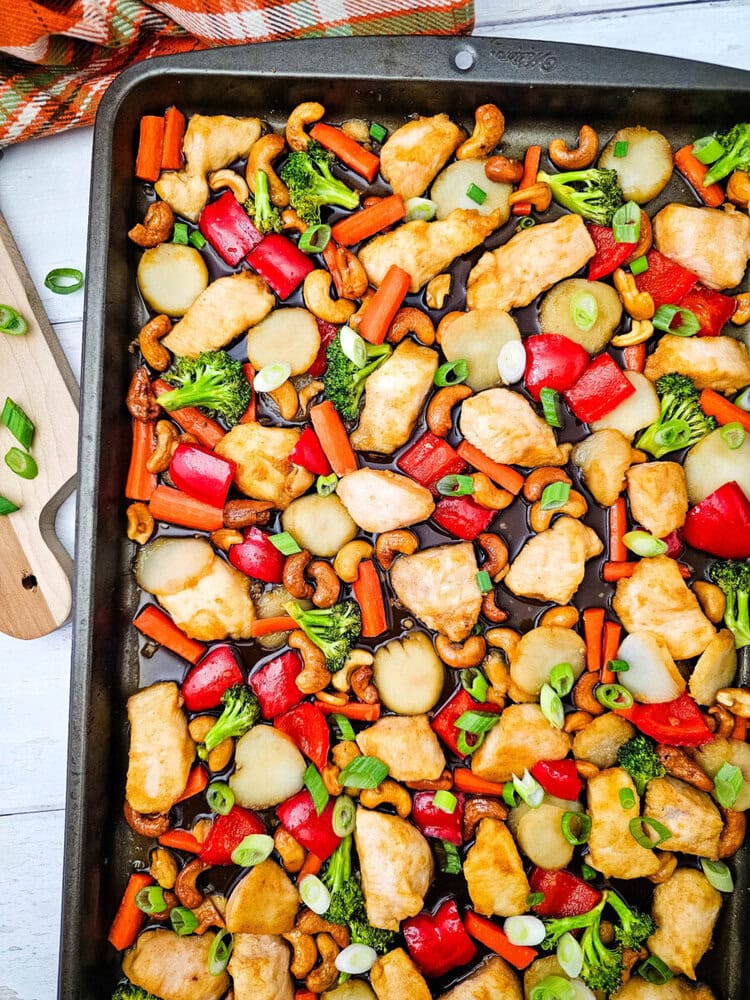
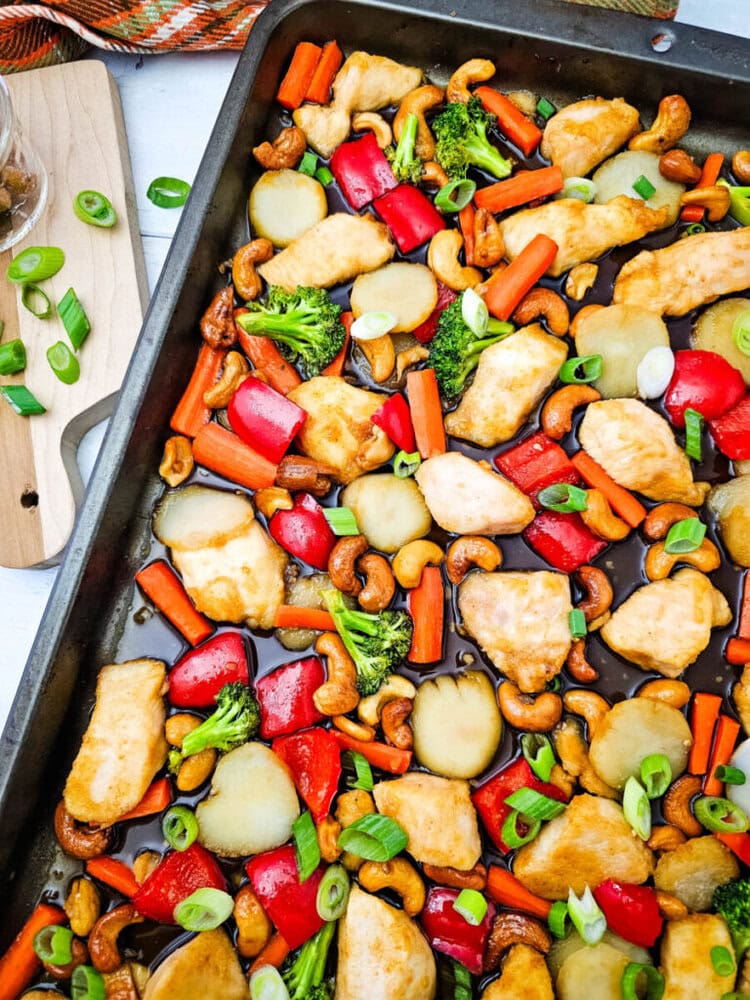
Sheet Pan Cashew Chicken
Some nights, dinner needs to behave itself. I do not mean fancy dinner, and I definitely do not mean the kind where every burner is going, the sink fills up, and somebody asks what smells funny right when you are trying to read the recipe.

I mean a simple, dependable, family friendly dinner that goes on one pan, tastes like you put in more effort than you did, and gets everybody to the table without a big fuss.
That is where this Sheet Pan Cashew Chicken has earned its place in our kitchen. It has tender pieces of chicken, colorful roasted vegetables, sweet and savory sauce, and those crunchy cashews that make every bite feel a little special.
✉ Never miss a recipe — grab Chicken Recipes Cookbook free
Drop your email and we’ll take care of the rest
Get It NowI like this one on busy school nights, especially when the day has already taken more out of me than I care to admit.
The oven does the heavy lifting, the sheet pan catches all that saucy goodness, and cleanup is the kind of easy that makes a dad quietly grateful.

This easy cashew chicken recipe gives you that takeout style flavor, but in a homier, lighter, straight from the oven kind of way.
The chicken gets coated with sesame oil, cornstarch, and seasonings so it bakes up tender with a little texture around the edges.
The broccoli, bell pepper, carrots, and water chestnuts roast right alongside it, then everything gets tossed in a sticky honey soy garlic sauce.
It is quick, colorful, and satisfying, which is exactly what I want when dinner needs to land on the table without drama.
What Is Sheet Pan Cashew Chicken?
Sheet Pan Cashew Chicken is a simple oven baked version of the classic cashew chicken flavors many of us love from takeout.
Instead of stir frying everything in batches, the chicken and vegetables are spread across one sheet pan and baked together until the chicken is cooked through and the vegetables are tender.
The sauce is sweet, salty, garlicky, and just sticky enough to coat everything without drowning it.

Brown sugar and honey bring the sweetness, soy sauce brings the savory depth, and minced garlic gives it that familiar kitchen smell that makes people wander in and ask when dinner is ready.
Add the cashews near the beginning, and they toast up just enough to bring crunch and flavor to the whole pan.
Why You’ll Love This Recipe
- One pan dinner: Everything bakes together on a single sheet pan, which means less mess and fewer dishes after dinner.
- Fast cooking time: This meal is ready in about 30 minutes from start to finish, which is a gift on a busy night.
- Family friendly flavor: The sauce is sweet, savory, and mild enough for kids while still being tasty for grown ups.
- Better than takeout feeling: You get those cozy cashew chicken flavors without waiting on delivery or spending extra money.
- Loaded with vegetables: Broccoli, bell pepper, carrots, and water chestnuts make the pan colorful, hearty, and fresh.
- Great texture: Tender chicken, roasted vegetables, crisp water chestnuts, and crunchy cashews all work together in every bite.
When to Serve This Recipe
- Busy weeknights: This is perfect when you need a real dinner but do not have the patience for a complicated one.
- Family dinner: The flavors are familiar and comforting, so it is a good choice for both picky eaters and hungry adults.
- Meal prep days: The chicken and vegetables reheat well, especially when served over rice or noodles.
- Casual company: It looks colorful and inviting on the pan, but it does not require you to hover over the stove.
- Takeout cravings: Make this when you want something sweet, savory, saucy, and satisfying without ordering in.
Ingredients
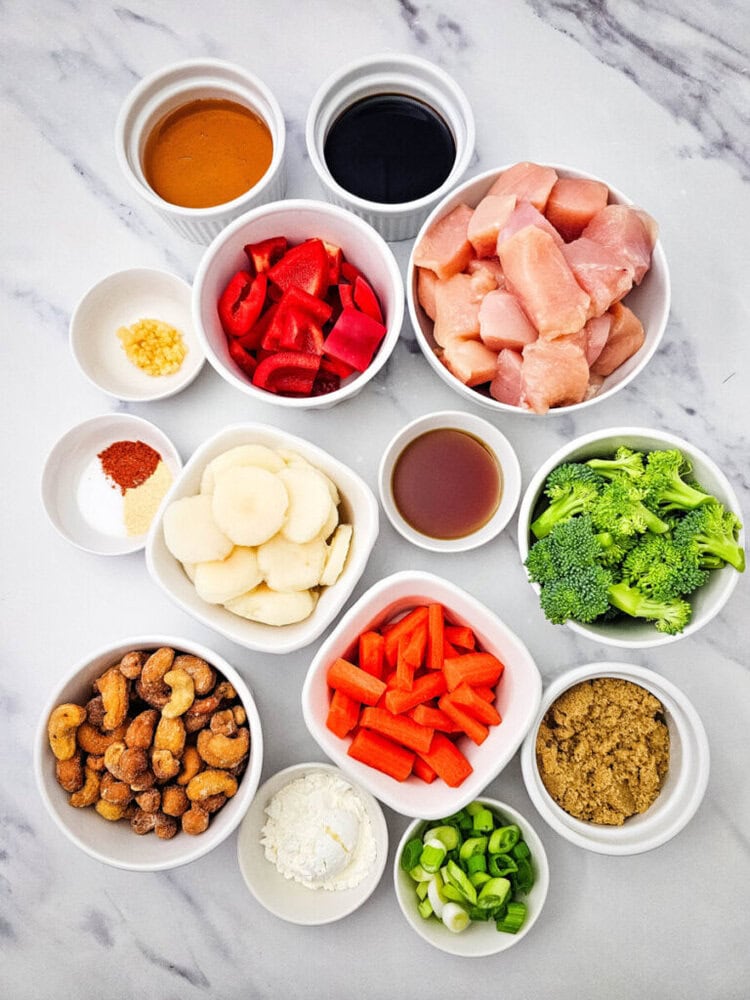
- 1.5 pounds boneless skinless chicken breast: Cut it into bite sized pieces so it cooks quickly and evenly.
- 1 tablespoon sesame oil: Adds a warm nutty flavor that gives the chicken a takeout style base.
- 2 tablespoons cornstarch: Helps coat the chicken and gives it a lightly crisp edge in the oven.
- 1 teaspoon salt: Brings out the flavor in the chicken and vegetables.
- 1 teaspoon garlic powder: Adds steady garlic flavor before the fresh garlic sauce goes on later.
- 1/2 teaspoon paprika: Gives gentle warmth and a little color without making the dish spicy.
- 1 cup small broccoli florets: Keep them small so they roast tender in the same time as the chicken.
- 1 red bell pepper, chopped: Adds sweetness, color, and a little juicy bite.
- 2 carrots, cut into 1 inch pieces, then halved: Cutting them smaller helps them soften without turning mushy.
- 8 ounces sliced water chestnuts: These bring that crisp crunch that makes cashew chicken so fun to eat.
- 1 cup cashews: Honey roasted cashews are delicious here, but regular roasted cashews work too.
- 1/4 cup brown sugar: Gives the sauce a warm sweetness and helps it cling to the chicken.
- 1/4 cup honey: Adds sticky sweetness and a glossy finish.
- 1/4 cup soy sauce: Brings salty, savory flavor that balances the sweet ingredients.
- 1 teaspoon minced garlic: Fresh or jarred both work, and either one makes the sauce smell wonderful.
- 2 green onions, diced: A fresh little garnish at the end wakes up the whole pan.
How to Make Sheet Pan Cashew Chicken
Step 1: Preheat the Oven
Set your oven to 400 degrees and grease a large sheet pan. I like to do this first because once the chopping starts, everything moves pretty quickly.
A hot oven helps the chicken cook through while giving the vegetables a little roasted flavor around the edges. Use the biggest sheet pan you have so the ingredients can spread out instead of steaming in a pile.
Step 2: Chop the Vegetables
Chop the broccoli into small florets, dice the red bell pepper, and cut the carrots into 1 inch pieces before halving them. This part matters more than folks think.
If the carrots are too thick, they will still be too firm when the chicken is done. If the broccoli is too large, the tops may brown before the stems are tender.
Keep everything bite sized and fairly even, and dinner will treat you right.
Step 3: Cut the Chicken

Dice the boneless skinless chicken breast into bite sized pieces. Try to keep the pieces close in size so they all cook at the same pace.
This is one of those little dad lessons that saves trouble later. Big chunks and tiny chunks on the same pan mean some pieces get dry while others are still catching up.
A steady size keeps the chicken juicy and dependable.
Step 4: Coat the Chicken
In a large bowl, mix the sesame oil, cornstarch, salt, garlic powder, and paprika. Add the chicken pieces and stir until every piece is coated.
The mixture may look simple, but it does important work. The sesame oil adds flavor, the seasonings build the base, and the cornstarch helps the chicken bake with a light coating instead of drying out.
Use a silicone spatula or clean hands and make sure there are no plain pieces hiding at the bottom of the bowl.
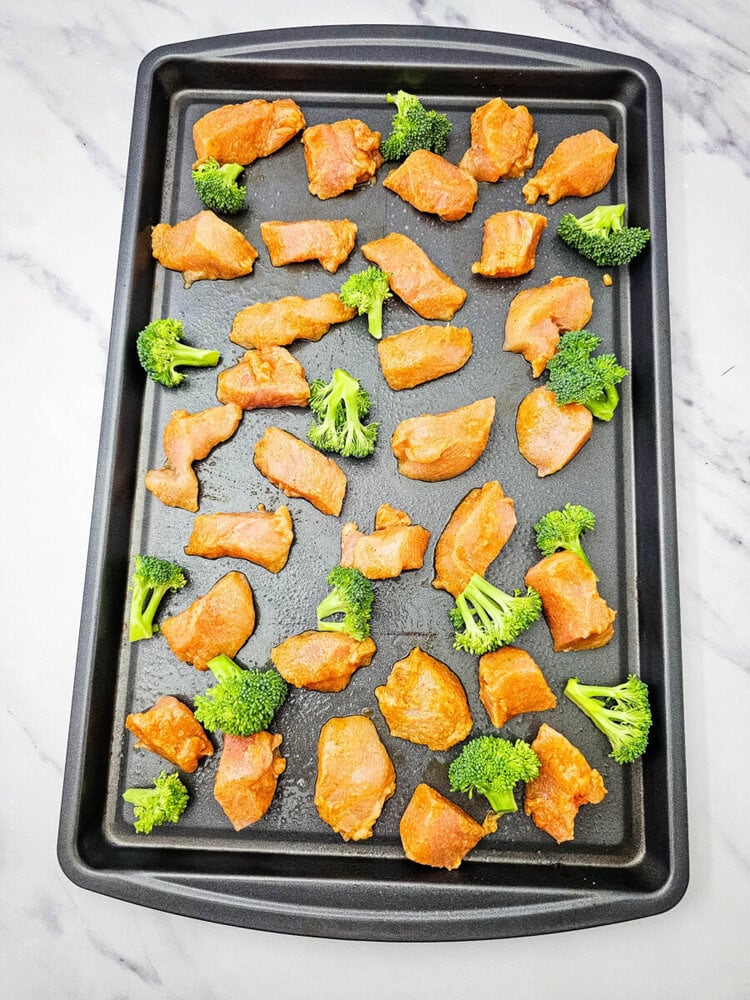
Step 5: Arrange the Chicken on the Pan
Spread the coated chicken across the greased sheet pan. Give the pieces a bit of space where you can.

They do not need their own little apartments, but they should not be stacked on top of each other either. When the chicken has room, it cooks more evenly and gets better texture.
If everything is crowded, it can steam, and we are looking for tender chicken with those nice roasted edges.
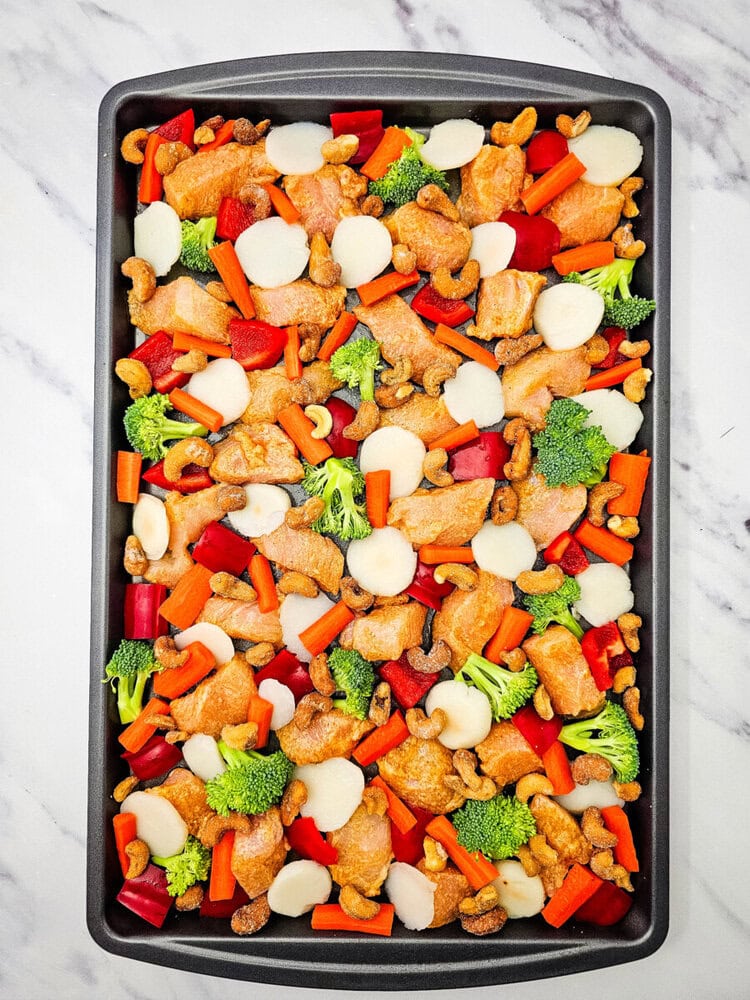
Step 6: Add the Vegetables and Cashews
Add the broccoli, red bell pepper, carrots, and sliced water chestnuts to the sheet pan around the chicken. Sprinkle the cashews over the top.
I like seeing all those colors on the pan at this point because it already looks like dinner is headed somewhere good. The cashews toast a bit as they bake, the vegetables soften, and the chicken starts cooking before the sauce goes on.
Step 7: Bake the First Round
Transfer the sheet pan to the oven and bake for 10 minutes. This first bake gives the chicken a head start and lets the vegetables begin to roast before the sauce is added.
If you add the sauce too early, the sugars can darken too fast and the pan can get a little too sticky. Ten minutes lets everything firm up just enough so the sauce can coat it nicely in the next step.
Step 8: Whisk the Sauce
While the pan is in the oven, whisk together the brown sugar, honey, soy sauce, and minced garlic in a small bowl. The sauce should look glossy and smell sweet, salty, and garlicky.
Give it a good whisk so the brown sugar starts to dissolve. This sauce is the heart of the recipe, and it brings all the chicken, vegetables, and cashews together in that cozy cashew chicken way.
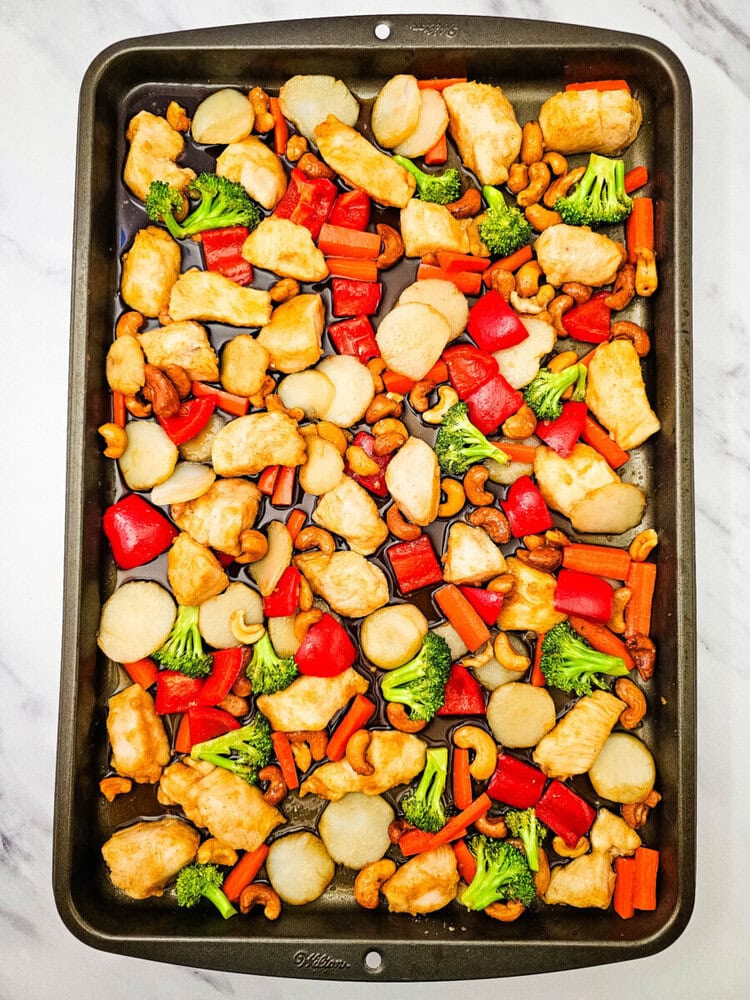
Step 9: Sauce and Toss

Remove the sheet pan from the oven and pour the sauce over everything. Toss gently to coat the chicken, vegetables, water chestnuts, and cashews.
Be careful here because the pan is hot, and nobody needs a heroic dinner injury. Use a silicone spatula to turn everything over just enough so the sauce touches every bite.
It may not look thick yet, but it will tighten up a bit as it finishes baking.
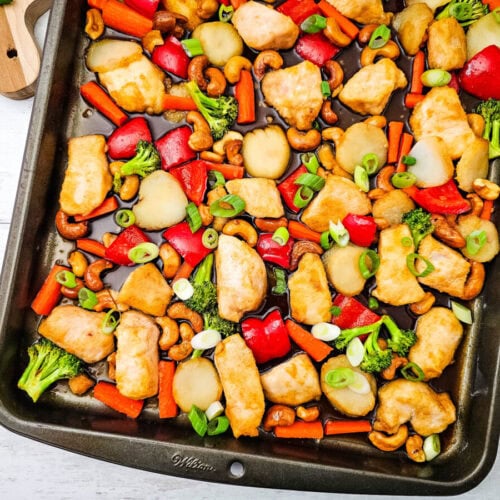
Step 10: Finish Baking
Return the sheet pan to the oven and bake for another 5 to 10 minutes, until the chicken is cooked through and the vegetables are tender. The chicken should reach 165 degrees in the center if you are using a meat thermometer.
The sauce will bubble around the edges and cling to the chicken. Once it is done, sprinkle diced green onions over the top and serve it while everything is hot and glossy.
Substitutions
- Chicken thighs: Use boneless skinless chicken thighs if you prefer a juicier, richer bite.
- Frozen broccoli: Use frozen broccoli in a pinch, but thaw and pat it dry first so the pan does not get watery.
- Tamari: Swap soy sauce for tamari if you need a gluten free option.
- Maple syrup: Use maple syrup instead of honey for a slightly deeper sweetness.
- Regular cashews: Use roasted salted cashews if you do not have honey roasted cashews.
- Different vegetables: Snow peas, zucchini, onion, or snap peas can work well as long as they are cut small.
Variations
- Spicy cashew chicken: Add crushed red pepper flakes or a little sriracha to the sauce for heat.
- Pineapple cashew chicken: Add pineapple chunks during the final bake for a sweet and tangy twist.
- Extra garlic version: Double the minced garlic if your family loves a stronger garlic flavor.
- Rice bowl style: Serve the chicken and vegetables over jasmine rice with extra green onions on top.
- Noodle dinner: Toss the finished chicken and vegetables with cooked lo mein noodles or rice noodles.
- More vegetable heavy: Add extra broccoli and bell pepper if you want the meal to stretch a little further.
Tips and Tricks
- Use a large pan: A crowded pan steams instead of roasts, so spread everything out as much as possible.
- Cut evenly: Similar sized chicken and vegetables cook better together and keep dinner from turning uneven.
- Do not skip the cornstarch: It helps the chicken hold seasoning and gives it a better texture in the oven.
- Watch the final bake: The sauce has sugar and honey, so keep an eye on it near the end.
- Use a thermometer: Chicken is done at 165 degrees, and checking keeps you from overcooking it.
- Serve right away: This dish is best when the cashews are still crunchy and the sauce is hot.
FAQs
Can I use chicken thighs instead of chicken breast?
Yes, boneless skinless chicken thighs work very well in this recipe. They are a little more forgiving than chicken breast and tend to stay juicy.
Cut them into bite sized pieces just like the breast meat and bake until they reach 165 degrees.
Can I make Sheet Pan Cashew Chicken ahead of time?
You can prep the chicken, chop the vegetables, and whisk the sauce earlier in the day. Keep everything covered in the refrigerator, with the sauce stored separately.
When dinner time comes, assemble the sheet pan and bake it fresh for the best texture.
What should I serve with cashew chicken?
Rice is the classic choice, and honestly, it is hard to beat. White rice, brown rice, jasmine rice, or even cauliflower rice all work.
The sauce soaks into the rice and makes the whole bowl feel complete.
Can I make this recipe gluten free?
Yes, use gluten free tamari instead of soy sauce and make sure your cashews are certified gluten free if needed. Everything else in the recipe is naturally gluten free, but it is always smart to check labels.
How do I know when the chicken is done?
The safest way is to use a meat thermometer and check that the chicken reaches 165 degrees in the center. The pieces should also look opaque all the way through with no pink remaining.
Since the chicken is cut small, it cooks quickly.
Can I double this recipe?
Yes, but use two sheet pans instead of cramming everything onto one. Crowding the pan will make the chicken and vegetables steam, and you will lose some of that good roasted texture.
Rotate the pans halfway through baking if your oven has hot spots.
Serving Ideas
- Over white rice: Spoon the saucy chicken and vegetables over fluffy rice for the easiest complete meal.
- With brown rice: Brown rice adds a nutty flavor that works nicely with the cashews and sesame oil.
- With noodles: Serve it over lo mein noodles, rice noodles, or even spaghetti in a pinch.
- In lettuce cups: Spoon the mixture into crisp lettuce leaves for a lighter dinner.
- With egg rolls: Add store bought egg rolls on the side when you want a fun takeout style plate.
- With extra vegetables: Serve alongside steamed green beans or roasted snap peas for a bigger meal.
Storage and Make Ahead Tips
- Refrigerator storage: Store leftovers in an airtight container in the refrigerator for up to 3 days.
- Reheating: Warm leftovers in a skillet over medium heat or microwave in short bursts until hot.
- Best texture: The cashews soften a little after storage, so add a few fresh cashews when reheating if you want crunch.
- Make ahead prep: Chop the vegetables and chicken up to 24 hours ahead and store them separately.
- Sauce prep: Whisk the sauce ahead and refrigerate it in a covered jar or small container.
- Freezer note: This recipe is best fresh, but you can freeze leftovers for up to 2 months if needed.
Sheet Pan Cashew Chicken
Ingredients
- 1.5 pounds boneless skinless chicken breast cut into bite sized pieces
- 1 tablespoon sesame oil
- 2 tablespoons corn starch
- 1 teaspoon salt
- 1 teaspoon garlic powder
- ½ teaspoon paprika
- 1 cup small broccoli florets
- 1 red bell pepper chopped
- 2 carrots cut into 1 inch pieces, then halved
- 8 oz sliced water chestnuts
- 1 cup cashews we used honey roasted
- ¼ cup brown sugar
- ¼ cup honey
- ¼ cup soy sauce
- 1 tsp minced garlic
✉ Never miss a recipe — grab Chicken Recipes Cookbook free
Drop your email and we’ll take care of the rest
Get It NowInstructions
- Step 1: Preheat the Oven – Set your oven to 400 degrees and grease a large sheet pan. I like to do this first because once the chopping starts, everything moves pretty quickly. A hot oven helps the chicken cook through while giving the vegetables a little roasted flavor around the edges. Use the biggest sheet pan you have so the ingredients can spread out instead of steaming in a pile.
- Step 2: Chop the Vegetables – Chop the broccoli into small florets, dice the red bell pepper, and cut the carrots into 1 inch pieces before halving them. This part matters more than folks think. If the carrots are too thick, they will still be too firm when the chicken is done. If the broccoli is too large, the tops may brown before the stems are tender. Keep everything bite sized and fairly even, and dinner will treat you right.
- Step 3: Cut the Chicken – Dice the boneless skinless chicken breast into bite sized pieces. Try to keep the pieces close in size so they all cook at the same pace. This is one of those little dad lessons that saves trouble later. Big chunks and tiny chunks on the same pan mean some pieces get dry while others are still catching up. A steady size keeps the chicken juicy and dependable.
- Step 4: Coat the Chicken – In a large bowl, mix the sesame oil, cornstarch, salt, garlic powder, and paprika. Add the chicken pieces and stir until every piece is coated. The mixture may look simple, but it does important work. The sesame oil adds flavor, the seasonings build the base, and the cornstarch helps the chicken bake with a light coating instead of drying out. Use a silicone spatula or clean hands and make sure there are no plain pieces hiding at the bottom of the bowl.
- Step 5: Arrange the Chicken on the Pan – Spread the coated chicken across the greased sheet pan. Give the pieces a bit of space where you can. They do not need their own little apartments, but they should not be stacked on top of each other either. When the chicken has room, it cooks more evenly and gets better texture. If everything is crowded, it can steam, and we are looking for tender chicken with those nice roasted edges.
- Step 6: Add the Vegetables and Cashews – Add the broccoli, red bell pepper, carrots, and sliced water chestnuts to the sheet pan around the chicken. Sprinkle the cashews over the top. I like seeing all those colors on the pan at this point because it already looks like dinner is headed somewhere good. The cashews toast a bit as they bake, the vegetables soften, and the chicken starts cooking before the sauce goes on.
- Step 7: Bake the First Round – Transfer the sheet pan to the oven and bake for 10 minutes. This first bake gives the chicken a head start and lets the vegetables begin to roast before the sauce is added. If you add the sauce too early, the sugars can darken too fast and the pan can get a little too sticky. Ten minutes lets everything firm up just enough so the sauce can coat it nicely in the next step.
- Step 8: Whisk the Sauce – While the pan is in the oven, whisk together the brown sugar, honey, soy sauce, and minced garlic in a small bowl. The sauce should look glossy and smell sweet, salty, and garlicky. Give it a good whisk so the brown sugar starts to dissolve. This sauce is the heart of the recipe, and it brings all the chicken, vegetables, and cashews together in that cozy cashew chicken way.
- Step 9: Sauce and Toss – Remove the sheet pan from the oven and pour the sauce over everything. Toss gently to coat the chicken, vegetables, water chestnuts, and cashews. Be careful here because the pan is hot, and nobody needs a heroic dinner injury. Use a silicone spatula to turn everything over just enough so the sauce touches every bite. It may not look thick yet, but it will tighten up a bit as it finishes baking.
- Step 10: Finish Baking – Return the sheet pan to the oven and bake for another 5 to 10 minutes, until the chicken is cooked through and the vegetables are tender. The chicken should reach 165 degrees in the center if you are using a meat thermometer. The sauce will bubble around the edges and cling to the chicken. Once it is done, sprinkle diced green onions over the top and serve it while everything is hot and glossy.
Notes
Substitutions
- Chicken thighs: Use boneless skinless chicken thighs if you prefer a juicier, richer bite.
- Frozen broccoli: Use frozen broccoli in a pinch, but thaw and pat it dry first so the pan does not get watery.
- Tamari: Swap soy sauce for tamari if you need a gluten free option.
- Maple syrup: Use maple syrup instead of honey for a slightly deeper sweetness.
- Regular cashews: Use roasted salted cashews if you do not have honey roasted cashews.
- Different vegetables: Snow peas, zucchini, onion, or snap peas can work well as long as they are cut small.
Variations
- Spicy cashew chicken: Add crushed red pepper flakes or a little sriracha to the sauce for heat.
- Pineapple cashew chicken: Add pineapple chunks during the final bake for a sweet and tangy twist.
- Extra garlic version: Double the minced garlic if your family loves a stronger garlic flavor.
- Rice bowl style: Serve the chicken and vegetables over jasmine rice with extra green onions on top.
- Noodle dinner: Toss the finished chicken and vegetables with cooked lo mein noodles or rice noodles.
- More vegetable heavy: Add extra broccoli and bell pepper if you want the meal to stretch a little further.
Tips and Tricks
- Use a large pan: A crowded pan steams instead of roasts, so spread everything out as much as possible.
- Cut evenly: Similar sized chicken and vegetables cook better together and keep dinner from turning uneven.
- Do not skip the cornstarch: It helps the chicken hold seasoning and gives it a better texture in the oven.
- Watch the final bake: The sauce has sugar and honey, so keep an eye on it near the end.
- Use a thermometer: Chicken is done at 165 degrees, and checking keeps you from overcooking it.
- Serve right away: This dish is best when the cashews are still crunchy and the sauce is hot.
Serving Ideas
- Over white rice: Spoon the saucy chicken and vegetables over fluffy rice for the easiest complete meal.
- With brown rice: Brown rice adds a nutty flavor that works nicely with the cashews and sesame oil.
- With noodles: Serve it over lo mein noodles, rice noodles, or even spaghetti in a pinch.
- In lettuce cups: Spoon the mixture into crisp lettuce leaves for a lighter dinner.
- With egg rolls: Add store bought egg rolls on the side when you want a fun takeout style plate.
- With extra vegetables: Serve alongside steamed green beans or roasted snap peas for a bigger meal.
Storage and Make Ahead Tips
- Refrigerator storage: Store leftovers in an airtight container in the refrigerator for up to 3 days.
- Reheating: Warm leftovers in a skillet over medium heat or microwave in short bursts until hot.
- Best texture: The cashews soften a little after storage, so add a few fresh cashews when reheating if you want crunch.
- Make ahead prep: Chop the vegetables and chicken up to 24 hours ahead and store them separately.
- Sauce prep: Whisk the sauce ahead and refrigerate it in a covered jar or small container.
- Freezer note: This recipe is best fresh, but you can freeze leftovers for up to 2 months if needed.
Private Notes
✉ Never miss a recipe — grab Chicken Recipes Cookbook free
Drop your email and we’ll take care of the rest
Get It NowFinal Thoughts
Sheet Pan Cashew Chicken is the kind of dinner I appreciate more every time I make it. It is quick, colorful, and full of flavor, but it still feels simple and practical.
That matters when the day has been long and everyone is hungry at once.
I love that it gives you tender chicken, roasted vegetables, sweet garlic soy sauce, and crunchy cashews without asking you to juggle three pans. It is the sort of recipe that makes the kitchen smell good, gets scooped over rice, and disappears faster than expected.
Around here, that is usually the sign of a keeper.