
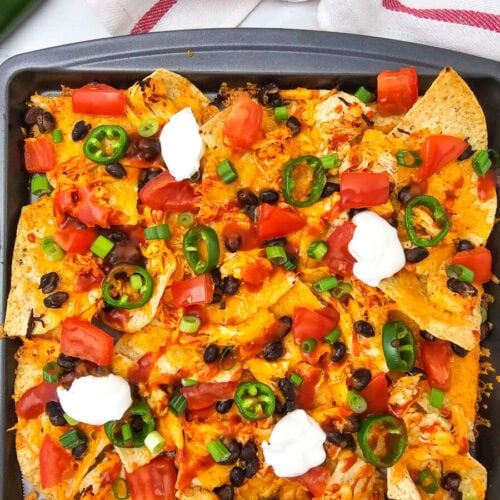
Sheet Pan Chicken Nachos
There is something about a tray of nachos that just brings everyone together, no questions asked. In our house, this recipe usually shows up on a Friday night when the week has done its best to wear us all down.

Shoes kicked off by the door, kids drifting in and out of the kitchen asking what smells so good, and me standing there with a sheet pan full of something that is guaranteed to disappear faster than I planned for.
Sheet Pan Chicken Nachos have become one of those go to meals that I lean on when I want something easy but still feel like I put in the effort. It is not fancy, and that is exactly the point.
✉ Never miss a recipe — grab Chicken Recipes Cookbook free
Drop your email and we’ll take care of the rest
Get It NowIt is warm, messy in the best way, and packed with flavor that makes everyone reach for just one more bite. I like to think of it as the kind of meal you make when you want to slow things down a little and just enjoy being together, even if it is just for a quick dinner around the table.
The best part is how simple it is. One pan, a handful of ingredients, and about twenty minutes from start to finish.

That means more time sitting down with your family instead of cleaning up a mountain of dishes. And if I am being honest, that is a win every single time.
What Is Sheet Pan Chicken Nachos?
Sheet Pan Chicken Nachos are a layered dish made by spreading tortilla chips across a baking pan and topping them with seasoned chicken, beans, cheese, and fresh toppings before baking everything together until warm and melty. The magic happens in the oven where the cheese melts into every corner and the toppings settle right into those crispy chips.
It is a one pan meal that delivers big flavor with very little effort. Think of it as the ultimate comfort food that is just as perfect for a casual dinner as it is for game day or a weekend get together.
Why You’ll Love This Recipe
- Quick and easy: This recipe comes together in about twenty minutes which makes it perfect for busy nights when you still want something satisfying.
- Minimal cleanup: Everything cooks on one sheet pan so you are not stuck at the sink after dinner.
- Family friendly: The flavors are simple and familiar which makes it a hit with both kids and adults.
- Customizable: You can easily adjust toppings to suit everyone at the table without much extra work.
- Great use for leftovers: Cooked chicken gets a second life here which means less waste and more flavor.
When to Serve This Recipe
- Weeknight dinners: This is the kind of meal you can throw together after a long day without thinking twice.
- Game day gatherings: A big tray of nachos fits right in with a crowd that is ready to snack and cheer.
- Movie nights: Set the pan right in the middle and let everyone dig in while the film rolls.
- Casual get togethers: It is relaxed, shareable, and always a conversation starter.
- After school hunger: When the kids come home starving, this fills them up fast and keeps everyone happy.
Ingredients
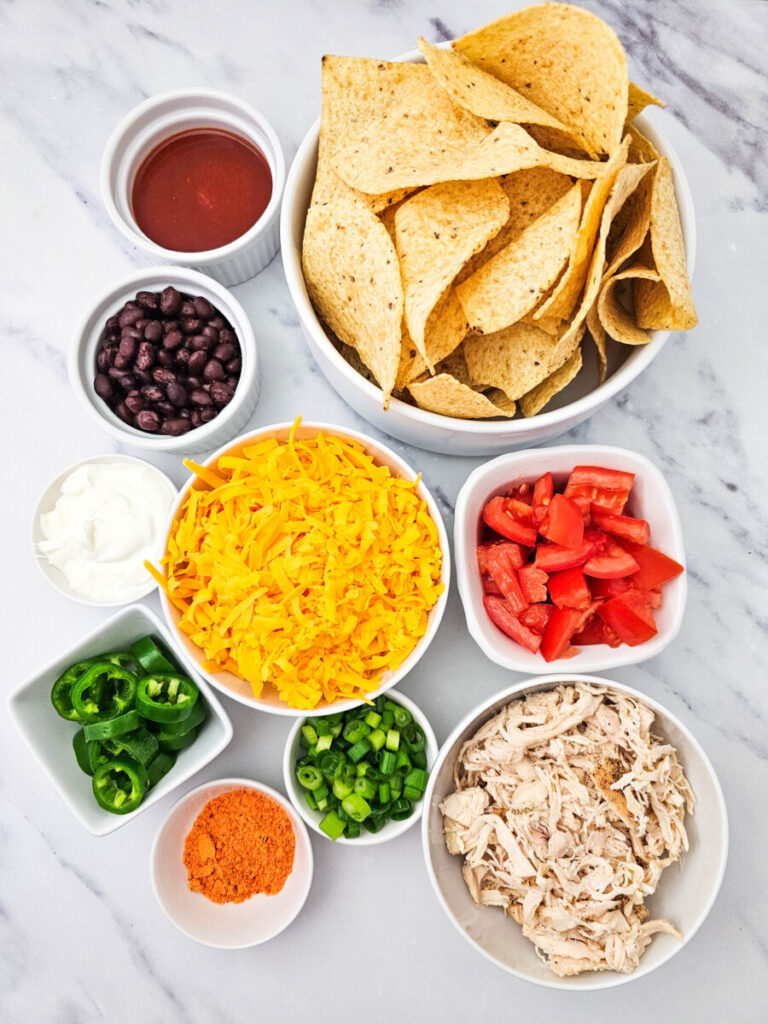
- 6 to 8 oz tortilla chips – sturdy chips work best so they hold up under all the toppings
- 1 cup cooked and shredded chicken – rotisserie chicken is a great time saver here
- 1 tbsp taco seasoning – adds that classic bold flavor without extra effort
- 2 thirds cup black beans – rinse and drain them well to avoid soggy chips
- 2 cups shredded cheddar cheese – melts beautifully and gives that rich cheesy pull
- 2 jalapenos – remove seeds for less heat or keep them for a little kick
- 2 roma tomatoes – fresh and diced for a bright bite
- 1 to 2 green onions – sliced thin for a fresh finish
- one quarter cup taco sauce – adds a tangy layer across the top
- one quarter cup sour cream – cool and creamy to balance the heat
How to Make Sheet Pan Chicken Nachos
Step 1: Preheat and Prep the Pan
Start by preheating your oven to 400 degrees. While that warms up, line a large sheet pan with parchment paper.
This step might seem small, but it makes cleanup a whole lot easier later on. Trust me, future you will appreciate it.
Step 2: Chop the Fresh Ingredients
Take a few minutes to dice the tomatoes, slice the green onions, and prepare the jalapenos. I usually do this all at once so everything is ready to go when it is time to assemble.
It keeps things smooth and avoids that last minute scramble.
Step 3: Season the Chicken

In a medium bowl, mix your shredded chicken with the taco seasoning. Give it a good stir so every piece gets coated.
This is where the flavor really starts to build, so do not rush it. You want that seasoning evenly spread.
Step 4: Layer the Chips
Spread the tortilla chips across your prepared sheet pan in an even layer. Try not to pile them too high.
A nice flat layer helps every chip get its fair share of toppings, which means no one ends up with a plain chip.
Step 5: Add the Toppings
Now comes the fun part. Sprinkle the seasoned chicken over the chips, followed by the black beans, shredded cheese, jalapenos, and tomatoes.
I like to make sure everything is evenly distributed so each bite has a little bit of everything.
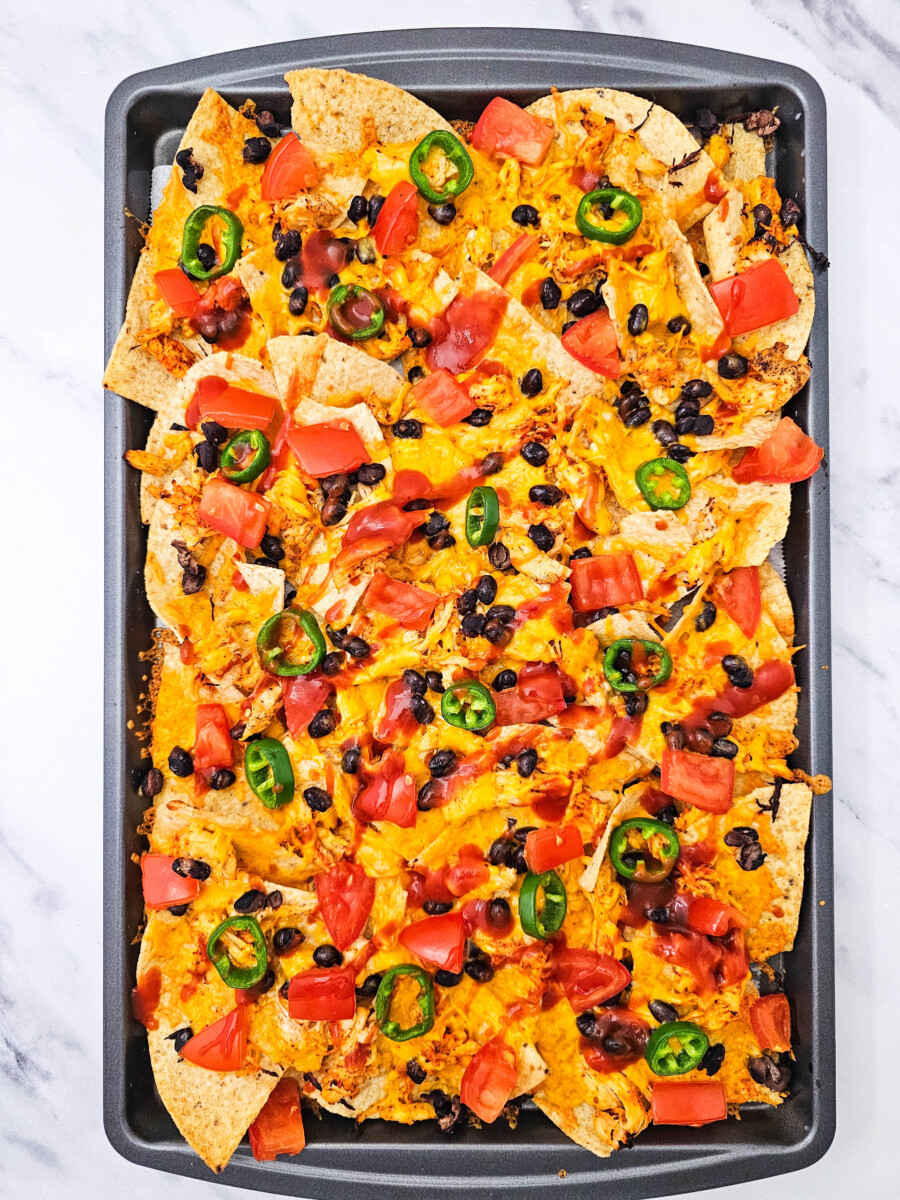
Step 6: Bake Until Melty
Slide the pan into the oven and bake for about ten minutes. Keep an eye on it.

You are looking for the cheese to melt and everything to heat through. The smell alone will let you know you are getting close.
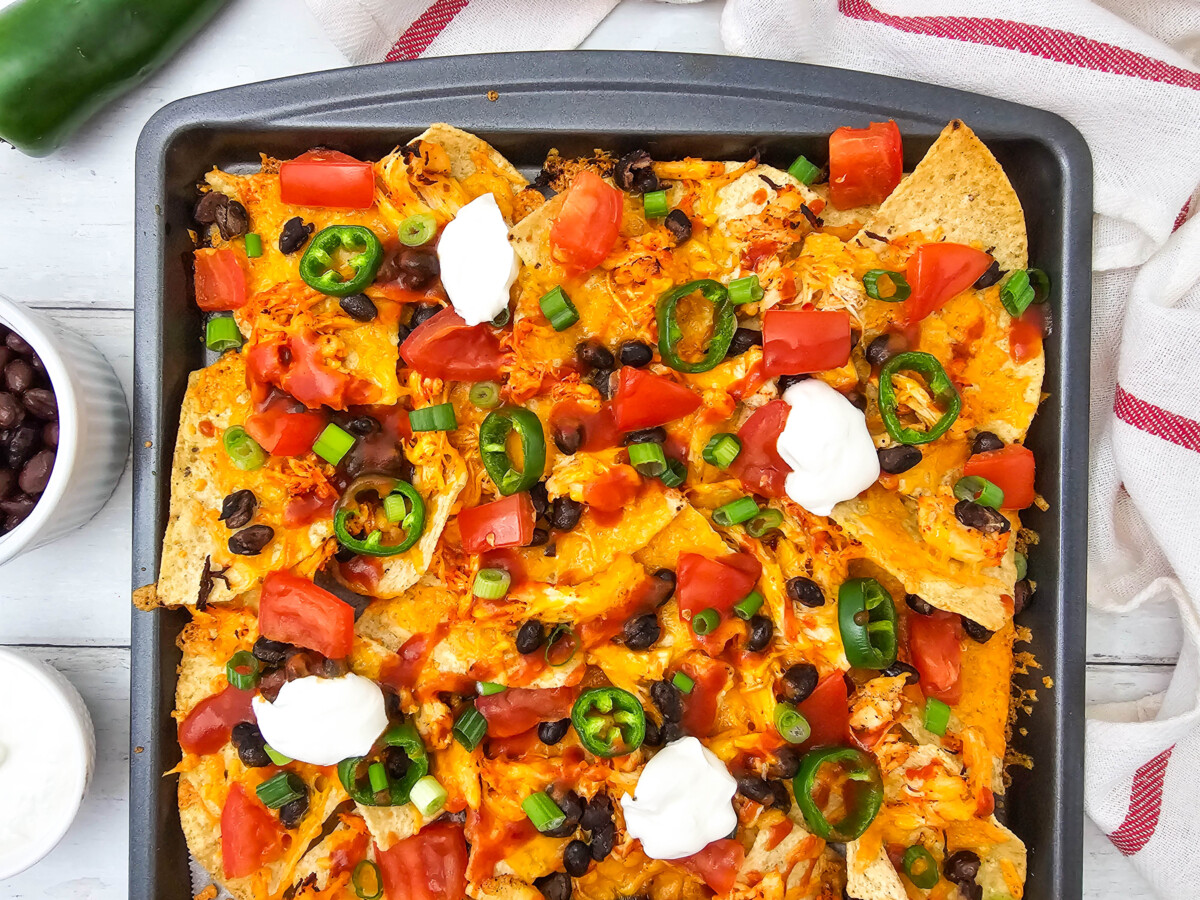
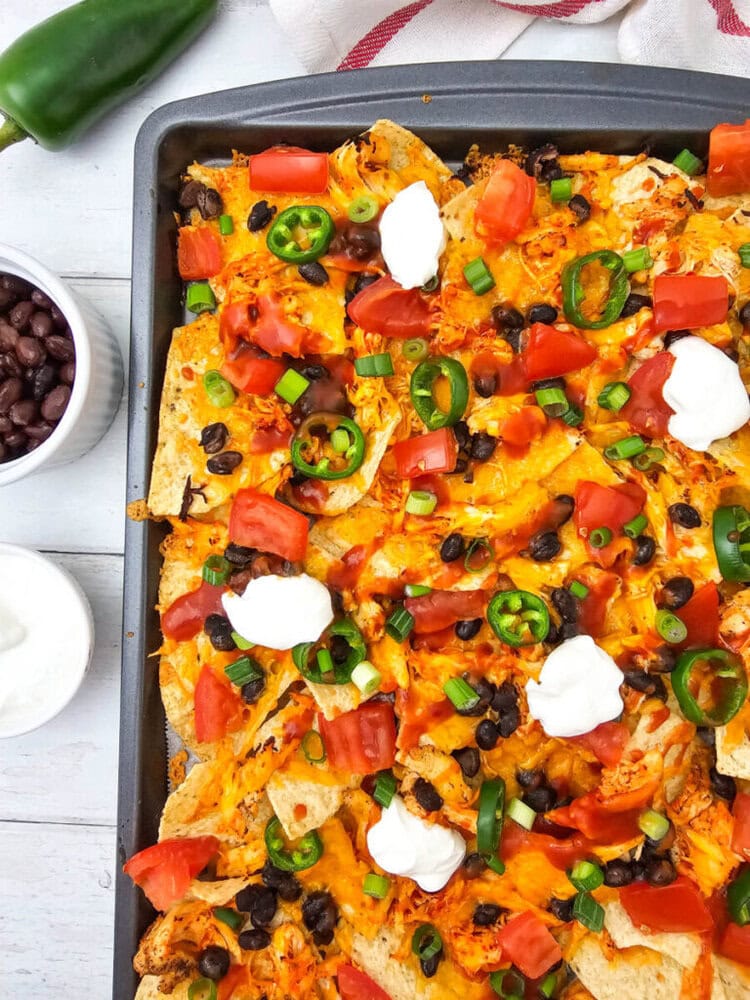
Step 7: Finish and Serve
Once out of the oven, drizzle the taco sauce across the top. Sprinkle on the green onions and add small dollops of sour cream.

Serve it up right away while everything is warm and gooey. This is not the kind of dish that waits around.
Substitutions
- Chicken swap: Use ground beef or turkey if that is what you have on hand for a different take on the same idea.
- Bean options: Pinto beans work just as well if you are out of black beans.
- Cheese choice: Monterey jack or a Mexican blend can be used for a slightly different flavor.
- Mild version: Skip the jalapenos or replace them with bell peppers for less heat.
- Dairy free option: Use dairy free cheese and sour cream alternatives to suit dietary needs.
Variations
- Loaded veggie nachos: Add corn, bell peppers, and avocado for a more vegetable forward version.
- Spicy kick: Add hot sauce or extra jalapenos if you like a bit more heat.
- BBQ twist: Swap taco seasoning for BBQ sauce on the chicken for a smoky flavor.
- Breakfast style: Top with scrambled eggs and a sprinkle of cheese for a morning version.
- Buffalo chicken: Toss the chicken in buffalo sauce instead of taco seasoning for a tangy change.
Tips and Tricks
- Use sturdy chips: Thin chips can break under the toppings so go for thicker ones.
- Do not overload: Too many toppings can make the nachos soggy so keep it balanced.
- Serve immediately: Nachos are best enjoyed fresh out of the oven while still crisp.
- Layer wisely: Spread toppings evenly so every bite is just right.
- Prep ahead: Chop veggies and prep chicken ahead of time to make dinner even faster.
FAQs
Can I make these nachos ahead of time?
You can prep the ingredients ahead of time, but I recommend assembling and baking right before serving. This keeps the chips from getting soft.
What is the best chicken to use?
Cooked shredded chicken works best. Rotisserie chicken is a great option because it is already flavorful and saves time.
Can I make this in a smaller portion?
Absolutely. Just scale down the ingredients and use a smaller pan.
It works just as well.
How do I keep nachos from getting soggy?
Make sure to drain your beans well and avoid adding too much sauce before baking. Adding sauces after baking helps keep the chips crisp.
Can I add more toppings?

Of course. Nachos are all about making them your own.
Just be mindful not to overload the pan.
Serving Ideas
- With guacamole: A side of fresh guacamole adds a creamy texture that pairs perfectly.
- With salsa: Serve with your favorite salsa for extra flavor and freshness.
- As a main meal: This dish is hearty enough to stand on its own for dinner.
- With a salad: A simple side salad balances out the richness of the nachos.
- For sharing: Place the pan in the center and let everyone dig in family style.
Storage and Make Ahead Tips
- Store leftovers: Keep leftovers in an airtight container in the fridge for up to two days.
- Reheat carefully: Warm in the oven to help bring back some crispness instead of using a microwave.
- Prep ingredients early: Chop and measure everything ahead of time to save effort later.
- Keep toppings separate: Store fresh toppings like sour cream separately and add after reheating.
- Avoid freezing: Nachos do not freeze well due to the texture of the chips.

Sheet Pan Chicken Nachos
Ingredients
- 6-8 oz tortilla chips about half a regular size bag
- 1 cup cooked and shredded chicken
- 1 tbsp taco seasoning
- ⅔ cup black beans rinsed and drained
- 2 cups shredded cheddar cheese
- 2 jalapeños seeded and sliced
- 2 roma tomatoes diced
- 1-2 green onions sliced
- ¼ cup taco sauce
- ¼ cup sour cream for serving
✉ Never miss a recipe — grab Chicken Recipes Cookbook free
Drop your email and we’ll take care of the rest
Get It NowInstructions
- Step 1: Preheat and Prep the Pan – Start by preheating your oven to 400 degrees. While that warms up, line a large sheet pan with parchment paper. This step might seem small, but it makes cleanup a whole lot easier later on. Trust me, future you will appreciate it.
- Step 2: Chop the Fresh Ingredients – Take a few minutes to dice the tomatoes, slice the green onions, and prepare the jalapenos. I usually do this all at once so everything is ready to go when it is time to assemble. It keeps things smooth and avoids that last minute scramble.
- Step 3: Season the Chicken – In a medium bowl, mix your shredded chicken with the taco seasoning. Give it a good stir so every piece gets coated. This is where the flavor really starts to build, so do not rush it. You want that seasoning evenly spread.
- Step 4: Layer the Chips – Spread the tortilla chips across your prepared sheet pan in an even layer. Try not to pile them too high. A nice flat layer helps every chip get its fair share of toppings, which means no one ends up with a plain chip.
- Step 5: Add the Toppings – Now comes the fun part. Sprinkle the seasoned chicken over the chips, followed by the black beans, shredded cheese, jalapenos, and tomatoes. I like to make sure everything is evenly distributed so each bite has a little bit of everything.
- Step 6: Bake Until Melty – Slide the pan into the oven and bake for about ten minutes. Keep an eye on it. You are looking for the cheese to melt and everything to heat through. The smell alone will let you know you are getting close.
- Step 7: Finish and Serve – Once out of the oven, drizzle the taco sauce across the top. Sprinkle on the green onions and add small dollops of sour cream. Serve it up right away while everything is warm and gooey. This is not the kind of dish that waits around.
Notes
Substitutions
- Chicken swap: Use ground beef or turkey if that is what you have on hand for a different take on the same idea.
- Bean options: Pinto beans work just as well if you are out of black beans.
- Cheese choice: Monterey jack or a Mexican blend can be used for a slightly different flavor.
- Mild version: Skip the jalapenos or replace them with bell peppers for less heat.
- Dairy free option: Use dairy free cheese and sour cream alternatives to suit dietary needs.
Variations
- Loaded veggie nachos: Add corn, bell peppers, and avocado for a more vegetable forward version.
- Spicy kick: Add hot sauce or extra jalapenos if you like a bit more heat.
- BBQ twist: Swap taco seasoning for BBQ sauce on the chicken for a smoky flavor.
- Breakfast style: Top with scrambled eggs and a sprinkle of cheese for a morning version.
- Buffalo chicken: Toss the chicken in buffalo sauce instead of taco seasoning for a tangy change.
Tips and Tricks
- Use sturdy chips: Thin chips can break under the toppings so go for thicker ones.
- Do not overload: Too many toppings can make the nachos soggy so keep it balanced.
- Serve immediately: Nachos are best enjoyed fresh out of the oven while still crisp.
- Layer wisely: Spread toppings evenly so every bite is just right.
- Prep ahead: Chop veggies and prep chicken ahead of time to make dinner even faster.
Serving Ideas
- With guacamole: A side of fresh guacamole adds a creamy texture that pairs perfectly.
- With salsa: Serve with your favorite salsa for extra flavor and freshness.
- As a main meal: This dish is hearty enough to stand on its own for dinner.
- With a salad: A simple side salad balances out the richness of the nachos.
- For sharing: Place the pan in the center and let everyone dig in family style.
Storage and Make Ahead Tips
- Store leftovers: Keep leftovers in an airtight container in the fridge for up to two days.
- Reheat carefully: Warm in the oven to help bring back some crispness instead of using a microwave.
- Prep ingredients early: Chop and measure everything ahead of time to save effort later.
- Keep toppings separate: Store fresh toppings like sour cream separately and add after reheating.
- Avoid freezing: Nachos do not freeze well due to the texture of the chips.
Private Notes
✉ Never miss a recipe — grab Chicken Recipes Cookbook free
Drop your email and we’ll take care of the rest
Get It NowFinal Thoughts
If there is one thing I have learned over the years, it is that the best meals are not always the most complicated ones. Sometimes it is a simple tray of nachos that brings everyone together, gets people talking, and fills the house with that kind of warmth you just cannot fake.

Sheet Pan Chicken Nachos are one of those recipes I keep coming back to because they never let me down. They are easy, they are comforting, and they have a way of turning an ordinary evening into something a little more memorable.
Give them a try, make them your own, and do not be surprised if they become a regular part of your rotation too.