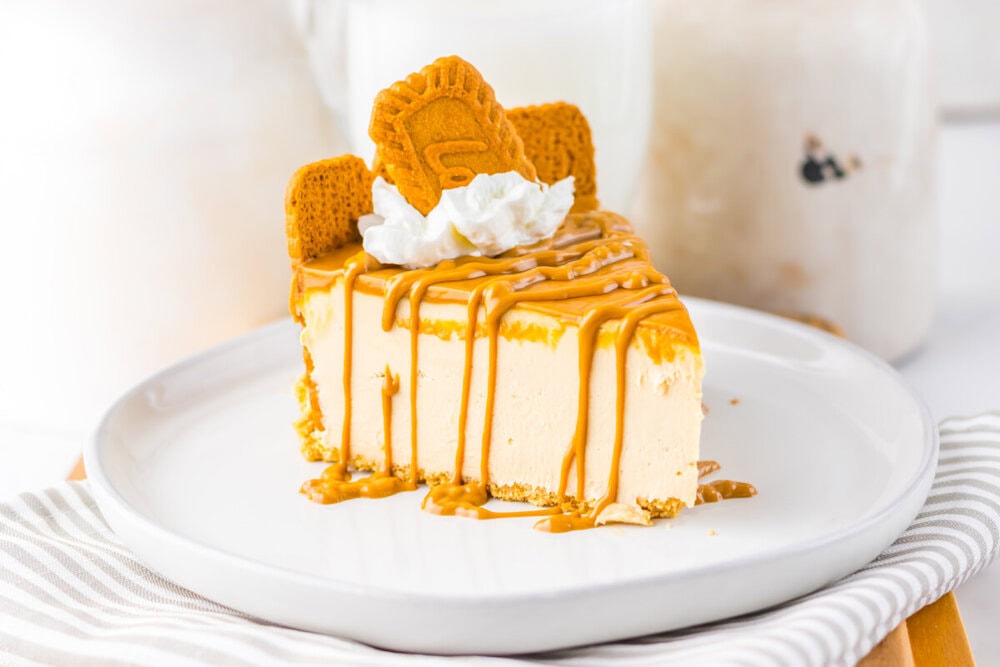
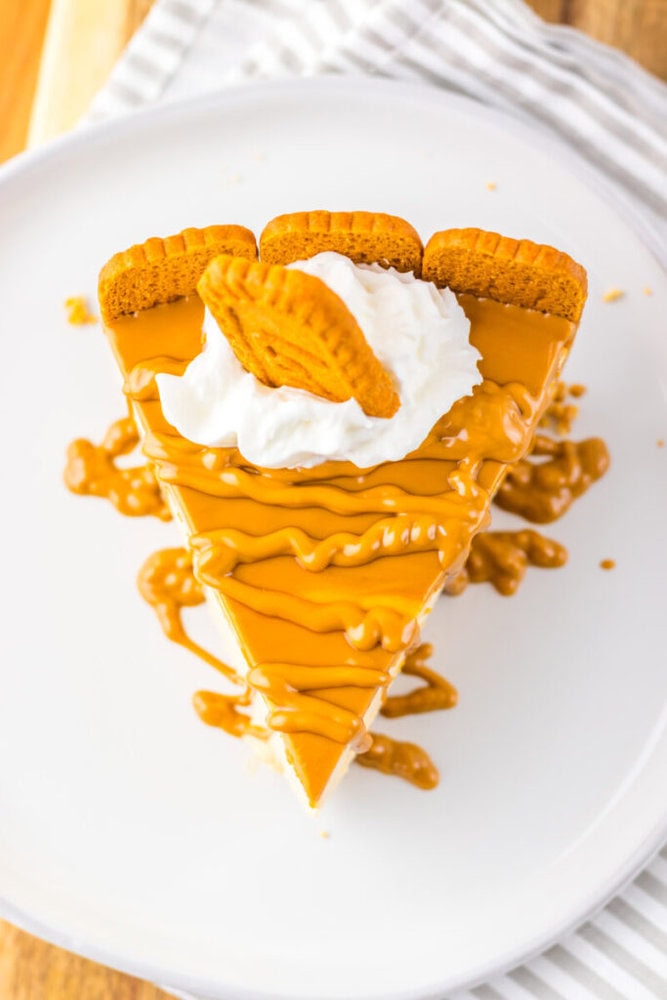
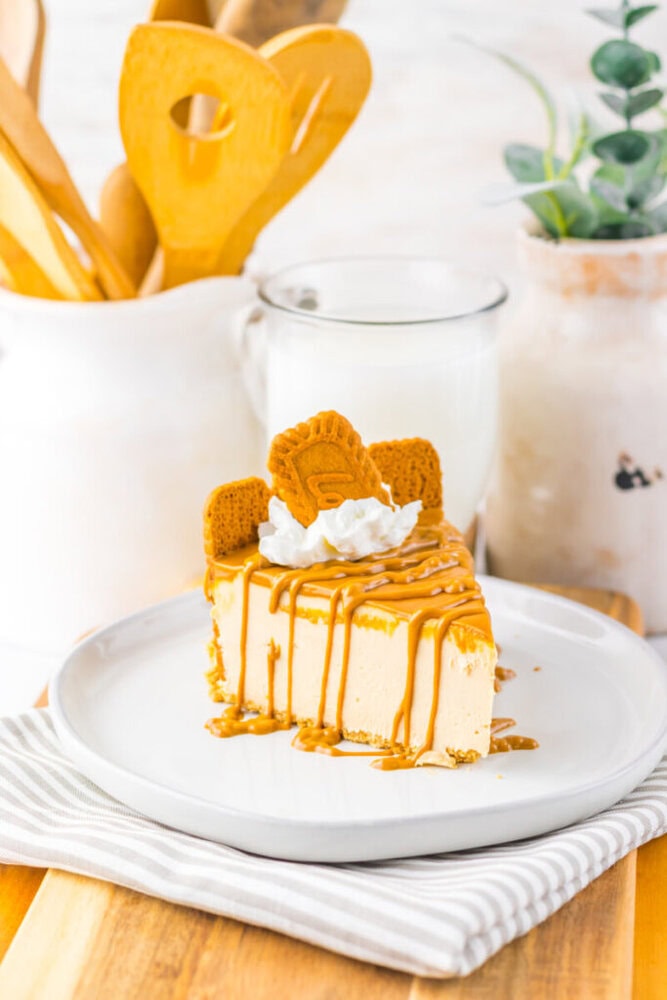
No Bake Cookie Butter Cheesecake
There are certain desserts that just slow life down a little. The kind you make when the house is quiet or when you want it to be quiet. This no bake cookie butter cheesecake is one of those recipes for me. I usually make it late in the evening after dinner dishes are done and the kitchen lights are dimmed just enough to feel cozy. The kids wander through asking what smells so good and I tell them it is a tomorrow dessert. That always gets a smile and a little patience from them.

I love recipes like this because they do not ask much from you. No oven heat. No rushing. Just a bowl a mixer and a little time in the fridge to let everything come together. Cookie butter has a way of feeling indulgent and familiar all at once. It reminds me of quiet weekends and sneaking a spoonful when no one is looking. When you turn it into a cheesecake it becomes something special but still easygoing.
This is the kind of dessert I bring when I want people to feel taken care of. Holidays potlucks birthdays or just because it is been a long week. It slices beautifully once chilled and always gets that pause at the table where everyone takes their first bite and nods. That is my favorite part. This cheesecake does the talking for you.
What Is No Bake Cookie Butter Cheesecake?
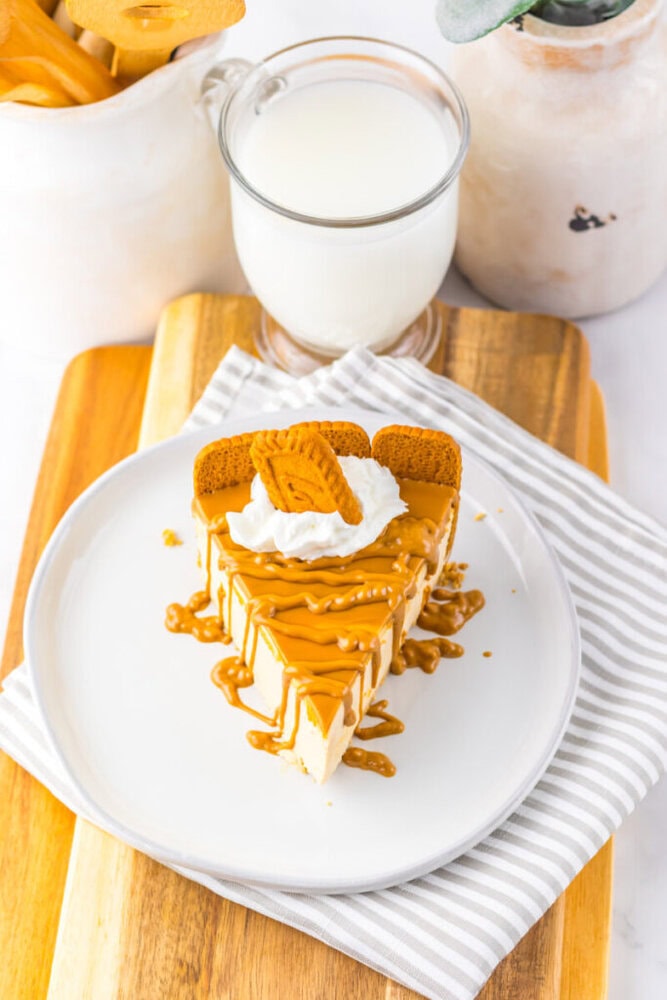
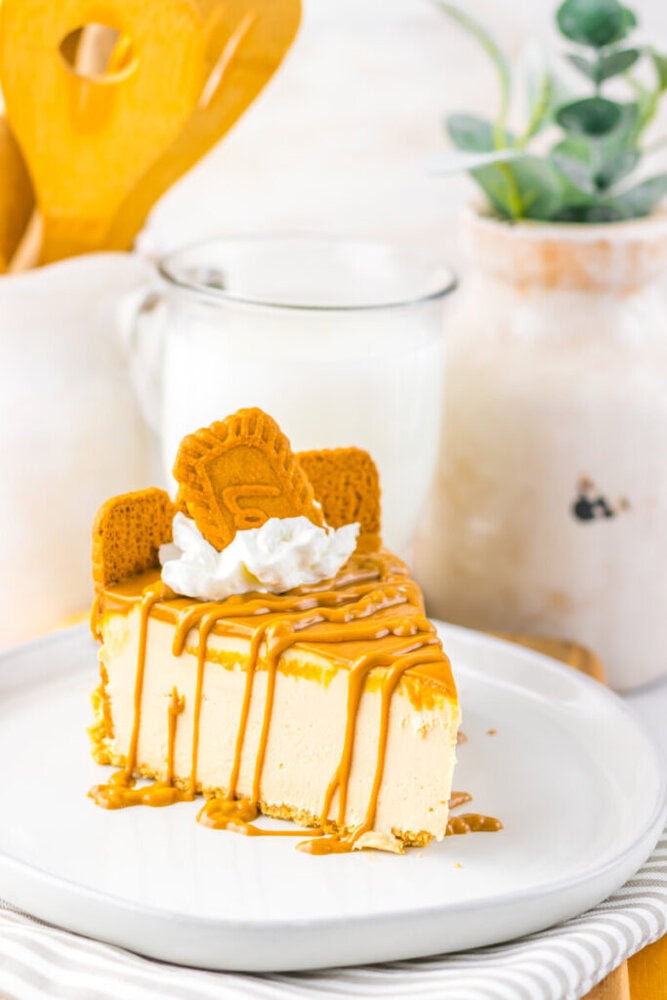
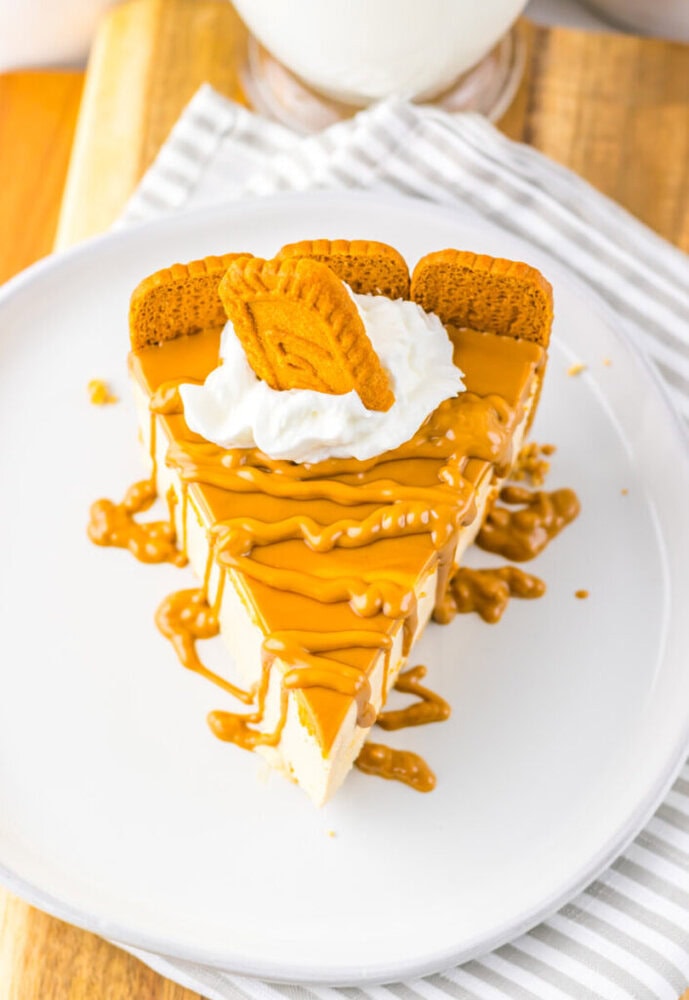
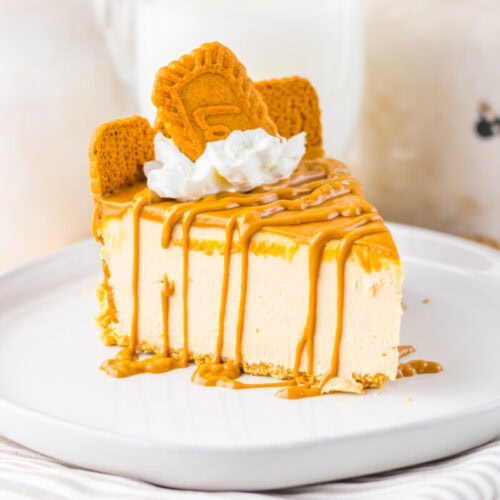
No bake cookie butter cheesecake is a chilled dessert made with a buttery Biscoff cookie crust and a creamy filling of cream cheese cookie butter and whipped cream.
Instead of baking it sets up in the refrigerator creating a smooth rich texture without turning on the oven.
Why You’ll Love This Recipe
- No oven required: This recipe keeps the kitchen cool and stress free while still delivering bakery level results.
- Rich cookie butter flavor: Every layer is infused with that warm spiced Biscoff taste that feels comforting and indulgent.
- Make ahead friendly: It needs time to chill which makes it perfect for planning ahead for gatherings or busy days.
- Crowd pleasing dessert: This is one of those desserts that disappears fast and always gets recipe requests.
- Beginner friendly: Simple steps and forgiving ingredients make this a great recipe even if you are new to cheesecakes.
When to Serve This Recipe
- Holiday gatherings: It fits right in on a dessert table during Thanksgiving Christmas or Easter.
- Summer parties: Since there is no baking it is ideal for warm weather celebrations.
- Birthday desserts: A great alternative to cake that still feels special and celebratory.
- Make ahead dinners: Perfect when you want dessert handled before guests arrive.
- Just because nights: Sometimes you do not need a reason other than wanting something good.
Ingredients
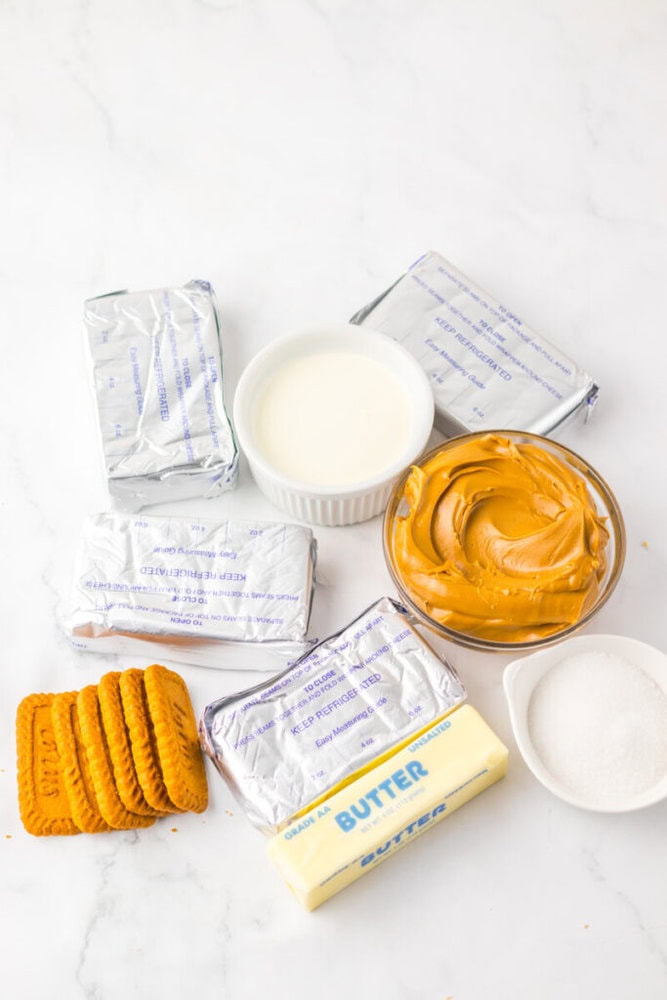
- 1½ cups Biscoff cookie crumbs – This forms the base of the crust and gives that signature spiced flavor.
- 1/3 cup butter melted – Helps bind the crumbs together for a sturdy crust.
- Whole Biscoff cookies for the sides – Adds structure and a bakery style look around the pan.
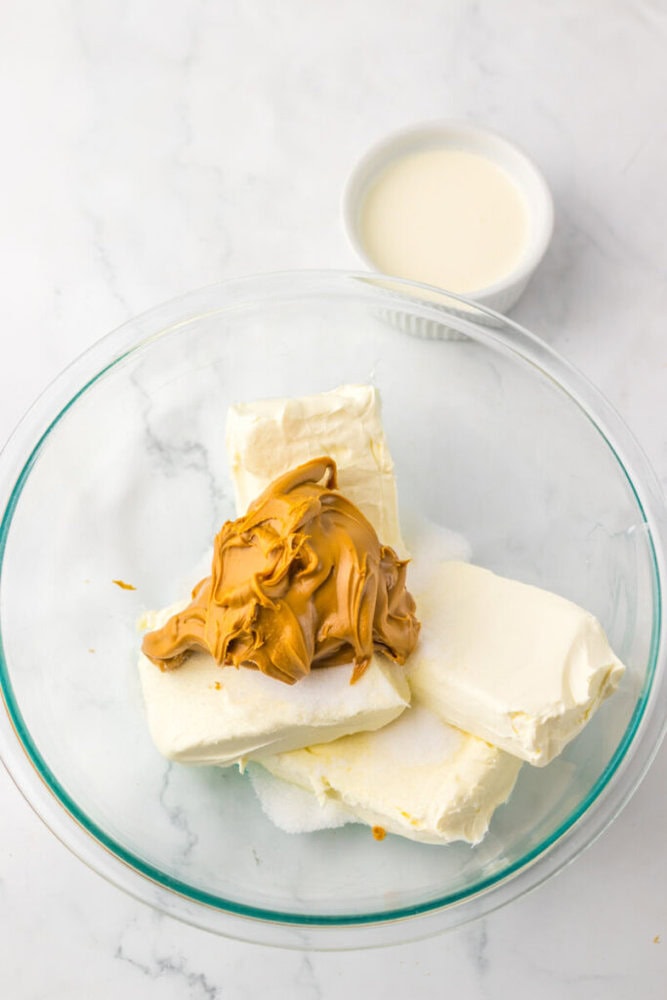
- 4 eight ounce blocks cream cheese softened to room temperature – Room temperature cream cheese ensures a smooth filling without lumps.
- 4 tablespoons sugar – Just enough sweetness to balance the cookie butter.
- 1½ cups Biscoff spread cookie butter – The star of the filling bringing richness and flavor.
- 2 cups heavy cream – Whipped into the filling to create a light but creamy texture.
- ½ cup cookie butter – Melted and poured on top for a smooth glossy finish.
- More Biscoff cookies for garnish – Adds crunch and a finished look right before serving.
How to Make No Bake Cookie Butter Cheesecake
Step 1: Make the cookie crumbs
Place the Biscoff cookies into a food processor and pulse until you have fine even crumbs. Take a moment here because evenly crushed crumbs make a sturdier crust.
Step 2: Combine with butter
Melt the butter and pour it into the cookie crumbs. Stir until everything is well combined and resembles damp sand.
Step 3: Press the crust
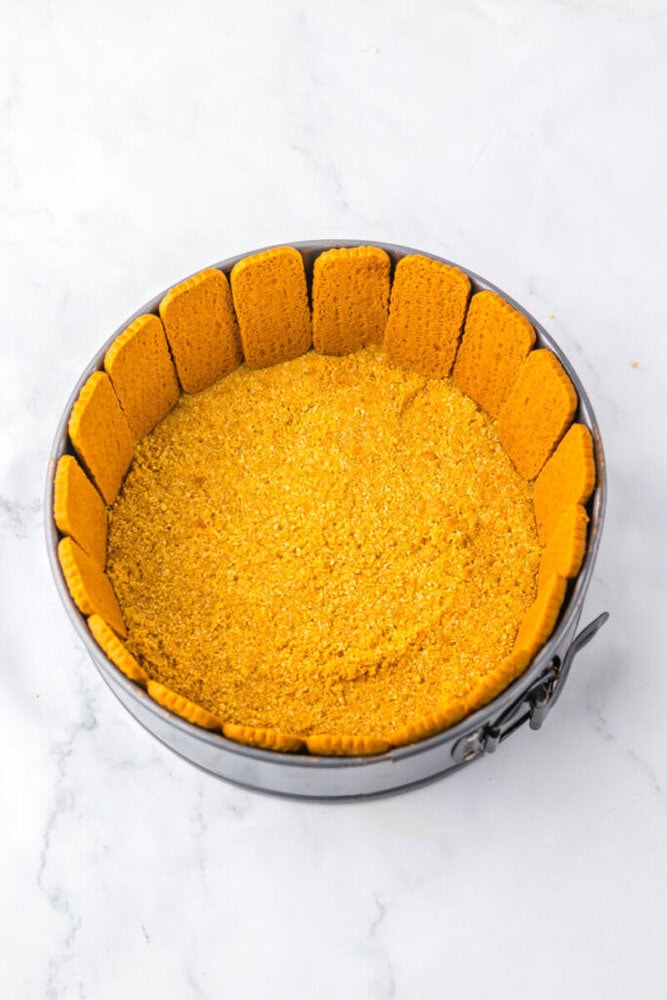
Pour the crumb mixture into an eight inch springform pan. Use the bottom of a measuring cup or a metal spoon to press the crumbs firmly into the bottom and slightly up the sides.
Step 4: Line the sides
Stand whole Biscoff cookies upright along the inside edge of the pan to create a cookie lined border. This step is optional but makes the cheesecake feel extra special.
Step 5: Mix the filling
In a large mixing bowl use an electric hand mixer to whip together the cream cheese sugar and cookie butter until smooth and fully combined.
Step 6: Add the cream
Pour in the heavy cream and continue mixing until the filling becomes fluffy thick and spreadable. Take care not to overmix.

Step 7: Fill the crust
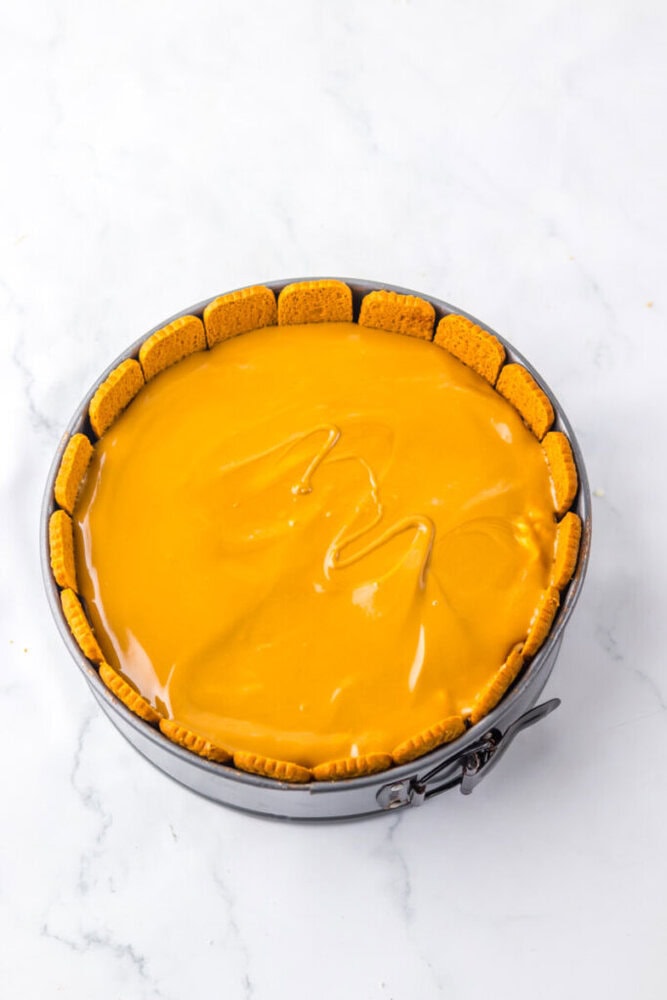
Pour the cheesecake filling over the prepared crust and use a spatula to smooth the top evenly.
Step 8: Melt the topping
Microwave the half cup of cookie butter for thirty to forty five seconds until fully melted and smooth.
Step 9: Finish the top
Pour the melted cookie butter over the cheesecake and gently spread it to the edges creating a glossy layer.
Step 10: Chill
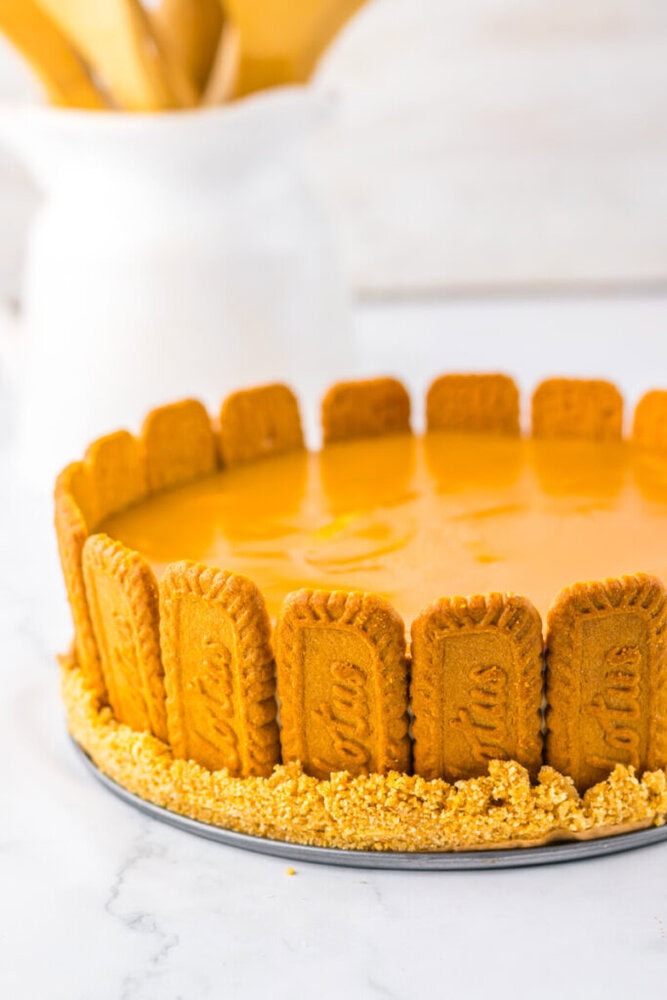
Refrigerate the cheesecake for at least six hours or freeze for four hours until fully set.
Step 11: Slice and serve
Remove from the pan slice and serve. I like to add whipped cream a cookie and a drizzle of extra cookie butter.
Substitutions
- Biscoff cookies: Graham crackers digestive biscuits or gingersnaps work well for a similar texture.
- Cookie butter: Nutella peanut butter or chocolate spread can be used for a different flavor profile.
- Heavy cream: Whipped topping can be used for a quicker shortcut version.
- Cream cheese: Neufchâtel cream cheese works for a slightly lighter option.
Variations
- Chocolate swirl: Drizzle melted chocolate on top before chilling and gently swirl it in.
- Mini cheesecakes: Make individual portions using cupcake liners for parties.
- Holiday version: Add caramel drizzle crushed peppermint or white chocolate curls.
- Layered jars: Alternate layers of filling and cookie crumbs in small glasses.
- Crunchy topping: Sprinkle crushed cookies or toffee bits over the top.
Tips and Tricks
- Use a springform pan: This makes removal clean and easy with smooth edges.
- Chill completely: Six hours minimum ensures the cheesecake sets properly.
- Press the crust firmly: A well packed crust holds together better when slicing.
- Wipe the knife: Clean the blade between slices for neat presentation.
- Room temperature cream cheese: Prevents lumps and keeps the filling silky.
FAQs
Can I make this the night before?
Yes and I recommend it. Overnight chilling gives the best texture and flavor.
Can I freeze this cheesecake?
Yes you can freeze it for up to one month. Thaw overnight in the refrigerator.
Do I need gelatin?
No the whipped cream and cream cheese provide enough structure once chilled.
Can I use a different pan size?
You can but the thickness will change. An eight inch pan gives the best height.
Serving Ideas
- With coffee: The spiced cookie butter pairs beautifully with a hot cup of coffee.
- After dinner dessert: Light enough to finish a meal without feeling heavy.
- Holiday dessert table: Looks beautiful alongside pies and cookies.
- Celebration dessert: Add candles or chocolate drizzle for birthdays.
- Casual gatherings: Slice and serve straight from the fridge with ease.
Storage and Make Ahead Tips
- Refrigerator storage: Store covered for up to five days.
- Freezer friendly: Freeze whole or sliced wrapped tightly.
- Make ahead crust: The crust can be made a day in advance.
- Transport tip: Keep chilled until ready to serve for best texture.
No Bake Cookie Butter Cheesecake
Ingredients
Crust
- 1½ cups biscoff cookie crumbs
- ⅓ cup butter melted
- More cookies for the sides
Cheesecake
- 4 (8 ounce blocks) cream cheese, softened to room temperature
- 4 tablespoons sugar
- 1 ½ cup biscoff spread cookie butter
- 2 cups heavy cream
Topping
- ½ cup cookie butter
- More cookies for garnish
Instructions
- Step 1: Make the cookie crumbs – Place the Biscoff cookies into a food processor and pulse until you have fine even crumbs. Take a moment here because evenly crushed crumbs make a sturdier crust.
- Step 2: Combine with butter – Melt the butter and pour it into the cookie crumbs. Stir until everything is well combined and resembles damp sand.
- Step 3: Press the crust – Pour the crumb mixture into an eight inch springform pan. Use the bottom of a measuring cup or a metal spoon to press the crumbs firmly into the bottom and slightly up the sides.
- Step 4: Line the sides – Stand whole Biscoff cookies upright along the inside edge of the pan to create a cookie lined border. This step is optional but makes the cheesecake feel extra special.
- Step 5: Mix the filling – In a large mixing bowl use an electric hand mixer to whip together the cream cheese sugar and cookie butter until smooth and fully combined.
- Step 6: Add the cream – Pour in the heavy cream and continue mixing until the filling becomes fluffy thick and spreadable. Take care not to overmix.
- Step 7: Fill the crust – Pour the cheesecake filling over the prepared crust and use a spatula to smooth the top evenly.
- Step 8: Melt the topping – Microwave the half cup of cookie butter for thirty to forty five seconds until fully melted and smooth.
- Step 9: Finish the top – Pour the melted cookie butter over the cheesecake and gently spread it to the edges creating a glossy layer.
- Step 10: Chill – Refrigerate the cheesecake for at least six hours or freeze for four hours until fully set.
- Step 11: Slice and serve – Remove from the pan slice and serve. I like to add whipped cream a cookie and a drizzle of extra cookie butter.
Notes
Substitutions
- Biscoff cookies: Graham crackers digestive biscuits or gingersnaps work well for a similar texture.
- Cookie butter: Nutella peanut butter or chocolate spread can be used for a different flavor profile.
- Heavy cream: Whipped topping can be used for a quicker shortcut version.
- Cream cheese: Neufchâtel cream cheese works for a slightly lighter option.
Variations
- Chocolate swirl: Drizzle melted chocolate on top before chilling and gently swirl it in.
- Mini cheesecakes: Make individual portions using cupcake liners for parties.
- Holiday version: Add caramel drizzle crushed peppermint or white chocolate curls.
- Layered jars: Alternate layers of filling and cookie crumbs in small glasses.
- Crunchy topping: Sprinkle crushed cookies or toffee bits over the top.
Tips and Tricks
- Use a springform pan: This makes removal clean and easy with smooth edges.
- Chill completely: Six hours minimum ensures the cheesecake sets properly.
- Press the crust firmly: A well packed crust holds together better when slicing.
- Wipe the knife: Clean the blade between slices for neat presentation.
- Room temperature cream cheese: Prevents lumps and keeps the filling silky.
Serving Ideas
- With coffee: The spiced cookie butter pairs beautifully with a hot cup of coffee.
- After dinner dessert: Light enough to finish a meal without feeling heavy.
- Holiday dessert table: Looks beautiful alongside pies and cookies.
- Celebration dessert: Add candles or chocolate drizzle for birthdays.
- Casual gatherings: Slice and serve straight from the fridge with ease.
Storage and Make Ahead Tips
- Refrigerator storage: Store covered for up to five days.
- Freezer friendly: Freeze whole or sliced wrapped tightly.
- Make ahead crust: The crust can be made a day in advance.
- Transport tip: Keep chilled until ready to serve for best texture.
Private Notes
Final Thoughts
This no bake cookie butter cheesecake is one of those recipes that earns a permanent spot in your rotation. It is reliable comforting and always welcomed at the table. I love that it asks for a little patience but rewards you with something that feels truly special.

If you make this for your family or friends I hope it brings the same quiet smiles and second slices it always brings to mine. Sometimes the best desserts are the ones that let you slow down and enjoy the moment.