Cheddar Bay Beef Cobbler
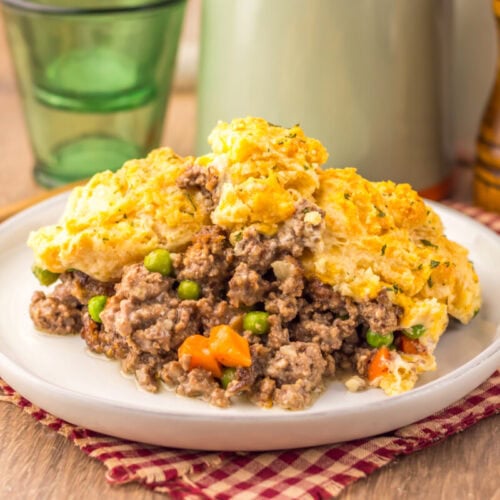
Cheddar Bay Beef Cobbler brings seasoned ground beef, tender peas and carrots, and rich creamy gravy together under a layer of fluffy cheddar biscuits brushed with warm garlic herb butter. It is the kind of hearty family dinner that feels cozy and homemade while still being realistic for a busy weeknight.
Print Recipe
Ingredients
- 2 pounds lean ground beef browned and drained
- 1 medium yellow onion diced
- 2 cloves garlic minced
- 1 tsp kosher salt
- ½ tsp black pepper
- 1 tsp garlic powder
- 1 tsp onion powder
- 1 tbsp Worcestershire sauce
- 1 10.5-ounce can cream of mushroom soup
- 1 cup beef broth
- 1 cup frozen peas and carrots
- 1 11.36-ounce box Red Lobster Cheddar Bay Biscuit Mix
- ¾ cup cold water
- ½ cup shredded sharp cheddar cheese
- ¼ cup unsalted butter melted
- 1 packet garlic herb seasoning included with the biscuit mix
Instructions
- Step 1: Heat the Oven and Prepare the Dish - Start by heating your oven to 375°F. Lightly grease a 9x13 inch baking dish so the creamy filling does not cling stubbornly to the sides later. I like getting the oven and pan ready first because once the beef mixture and biscuit dough are assembled, you can move straight into baking without stopping in the middle of the process.
- Step 2: Mix the Savory Beef Filling - Add the browned and well drained ground beef to a large bowl. Stir in the diced yellow onion, minced garlic, kosher salt, black pepper, garlic powder, onion powder, Worcestershire sauce, cream of mushroom soup, beef broth, and frozen peas and carrots. Keep stirring until the creamy mixture coats the beef evenly and the vegetables are distributed throughout. It should look fairly saucy at this point. That is what you want because the filling will thicken as it bakes.
- Step 3: Spread the Filling Into the Baking Dish - Spoon the beef mixture into your prepared baking dish and spread it into an even layer. Try to get the vegetables and meat distributed from corner to corner so every serving has a little bit of everything. You do not need to pack the mixture down. Just smooth the surface enough that the biscuit dough will have a nice base to sit on.
- Step 4: Mix the Cheddar Bay Biscuit Dough - In a medium bowl, combine the Cheddar Bay Biscuit Mix, cold water, and shredded sharp cheddar cheese. Stir only until you no longer see large pockets of dry biscuit mix and a soft dough forms. This is one place where doing less is actually better. Too much stirring develops the dough more than you want and can leave you with heavier biscuits instead of those soft, fluffy centers we are after.
- Step 5: Spoon the Biscuits Over the Beef - Drop spoonfuls of biscuit dough across the top of the beef filling. Leave some small gaps between the portions rather than spreading the dough into one solid blanket. Those open spaces give the biscuits room to bake around the edges and allow steam and bubbling gravy to escape. I also think those little spots where the creamy beef filling peeks through make the finished cobbler look especially inviting.
- Step 6: Bake Until Golden and Bubbling - Place the dish in the oven uncovered and bake for 35 to 40 minutes. You are looking for a filling that is bubbling around the edges and biscuits that are golden on top and cooked through in the centers. If the biscuit tops are getting darker than you would like but the middles still need more time, place a loose sheet of foil over the baking dish and let it continue cooking.
- Step 7: Make the Garlic Herb Butter - While the cobbler finishes baking, stir the melted unsalted butter together with the garlic herb seasoning packet included in the biscuit mix. Do this close to the end of the baking time so the butter stays warm and easy to brush. The smell alone is usually enough to get somebody wandering into my kitchen asking when dinner will be ready.
- Step 8: Brush the Biscuits and Let the Cobbler Rest - Take the baking dish from the oven and immediately brush the warm garlic herb butter generously across the biscuit topping. Get into the little cracks and along the golden edges because that buttery seasoning will soak into the hot biscuits. Then give the cobbler about 10 minutes to rest before serving. That short rest gives the creamy filling a chance to settle and thicken, which means you get hearty spoonfuls instead of gravy running all over the plate.
Notes
Substitutions
- Ground turkey: Use ground turkey instead of beef for a lighter filling while keeping the same creamy, comforting structure.
- Cream of celery soup: Swap it for the cream of mushroom soup if your family is not big on mushroom flavor.
- Frozen mixed vegetables: A blend with corn, green beans, peas, and carrots works well and is an easy way to use whatever is already in your freezer.
- Mild or medium cheddar: Either works in place of sharp cheddar if your kids prefer a gentler cheese flavor.
- Chicken broth: Chicken broth can stand in for beef broth when that is what you have in the pantry.
- Fresh vegetables: You can use freshly diced carrots and peas, but make sure the carrots are cut small enough to become tender during baking.
Variations
- French Onion Cheddar Bay Beef Cobbler: Replace the cream of mushroom soup with condensed French onion soup and stir one packet of onion soup mix into the beef filling for a deeper onion flavor.
- Mushroom Beef Cobbler: Add 8 ounces of sliced mushrooms and cook them with the onion until tender before combining them with the remaining filling ingredients.
- Spicy Cheddar Bay Beef Cobbler: Add one diced jalapeño to the beef mixture and stir a little hot sauce into the gravy for a gentle kick.
- Cheddar Bay Steak Cobbler: Replace the ground beef with bite sized pieces of cooked steak for an especially hearty version.
- Extra Cheesy Cobbler: Sprinkle a small handful of shredded cheddar over the beef filling before adding the biscuit dough for another layer of melted cheese.
Tips and Tricks
- Drain the beef thoroughly: Extra grease can make the creamy filling feel heavy and oily, so give the cooked beef a good drain before mixing everything together.
- Keep spaces between the biscuits: Small gaps help the biscuit dough bake more evenly and give the bubbling filling somewhere to rise.
- Do not overmix the dough: Stir only until the dough comes together so the biscuits stay tender and fluffy.
- Watch the biscuit tops: If they are nicely browned before the centers are done, loosely cover the pan with foil and continue baking.
- Brush the butter on immediately: Hot biscuits absorb the garlic herb butter much better than biscuits that have already cooled.
- Let the cobbler rest: Those 10 minutes after baking help the gravy thicken and make serving much less messy.
- Use a big serving spoon: You want to scoop down through both layers so every plate gets creamy beef filling and a piece of buttery biscuit.
Serving Ideas
- Simple green salad: A crisp salad with a tangy dressing gives you something fresh alongside the rich beef and biscuits.
- Roasted green beans: Green beans bring a little color and texture to the plate without competing with the cobbler.
- Steamed broccoli: This is an easy family side that works especially well for soaking up any extra gravy.
- Roasted Brussels sprouts: Their crisp edges are a nice contrast to the soft biscuits and creamy filling.
- Fresh fruit: For a very busy family night, a bowl of sliced apples, grapes, or berries makes a completely respectable side dish.
- Nothing at all: There is meat, vegetables, gravy, cheese, and biscuits already in the pan. Some nights I put this on the table by itself and call dinner handled.
Storage and Make Ahead Tips
- Refrigerate leftovers: Store cooled leftovers in an airtight container in the refrigerator for up to 4 days.
- Reheat individual servings: Microwave portions until hot when speed matters more than keeping the biscuit edges crisp.
- Reheat larger portions in the oven: Warm the cobbler at 325°F until heated through for a better biscuit texture.
- Prepare the filling ahead: The beef mixture can be assembled up to 2 days in advance and kept covered in the refrigerator.
- Warm chilled filling before baking: If you make the filling ahead, warm it before transferring it to the baking dish so the biscuits and filling cook evenly.
- Freeze the filling only: Freeze the prepared beef filling without biscuit dough for up to 3 months.
- Thaw before assembling: Let frozen filling thaw overnight in the refrigerator, then add freshly prepared Cheddar Bay biscuit dough before baking.
Private Notes
Servings: 6 servings
