Cheesy Taco Stuffed Shells
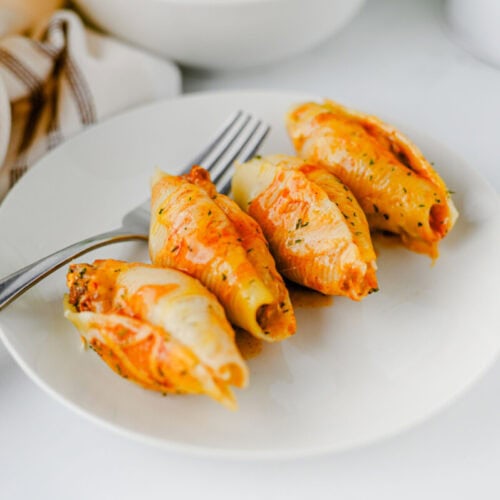
Cheesy Taco Stuffed Shells bring taco night and baked pasta together in one cozy family dinner. Jumbo pasta shells are packed with creamy seasoned beef, covered in enchilada sauce and shredded cheese, then baked until warm and gooey. It is hearty, familiar, and exactly the kind of meal that makes a busy weeknight feel a little more manageable.
Print Recipe
Ingredients
- 1 lb. lean ground beef
- 6 ounces cream cheese
- 1 packet taco seasoning
- 12 ounces jumbo shell pasta
- 10 ounces enchilada sauce
- 1-1 ½ cups shredded fiesta blend cheese
Instructions
- Step 1: Prepare the Baking Dish - Preheat your oven to 350 degrees Fahrenheit. Lightly coat a 9x13 inch baking dish with nonstick cooking spray so the sauce and cheese around the edges release more easily when you serve the shells. Getting the pan ready first is one of those small things that makes assembly feel much smoother once the pasta and filling are finished.
- Step 2: Cook and Cool the Pasta Shells - Bring a large pot of salted water to a boil and cook the jumbo shells according to the package directions. You want them tender enough to eat but still sturdy enough to hold the filling, so avoid cooking them beyond the recommended time. Once they are done, drain the shells and rinse them gently under cold water. The cold water stops the cooking process and, just as importantly, makes the shells cool enough for you to handle without burning your fingers while you stuff them. A few shells may tear while boiling. That happens. I usually cook the full package amount called for so I have enough good shells to fill the baking dish without having to wrestle with the broken ones.
- Step 3: Brown the Ground Beef - While the pasta cooks, place the ground beef in a large skillet over medium heat. Break it into small crumbles with a wooden spoon or spatula as it cooks. Continue cooking until there is no pink remaining and the beef is evenly browned. Drain away the excess grease before moving on. Since cream cheese is going into the filling, getting rid of that extra grease keeps the final mixture creamy rather than heavy or oily.
- Step 4: Season the Beef - Return the drained beef to the skillet and sprinkle in the taco seasoning. Add the amount of water called for on your seasoning packet, since brands can vary a little. Stir everything together and let the beef simmer for about 2 to 3 minutes. You are looking for the liquid to reduce and the seasoning mixture to thicken around the beef. Instead of watery meat sitting in the bottom of the skillet, you should see a glossy, seasoned coating clinging to every little crumble.
- Step 5: Make the Creamy Taco Filling - Add the cream cheese to the seasoned beef, then turn off the heat. Stir while the beef is still hot so the cream cheese melts into the mixture. At first you may see little streaks or chunks of cream cheese. Keep stirring. Within a minute or two, it should become a smooth, creamy filling with the beef evenly distributed throughout. This is the part that takes ordinary taco meat and makes it especially good inside pasta shells. You want a filling that is soft enough to spoon easily but thick enough to stay tucked inside each shell.
- Step 6: Sauce and Stuff the Shells - Spoon a few generous spoonfuls of enchilada sauce into the prepared baking dish and spread it across the bottom. You do not need a deep pool of sauce. You just want enough to give the shells a moist, flavorful base while they bake. Pick up one cooled jumbo shell and gently open it with your fingers. Spoon a heaping tablespoon of the beef and cream cheese filling into the center, then place the stuffed shell into the baking dish with the opening facing up. Continue filling and arranging the shells until you have used the filling. You can nestle them fairly close together. I actually like having them snug in the pan because they support one another and make the finished casserole easy to portion.
- Step 7: Add the Sauce and Cheese - Pour the remaining enchilada sauce over the stuffed shells. Try to spread it across the pan so every section gets some sauce, especially along the exposed edges of the pasta. Sprinkle the shredded fiesta blend cheese evenly over the top. A cup gives you a nice cheesy covering, while 1 1/2 cups creates that thicker, gooier top layer that tends to disappear quickly at my table.
- Step 8: Bake Until Hot and Melty - Place the baking dish in the preheated 350 degree oven and bake for about 15 minutes. The filling is already cooked, so you are mainly warming everything through, letting the sauce settle around the shells, and melting the cheese. When the cheese is fully melted and the sauce is hot around the edges, pull the pan from the oven. Give the shells a few minutes to sit before serving. That short rest makes them easier to lift from the dish and gives the filling a chance to settle inside the pasta.
Notes
Substitutions
- Ground turkey: Swap the beef for ground turkey if you want a lighter tasting filling while keeping the same taco seasoning and preparation.
- Ground chicken: Ground chicken also works well, though you may want a little extra seasoning since its flavor is milder than beef.
- Cheddar cheese: If you do not have fiesta blend cheese, shredded cheddar melts beautifully and keeps the flavor familiar.
- Monterey Jack: Use Monterey Jack for a mild, creamy cheese topping with a particularly smooth melt.
- Neufchatel cheese: This can replace regular cream cheese if you want a slightly lighter filling with a similar creamy texture.
- Green enchilada sauce: Green sauce gives the shells a brighter, tangier character and works especially well if your family already enjoys green chile flavors.
Variations
- Add black beans: Stir drained and rinsed black beans into the beef mixture to stretch the filling and add another hearty ingredient.
- Mix in corn: A handful of corn brings a little sweetness and color to the creamy taco filling.
- Make it spicier: Add chopped jalapeños, hot enchilada sauce, or a pinch of cayenne if your table likes more heat.
- Add green chiles: Stir a small can of drained diced green chiles into the filling for a mild roasted chile flavor.
- Use pepper Jack: Replace some or all of the fiesta blend with pepper Jack for extra creaminess and a gentle kick.
- Finish with fresh toppings: Add diced tomatoes, sliced green onions, cilantro, avocado, or sour cream after baking so everyone can dress up their own serving.
Tips and Tricks
- Do not overcook the shells: Pasta that gets too soft in the pot can tear while you are filling it and become mushier during baking.
- Cool the pasta before stuffing: A cold rinse makes the shells much easier to handle and also keeps them from continuing to cook.
- Drain the beef well: Removing excess grease helps the cream cheese blend smoothly and keeps the filling from becoming oily.
- Soften the cream cheese: Cream cheese that is slightly softened melts into the warm beef faster and leaves fewer lumps.
- Season before adding cream cheese: Let the taco seasoning cook with the beef and water first so the spices distribute evenly before the creamy ingredient goes in.
- Keep sauce underneath the pasta: That first layer of enchilada sauce helps protect the bottoms of the shells from drying out or sticking.
- Fill generously but gently: A heaping tablespoon is usually plenty, and pushing too much filling into a shell can cause the pasta to split.
- Let the pan rest briefly: Giving the finished shells about 5 minutes before serving makes them easier to scoop without everything sliding apart.
Serving Ideas
- Simple green salad: A crisp salad with lettuce, tomatoes, cucumber, and a tangy dressing gives you something cool and fresh beside the rich pasta.
- Mexican style rice: A scoop of seasoned rice makes the meal especially hearty when you are feeding bigger appetites.
- Corn on the side: Roasted, grilled, or simply buttered corn fits naturally with the taco flavors in the shells.
- Avocado and tomatoes: Fresh avocado and chopped tomatoes add a cool contrast to the warm cheese and enchilada sauce.
- Sour cream: A spoonful on top adds a creamy, cool finish that kids can easily add to their own plates.
- Fresh cilantro: Sprinkle cilantro over the casserole right before serving if your family enjoys its fresh, citrusy flavor.
- Tortilla chips: A bowl of crunchy chips on the table is an easy way to add texture and gives everyone something to scoop through the extra sauce.
Storage and Make Ahead Tips
- Refrigerate leftovers promptly: Transfer cooled leftovers to an airtight container and refrigerate them for up to 3 to 4 days.
- Reheat individual portions: A microwave works well for one or two shells and helps you avoid heating the entire casserole for a quick lunch.
- Reheat in the oven: Cover leftover shells and warm them in the oven until heated through if you want the cheese and pasta to stay closer to their original texture.
- Add a little extra sauce when reheating: If the pasta looks dry after refrigeration, spoon a small amount of enchilada sauce over the shells before warming them.
- Assemble a day ahead: Prepare the entire pan, cover it, and refrigerate for up to 24 hours so dinner only needs to be baked the next day.
- Freeze before baking: Assemble the shells in a freezer safe dish and freeze them tightly covered for up to about 3 months.
- Freeze smaller portions: Pack two or three cooked shells together so you can thaw only what you need instead of committing to the entire pan.
Private Notes
Servings: 5 servings
