Copycat Raising Canes Chicken Tenders and Canes Sauce
Print Recipe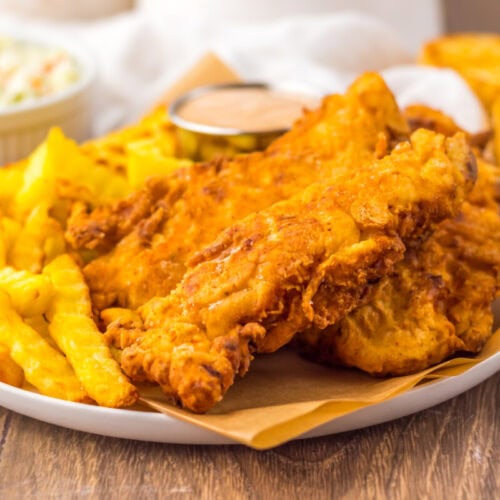
Ingredients
- 1 large egg
- 1 ½ cups buttermilk
- 5 teaspoons kosher salt divided
- Freshly ground black pepper
- 2 pound chicken tenderloins
- 2 ½ cups flour
- ½ cup cornstarch
- 1 ½ teaspoons paprika
- 1 teaspoon garlic powder
- ½ teaspoon onion powder
- Vegetable oil for frying
Sauce
- ¾ cup mayonnaise
- 3 tablespoons ketchup
- 1 tablespoon Worcestershire sauce
- 1 teaspoon garlic powder
- ¾ teaspoon freshly ground black pepper
- ½ teaspoon kosher salt
- ½ teaspoon onion powder
Instructions
- Step 1: Mix the Buttermilk Marinade - Grab a large bowl and whisk together the egg, buttermilk, 2 teaspoons of kosher salt, and a good pinch of freshly ground black pepper. You want everything smooth and combined before the chicken goes in. The buttermilk is what helps tenderize the chicken, and the egg gives the coating something to hold onto later. I like to use a bowl big enough that I can stir the chicken around without splashing buttermilk all over the counter, because I have learned that lesson the messy way.
- Step 2: Marinate the Chicken - Add the chicken tenderloins to the bowl and turn them until every piece is well coated. Cover the bowl and place it in the refrigerator for at least 2 hours. Overnight is even better if you have the time. This is where patience pays off. The buttermilk gently softens the chicken, the salt seasons it, and the pepper gives it that little background kick. When you fry it later, you will notice the difference because the inside stays juicy instead of dry.
- Step 3: Stir Together the Seasoned Coating - In a shallow bowl or pie pan, mix the flour, cornstarch, paprika, garlic powder, onion powder, the remaining 3 teaspoons of kosher salt, and more freshly ground black pepper. Use a fork or whisk to break up any little clumps. The cornstarch is one of my favorite parts here because it helps the coating fry up crisp and light. You want this mixture evenly seasoned because every bit of it becomes that crunchy outside.
- Step 4: Heat the Oil - Pour about 2 inches of vegetable oil into a large high walled skillet and heat it to 350 degrees. A thermometer is your best friend here. I know it feels like one more thing to pull out of the drawer, but it really does make frying easier. If the oil is too cool, the chicken can turn greasy. If it is too hot, the outside browns before the inside cooks. That steady 350 degree temperature is what gives you golden, crisp tenders that cook through nicely.
- Step 5: Double Coat the Chicken - Take one piece of chicken from the marinade and let the extra drip off for a second. Coat it in the flour mixture, then dip it back into the marinade, and coat it in the flour mixture again. Set it on a plate or rack while you finish the rest. This double dip is how you get that thick, crunchy, restaurant style coating. Do not press too hard, but do give the flour enough contact with the chicken so it sticks in all the little corners.
- Step 6: Fry the Tenders in Batches - Carefully lower a few chicken tenders into the hot oil. Do not crowd the pan, because too much chicken at once drops the oil temperature and makes the coating less crisp. Fry each batch for about 3 to 4 minutes, turning as needed, until the chicken is deeply golden and cooked through to 165 degrees inside. The smell at this point is going to bring people into the kitchen, so be ready for the usual comments about whether any are ready yet.
- Step 7: Drain the Chicken on a Wire Rack - Move the cooked chicken tenders to a wire rack set over a baking sheet. This keeps air moving around the coating so it stays crunchy. Paper towels work in a pinch, but they can trap steam underneath the chicken, and steam is the enemy of crispiness. Letting the tenders rest on a rack for a few minutes also gives the juices time to settle, which makes every bite better.
- Step 8: Mix the Cane’s Sauce - In a bowl, stir together the mayonnaise, ketchup, Worcestershire sauce, garlic powder, onion powder, salt, and black pepper. Mix until smooth and creamy. Taste it and give it a little more pepper if you like that bold Cane’s style bite. I like to make the sauce before frying the chicken when I remember, because a little time in the fridge helps the flavors settle together. But I have also made it right at the end, and nobody at my table has ever complained.
- Step 9: Serve Everything Hot - Serve the crispy chicken tenders right away with a generous bowl of Cane’s Sauce. If you want the full restaurant style meal, add crinkle fries, buttery Texas toast, and a scoop of coleslaw. This is one of those meals that is best enjoyed hot, with plenty of napkins nearby and no one pretending they are only having two tenders.
Notes
Substitutions
- Chicken breasts: You can slice boneless skinless chicken breasts into strips if you do not have tenderloins.
- Boneless thighs: Use boneless chicken thighs for an extra juicy version with a slightly richer flavor.
- Homemade buttermilk: Mix 1 1/2 cups milk with 1 1/2 tablespoons vinegar or lemon juice and let it sit for 5 minutes.
- Gluten free flour blend: Use a cup for cup gluten free flour blend if you need a gluten free option.
- Canola oil: Canola oil works well because it has a neutral taste and handles frying temperatures nicely.
- Peanut oil: Peanut oil is another great frying choice if allergies are not a concern.
- Soy sauce: Use a small splash of soy sauce in the sauce if you are out of Worcestershire sauce.
- Steak sauce: A little steak sauce can stand in for Worcestershire and still give that savory tang.
Variations
- Spicy tenders: Add cayenne pepper or hot sauce to the marinade for a little heat.
- Extra peppery sauce: Increase the black pepper in the sauce if you love that bold Cane’s style flavor.
- Baked tenders: Bake at 400 degrees for 18 to 20 minutes, flipping halfway, for a lighter version.
- Air fryer tenders: Cook at 390 degrees for 12 to 14 minutes and spray the coating lightly with oil.
- Party bites: Cut the chicken smaller before marinating and serve the pieces with toothpicks and sauce.
- Full copycat plate: Serve with fries, Texas toast, coleslaw, and extra sauce for the complete meal.
Tips and Tricks
- Marinate longer: Overnight marinating gives the chicken the best tenderness and flavor.
- Use a thermometer: Keeping the oil at 350 degrees makes frying much easier and more consistent.
- Do not overcrowd the skillet: Frying in batches keeps the oil hot and the coating crisp.
- Double dip every piece: Flour, marinade, and flour again gives the tenders their signature crunch.
- Rest on a rack: A wire rack keeps the bottom of the chicken from getting soft.
- Season the flour well: The coating needs enough salt and spices so every bite tastes flavorful.
- Make sauce early: The sauce tastes even better after chilling for a little while.
- Serve right away: Fried chicken tenders are at their best when hot and freshly crisp.
Serving Ideas
- Crinkle fries: Fries are the classic partner for crispy chicken tenders and Cane’s Sauce.
- Texas toast: Thick buttery toast makes the meal feel like a true restaurant style plate.
- Coleslaw: A cool scoop of coleslaw balances the rich chicken and creamy sauce.
- Pickles: Crisp pickles add a bright bite that cuts through the fried coating.
- Side salad: A simple green salad gives the plate a fresher feel.
- Mac and cheese: Creamy mac and cheese turns this into a serious comfort food dinner.
- Potato wedges: Thick seasoned wedges are great for dipping in extra sauce.
- Corn on the cob: Sweet corn makes this meal feel extra family friendly.
Storage and Make Ahead Tips
- Refrigerate leftovers: Store leftover chicken tenders in an airtight container in the refrigerator for up to 3 days.
- Keep sauce separate: Store Cane’s Sauce in its own covered container so the chicken coating stays crisp.
- Reheat in the oven: Warm chicken tenders at 375 degrees until heated through and crisp again.
- Use an air fryer: Reheat tenders in the air fryer for a few minutes to bring back the crunch.
- Avoid the microwave: The microwave works fast, but it can make the coating soft.
- Make sauce ahead: Prepare the sauce up to 3 days ahead and keep it chilled.
- Marinate ahead: Start the chicken in the buttermilk marinade the night before for easier cooking the next day.
- Freeze cooked tenders: Freeze cooled tenders in a single layer, then store them in a freezer bag for a quick future meal.
Private Notes
