Oven Baked Boneless Skinless Chicken Thighs
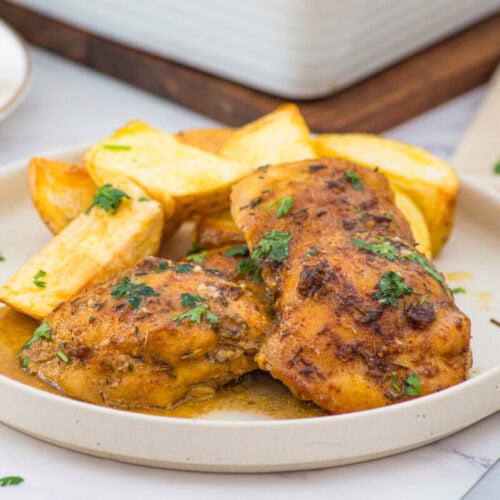
These oven baked boneless skinless chicken thighs are coated with paprika, garlic, Dijon mustard, thyme, olive oil, and brown sugar, then roasted until juicy inside and caramelized at the edges. With only a few minutes of prep, they make a warm, reliable family dinner for busy nights.
Print Recipe
Ingredients
- 2 lb or 8 boneless skinless chicken thighs
- 1 teaspoon paprika
- 1 teaspoon onion powder
- 1 teaspoon garlic powder
- ½ teaspoon black pepper
- 1 tablespoon Dijon mustard
- 1 teaspoon dried thyme
- 1 teaspoon salt
- 2 tablespoons olive oil
- 1 tablespoon brown sugar
- Fresh cilantro chopped for garnish
Instructions
- Step 1: Heat the Oven and Choose the Dish - Preheat your oven to 400°F. Give it time to reach the full temperature before the chicken goes in, since a properly heated oven helps the outside start browning right away. Choose a casserole dish that holds all eight thighs in a single layer with a little room between them. A crowded dish traps more steam, while a little space helps those edges turn golden. You do not need to grease the dish because the chicken and olive oil will provide enough moisture.
- Step 2: Add the Chicken and Dry Seasonings - Place the boneless skinless chicken thighs in a large mixing bowl. Sprinkle in the paprika, onion powder, garlic powder, and black pepper. I like to scatter the spices across the whole bowl instead of dropping them in one pile, because that gives you a head start on even seasoning. Use clean hands or sturdy tongs to turn the chicken several times until the dry mixture reaches every fold and surface.
- Step 3: Build the Dijon Herb Coating - Add the Dijon mustard, dried thyme, salt, olive oil, and brown sugar to the seasoned chicken. Toss again until every thigh looks glossy and evenly coated, with no dry pockets of spice hiding at the bottom of the bowl. Take an extra thirty seconds here. A thorough coating means the tangy mustard, warm spices, and gentle sweetness bake directly onto the meat instead of ending up in one concentrated spot. The mixture should cling to the chicken rather than run off like a thin marinade.
- Step 4: Arrange the Chicken for Even Roasting - Transfer the coated thighs to your casserole dish and arrange them in a single layer. Smooth each piece open instead of leaving it folded under itself, which helps the chicken cook evenly from edge to center. Scrape any seasoning mixture left in the bowl over the top. When I am trying to get dinner moving quickly, this is the moment I wash the mixing bowl and set out the side dishes, because the rest of the recipe needs very little attention.
- Step 5: Bake Until Juicy and Nearly Done - Place the casserole dish in the oven and bake for 30 minutes. The chicken will release flavorful juices as it cooks, and the surface will slowly change from glossy red brown to a deeper roasted color. At the 30 minute mark, check the thickest piece with an instant read thermometer. You are looking for at least 165°F in the center. If the thighs are especially thick, they may need the additional five minutes listed in the recipe.
- Step 6: Spoon the Juices and Finish Browning - About five minutes before the chicken is finished, carefully slide the dish forward and spoon some of the hot pan juices over each thigh. This small step keeps the surface moist and carries all that paprika, garlic, mustard, and thyme back over the meat. Return the dish to the oven for about five minutes, or until the tops look deeply golden and lightly caramelized. If you want more color, give the chicken a few additional minutes while watching it closely so the brown sugar does not scorch.
- Step 7: Rest, Garnish, and Bring It to the Table - Remove the casserole dish from the oven and let the chicken rest for five minutes. I know everyone is usually circling the kitchen by this point, but resting gives the juices time to settle back into the meat instead of running onto the cutting board. Spoon a little more of the pan liquid over the thighs, scatter chopped cilantro on top, and serve while everything is warm. The fresh green garnish wakes up the rich roasted flavors and makes the whole dish look ready for company.
Notes
Substitutions
- Chicken breasts: Use small boneless skinless chicken breasts, but begin checking earlier because lean breast meat can dry out more quickly.
- Yellow mustard: Replace Dijon with yellow mustard for a milder, slightly brighter tang that still helps the seasoning stick.
- Maple syrup: Swap the brown sugar for one tablespoon of pure maple syrup, knowing the coating may stay a little softer and less caramelized.
- Avocado oil: Use the same amount of avocado oil in place of olive oil when that is what you keep near the stove.
- Italian seasoning: Replace the dried thyme with Italian seasoning for a broader herb flavor with oregano, basil, and rosemary notes.
- Fresh parsley: Use chopped parsley instead of cilantro for a clean, mild finish that works for almost every palate.
Variations
- Smoky chicken thighs: Use smoked paprika in place of sweet paprika to add a deeper campfire style aroma without extra heat.
- Spicy chicken thighs: Add one quarter teaspoon cayenne pepper or crushed red pepper when your family likes a noticeable kick.
- Lemony chicken thighs: Stir one tablespoon fresh lemon juice into the seasoning mixture and serve with extra lemon wedges at the table.
- Herb rich chicken thighs: Add dried rosemary or oregano along with the thyme for a more pronounced roasted herb flavor.
- Extra savory chicken thighs: Add one teaspoon Worcestershire sauce to the Dijon mixture for more depth in the pan juices.
- Vegetable bake: Scatter quick cooking vegetables such as sliced zucchini or bell pepper around the chicken, leaving space so the thighs can still brown.
Tips and Tricks
- Pat the chicken dry: Blot excess moisture with paper towels before seasoning so the spice mixture clings instead of sliding into the dish.
- Use similar sizes: Choose thighs with roughly equal thickness so the smaller pieces do not overcook while the largest piece finishes.
- Do not crowd the pan: Leave a little breathing room between pieces to encourage roasted edges rather than a steamed surface.
- Check with a thermometer: Measure the temperature in the thickest part of the largest thigh and make sure it reaches 165°F.
- Baste near the end: Spoon the seasoned juices over the chicken during the final five minutes to build moisture, shine, and caramelized color.
- Rest before serving: Give the thighs five minutes out of the oven so the juices redistribute and each bite stays tender.
- Save the pan juices: Spoon them over rice, potatoes, or vegetables because they carry some of the best flavor in the dish.
Serving Ideas
- Creamy mashed potatoes: Spoon the chicken and its savory juices over mashed potatoes for the kind of dinner that makes everybody linger at the table.
- Buttered rice: Serve the thighs with white or brown rice so every drop of the mustard and paprika pan sauce gets soaked up.
- Roasted vegetables: Pair the chicken with broccoli, carrots, Brussels sprouts, or green beans for an easy oven based meal.
- Simple green salad: Add a crisp salad with cucumber, tomato, and a bright vinaigrette when you want something fresh beside the rich chicken.
- Warm dinner rolls: Put a basket of rolls on the table for wiping up the seasoned juices left on the plate.
- Macaroni and cheese: Serve this chicken beside creamy macaroni and cheese when the family needs a deeply comforting dinner.
- Grain bowls: Slice leftover thighs over quinoa or rice with greens, cucumbers, and a spoonful of yogurt sauce.
Storage and Make Ahead Tips
- Refrigerator storage: Cool the cooked chicken, place it in an airtight container with a little pan juice, and refrigerate it for up to 4 days.
- Freezer storage: Transfer cooled chicken to a freezer safe container or bag and freeze it for up to 3 months.
- Thawing: Move frozen chicken to the refrigerator the night before you plan to serve it so it can thaw gradually and evenly.
- Oven reheating: Place the thighs in a covered baking dish with a spoonful of pan juice or water and warm them at 350°F until heated through.
- Microwave reheating: Cover one portion and heat it in short intervals, turning or rearranging the chicken so it warms without becoming tough.
- Advance seasoning: Mix and coat the raw chicken up to 24 hours ahead, cover it tightly, and keep it refrigerated until baking time.
- Lunch preparation: Slice chilled leftovers and portion them with rice, vegetables, or salad for quick family lunches during the week.
Private Notes
Servings: 4 servings
