Slow Cooker Braised Short Ribs
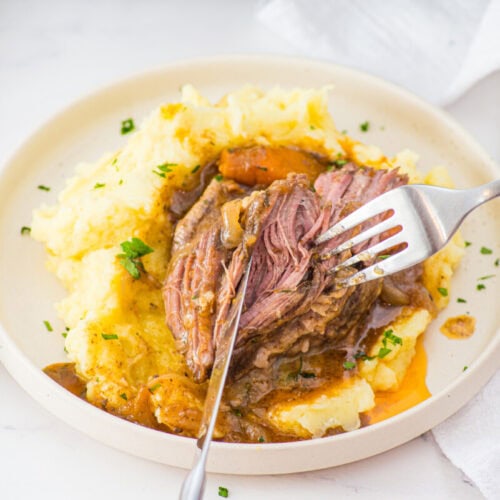
These Slow Cooker Braised Short Ribs simmer with onions, carrots, garlic, herbs, tomato paste, and beef broth until the meat is tender and the sauce is rich. With about 10 minutes of prep, it is a cozy family dinner that feels special while the slow cooker handles most of the work.
Print Recipe
Ingredients
- 2 lb beef short ribs
- 1 large onion sliced
- 3 carrots cut into large pieces
- 1 cup beef broth
- 1 tablespoon tomato paste
- 1 teaspoon paprika
- 1 teaspoon dried thyme
- 1 ½ teaspoons salt
- ½ teaspoon black pepper
- 1 teaspoon onion powder
- 2 cloves garlic minced
- 1 tablespoon cornstarch
- 2 tablespoons cold water
- Fresh parsley chopped for garnish
Instructions
- Step 1: Set the Short Ribs in the Slow Cooker - Place the beef short ribs in the bottom of your slow cooker in a fairly even layer. They do not need to look perfect, and a little overlap is fine, but try not to stack every piece directly on top of another. Giving the ribs some contact with the cooking liquid helps them cook evenly and soak up the seasoning. I usually take a moment here to check for any small bone fragments, since short ribs can occasionally have a loose piece left from cutting.
- Step 2: Add the Onion and Seasonings - Scatter the sliced onion over and around the short ribs. Add the onion powder, dried thyme, paprika, salt, black pepper, and minced garlic. Use a large spoon or clean hands to move the seasonings around so they are not sitting in one little pile. You want those warm, savory flavors touching the beef and beginning to season the broth from the first hour of cooking.
- Step 3: Add the Carrots and Braising Liquid - Tuck the large carrot pieces around the ribs, keeping them chunky so they hold their shape. Stir the tomato paste into the beef broth until it is mostly smooth, then pour that mixture into the slow cooker. Give everything a gentle stir, just enough to spread the liquid and seasonings without turning the slow cooker into a wrestling match. Put the lid on securely so the heat and moisture stay trapped inside.
- Step 4: Cook Until the Beef Begins to Soften - Cook the short ribs on Low for 6 hours or on High for 4 hours. Avoid lifting the lid during the early part of cooking, since every peek lets out heat and can slow things down. About 1 hour before the total cooking time is complete, open the lid and gently stir the onions, carrots, and sauce around the ribs. By this point, the kitchen should smell deeply savory, and the beef should already be starting to relax and soften.
- Step 5: Mix and Add the Cornstarch - In a small bowl, whisk the cornstarch with the cold water until the mixture is completely smooth. This is sometimes called a slurry, but all you really need to remember is that cold water prevents the cornstarch from forming stubborn lumps. Pour it into the slow cooker while stirring the hot liquid gently. Try to distribute it through the sauce rather than pouring it over one piece of meat.
- Step 6: Finish the Sauce and Check the Beef - Cover the slow cooker again and continue cooking for the final hour. The sauce will gradually thicken and become glossy, while the short ribs finish turning tender. Check the meat with a fork near the end. It should pull apart easily without much pressure. Taste the sauce and adjust the salt or pepper if needed, then spoon the ribs, carrots, onions, and plenty of gravy onto plates. Finish with chopped parsley right before serving.
Notes
Substitutions
- Boneless short ribs: You can use boneless beef short ribs, though they may cook a little faster, so begin checking for tenderness before the full time is up.
- Chuck roast: Cut a chuck roast into large pieces for a budget friendly option that still becomes tender with slow cooking.
- Chicken broth: Chicken broth can stand in for beef broth, though the finished sauce will taste a little lighter.
- Fresh thyme: Use about 1 tablespoon of fresh thyme leaves in place of the dried thyme for a brighter herbal flavor.
- Baby carrots: Baby carrots work when that is what you have, but leave them whole so they hold together better.
- Arrowroot starch: Arrowroot can replace cornstarch, but stir it in near the end and avoid cooking it much longer than needed.
- Gluten free broth: Choose a broth labeled gluten free when preparing this meal for someone who avoids gluten.
Variations
- Mushroom short ribs: Add 8 ounces of sliced mushrooms during the final 2 hours so they become tender without completely disappearing into the sauce.
- Red wine version: Replace 1/2 cup of the beef broth with dry red wine for a deeper sauce with a more traditional braised flavor.
- Extra garlic version: Add 2 more minced garlic cloves when your family enjoys a stronger garlic presence.
- Herb rich version: Add a small sprig of rosemary with the thyme, then remove the woody stem before serving.
- Creamy gravy version: Stir in a small splash of heavy cream after the sauce has thickened for a softer, richer finish.
- Potato pot version: Add halved baby potatoes at the beginning so the slow cooker makes the main dish and side together.
- Gentle heat version: Add a pinch of crushed red pepper for a mild warmth that stays in the background.
Tips and Tricks
- Choose large carrot pieces: Smaller pieces can become too soft during several hours of cooking, so cut the carrots thicker than you would for a quick soup.
- Keep the lid closed: The slow cooker depends on trapped heat, and repeated peeking can extend the cooking time.
- Whisk the cornstarch with cold water: Cornstarch added directly to hot liquid tends to clump, while cold water helps it blend smoothly.
- Check tenderness rather than the clock alone: Short ribs vary in size and thickness, so the fork test tells you more than the timer.
- Skim extra fat when needed: Short ribs are naturally rich, so you can spoon off some fat from the surface before thickening the sauce.
- Taste before adding more salt: Beef broth brands vary, and some are much saltier than others.
- Use the Low setting for maximum tenderness: The High setting works well when time is tight, but Low gives the connective tissue more time to soften gradually.
- Make enough sauce for the side: Mashed potatoes, rice, and noodles all soak up gravy, so do not leave the good stuff behind in the cooker.
Serving Ideas
- Creamy mashed potatoes: Spoon the beef and gravy over mashed potatoes so every soft, buttery bite catches the sauce.
- Egg noodles: Wide egg noodles make a simple, family friendly base that lets the short ribs stay at the center of the plate.
- Steamed rice: White or brown rice absorbs the savory broth and keeps the meal straightforward.
- Creamy polenta: Soft polenta gives the dish a cozy, slightly rustic feel and pairs especially well with the rich beef.
- Buttered green beans: A crisp green vegetable brings freshness and color next to the tender meat.
- Roasted broccoli: The browned edges of roasted broccoli give you a pleasant contrast to the soft ribs and carrots.
- Simple dinner rolls: Warm rolls are handy for wiping up the last spoonfuls of gravy, which my kids consider an important dinner job.
- Bright green salad: A salad with a tangy vinaigrette balances the richness when you want something fresh on the side.
Storage and Make Ahead Tips
- Refrigerator storage: Cool the short ribs and sauce, place them in an airtight container, and refrigerate for up to 4 days.
- Freezer storage: Freeze the cooled beef and sauce in a freezer safe container for up to 3 months, leaving a little room for expansion.
- Thawing: Move frozen short ribs to the refrigerator the night before you plan to reheat them.
- Stovetop reheating: Warm the ribs and sauce in a covered saucepan over low heat, adding a small splash of water or broth when the gravy is too thick.
- Microwave reheating: Place a portion in a microwave safe dish, cover loosely, and heat in short intervals while stirring the sauce between rounds.
- Make ahead prep: Slice the onion, cut the carrots, and measure the seasonings the night before, then store everything separately in the refrigerator.
- Fat removal: When the chilled sauce has a firm layer of fat on top, lift off as much as you like before reheating.
- Lunch planning: Pack leftovers with mashed potatoes or rice in individual containers so the next day's meal is ready to grab.
Private Notes
Servings: 4 servings
