Slow Cooker Cheddar Bay Sloppy Joe Bake
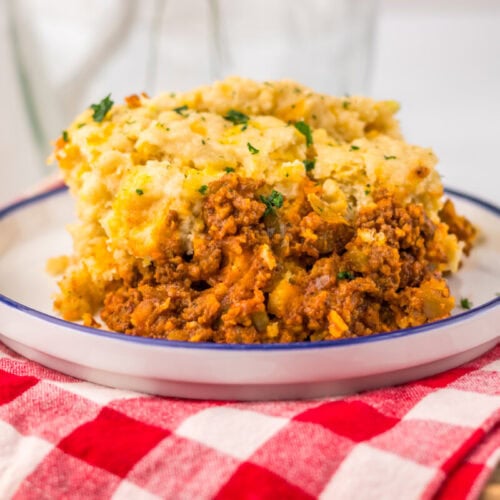
Slow Cooker Cheddar Bay Sloppy Joe Bake combines rich homemade sloppy joe filling, melted sharp cheddar, and fluffy garlic herb biscuits in one cozy family dinner.
Print Recipe
Ingredients
Sloppy Joe Filling
- 2 pounds lean ground beef browned and drained
- 1 teaspoon salt
- ½ teaspoon black pepper
- 1 small onion diced
- 1 small green bell pepper diced
- 2 cloves garlic minced
- 2 cups ketchup
- 2 tablespoons tomato paste
- 2 tablespoons brown sugar
- 1 tablespoon yellow mustard
- 1 tablespoon Worcestershire sauce
- 1 teaspoon chili powder
- ½ teaspoon smoked paprika
- 1 cup shredded sharp cheddar cheese
Biscuit Topping
- 2 boxes Cheddar Bay Biscuit Mix
- Ingredients called for on the biscuit mix package
- Seasoning packets included in the boxes
- 2 tablespoons butter melted
- Chopped parsley for garnish
Instructions
- Step 1: Brown and Drain the Beef - Brown the ground beef in a large skillet over medium heat, breaking it into small crumbles as it cooks. You want the pieces small enough that the filling is easy to scoop and every spoonful gets plenty of sauce. Once no pink remains, carefully drain off the extra grease. This quick step keeps the finished bake rich without becoming oily, and it gives the beef a better texture than adding it raw. I usually take a wooden spoon and break up any larger pieces before moving the meat to the slow cooker. Nobody at my table wants one giant chunk of beef stealing the whole biscuit bite.
- Step 2: Build the Savory Base - Transfer the browned beef to a six quart slow cooker. Add the salt, black pepper, diced onion, diced green bell pepper, and minced garlic. Give everything a good stir so the vegetables are spread evenly through the meat. The onion and pepper may look a little firm at this point, but they will soften as the filling cooks and become part of that familiar sloppy joe texture. Cutting them into fairly small pieces helps them cook evenly and makes the finished dish friendlier for kids who might otherwise inspect every vegetable.
- Step 3: Stir Together the Sauce - Add the ketchup, tomato paste, brown sugar, yellow mustard, Worcestershire sauce, chili powder, and smoked paprika. Stir slowly but thoroughly, making sure the tomato paste is fully blended and there are no thick streaks hiding along the bottom. The sauce will seem generous, which is exactly what you want. It needs enough moisture to simmer the beef and vegetables while still leaving a saucy layer beneath the biscuits. Scrape along the sides and bottom of the slow cooker as you stir so every bit of meat gets coated. At this point, the mixture should look glossy, thick, and bright red. The flavor will deepen as it cooks, so resist the urge to add more seasoning before the ingredients have had time to settle in together.
- Step 4: Slow Cook Until Rich - Cover the slow cooker and cook on low for four to five hours or on high for two to three hours. If you are home, give the filling a stir once around the halfway point, but do not worry if your day is too busy for that. By the end, the onion and pepper should be tender, the sauce should look darker and thicker, and the whole kitchen should smell like dinner is already handled. That is one of my favorite parts of using the slow cooker. You can be helping with homework, folding laundry, or trying to remember where somebody left their water bottle, and dinner quietly keeps moving forward. If the filling looks thinner than you prefer, leave the lid slightly open for a few minutes before adding the cheese. If it looks very thick, stir in a tablespoon or two of water. Most batches will be ready as they are.
- Step 5: Melt in the Cheddar - Stir the shredded sharp cheddar into the hot sloppy joe filling until it melts completely. Freshly shredded cheese blends especially smoothly, but use what makes sense for your evening. Take a second to scrape around the edges and pull everything back into an even layer. A level surface gives the biscuit dough a steady place to sit and helps the portions cook at a similar pace. The cheese should disappear into the sauce rather than sit in long strings on top. Once it is melted, the filling will look a little creamier and taste rounder. That sharp cheddar also connects the sloppy joe layer to the cheddar biscuit topping, making the whole dinner feel like one complete dish.
- Step 6: Mix and Add the Biscuit Dough - Prepare both boxes of Cheddar Bay biscuit mix according to the package directions. Stir only until the dough comes together. Mixing too aggressively can make the biscuits firmer instead of soft and fluffy. Drop large spoonfuls of dough evenly over the hot filling, leaving a little space between each mound. Those spaces matter because they let steam move around the dough and help the centers cook. Try to make the biscuits close to the same size so one does not finish long before the others. I usually work around the outside edge first, then place a few spoonfuls in the center. You do not need to make them beautiful. Once they puff up and get brushed with seasoned butter, nobody will care whether every scoop was perfectly shaped.
- Step 7: Cook the Biscuit Topping - Cover the slow cooker and cook on high for 45 to 60 minutes, or until the biscuits are cooked through in the center. Slow cookers vary, so start checking near the 45 minute mark. Gently lift or separate one biscuit near the middle with a butter knife. It should look fluffy rather than wet or doughy. If your cooker runs cool, the biscuits may need a little extra time. Try not to lift the lid repeatedly during the first part of cooking. Every time the lid comes off, heat and steam escape, which can slow the biscuits down. I know it is tempting to peek, especially when the kids keep asking if dinner is ready, but give the dough time to do its thing. The tops may stay lighter than oven baked biscuits because the slow cooker holds moisture. That is normal. The important thing is that the centers are set and no longer raw.
- Step 8: Brush, Garnish, and Rest - Mix the melted butter with the included garlic herb seasoning packets, then brush that mixture generously over the hot biscuit tops. Make sure each biscuit gets a little butter because this is where the topping picks up that familiar garlic herb taste. Sprinkle on the chopped parsley and let the bake rest uncovered for about five minutes. That brief pause helps the filling settle, keeps the first scoop from running across the plate, and gives everyone just enough time to wash hands and make it to the table. Serve it with a large spoon so you can reach through the biscuits and collect plenty of sloppy joe filling underneath. I like to make sure every plate gets one fluffy biscuit and a generous scoop of the saucy beef.
Notes
Substitutions
- Ground turkey or chicken: Either one can replace the beef for a lighter filling, though you may want a small splash of oil while browning very lean meat.
- Monterey Jack or Colby Jack: These cheeses melt smoothly and give the filling a milder, creamier finish than sharp cheddar.
- Red bell pepper: Use it in place of green bell pepper for a sweeter taste and a little extra color.
- Homemade biscuit dough: Your favorite drop biscuit dough can replace the boxed mix, though cooking time may change depending on the size and moisture of the dough.
- Dairy free butter and cheese: These can work when needed, but choose products that melt well and check the biscuit mix ingredients for your specific dietary needs.
- Light brown or dark brown sugar: Either one works, with dark brown sugar adding a slightly deeper molasses taste.
- Prepared minced garlic: Jarred garlic can replace fresh garlic when saving a few minutes matters more than chopping another ingredient.
- Regular paprika: Use regular paprika when smoked paprika is not available, though the filling will have a milder smoky taste.
Variations
- Bacon cheddar version: Stir in six slices of cooked, crumbled bacon before adding the cheese for a smoky, salty bite.
- Spicy version: Add diced jalapeños and a few dashes of hot sauce to the filling for a warmer finish.
- Barbecue version: Replace ½ cup of the ketchup with your favorite barbecue sauce to bring in smoke, tang, and a little extra sweetness.
- Pepper Jack version: Replace the cheddar with Pepper Jack cheese for creamy texture and gentle heat.
- Loaded version: Finish each serving with diced pickles and crispy fried onions for cool tang and crunchy contrast.
- Extra vegetable version: Add finely diced carrots or mushrooms with the onion and pepper so they can soften into the filling.
- Cheeseburger version: Add a spoonful of pickle relish to the sauce and serve each portion with extra cheddar and diced pickles.
- Smoky campfire version: Add a little extra smoked paprika and use a smoky barbecue sauce for a deeper outdoor cookout taste.
Tips and Tricks
- Use a vented lid when possible: A programmable slow cooker with a vented lid can let excess steam escape and help the biscuits cook more evenly.
- Leave space between the biscuits: Small gaps allow steam to circulate instead of collecting under one solid layer of dough.
- Check the center biscuits first: The dough near the center often takes longer, so use that area when testing for doneness.
- Shred the cheddar fresh: Cheese from a block usually melts more smoothly because it does not have the same coating used on many packaged shreds.
- Brown the tops when needed: If your slow cooker runs cool, transfer the removable oven safe insert to the oven and broil briefly, watching closely the entire time.
- Let it rest before scooping: Five minutes gives the sauce time to settle and makes the servings neater without cooling the dinner too much.
- Keep the biscuit dough cool: Prepare the dough right before adding it so the butter and leavening can give you the fluffiest possible result.
- Do not flatten the dough: Rounded spoonfuls leave room for the biscuits to rise and create soft centers.
- Dice the vegetables evenly: Similar sized onion and pepper pieces will soften at the same rate and blend more naturally into the filling.
- Taste before adding extra salt: The ketchup, Worcestershire sauce, cheese, biscuit mix, and seasoning packets all contain seasoning, so the finished dish may already have plenty.
Serving Ideas
- Simple green salad: A crisp salad with a tangy dressing cuts through the rich beef, cheddar, and butter.
- Roasted green beans: Their lightly crisp texture gives the plate a fresh contrast without adding much work.
- Steamed broccoli: Broccoli is easy, familiar, and good for catching any extra sloppy joe sauce.
- Dill pickles: Cold, crunchy pickles bring a sharp bite that balances the sweet tomato filling.
- Corn on the cob: Sweet corn keeps the meal family friendly and feels especially right for a casual weekend dinner.
- Fresh fruit: Grapes, apple slices, or berries add something cool and bright for kids who like a simple side.
- Creamy coleslaw: Cool cabbage and a tangy dressing give the rich casserole a welcome crunch.
- Cucumber salad: Crisp cucumbers, tomatoes, and a light vinaigrette help freshen up the plate.
- Potato chips: For a very casual dinner, a handful of crunchy chips fits right in with the sloppy joe flavors.
- Extra pickles and onions: Set out a few toppings so everyone can finish their serving exactly the way they like it.
Storage and Make Ahead Tips
- Refrigerate leftovers promptly: Transfer cooled leftovers to an airtight container and store them in the refrigerator for up to four days.
- Keep biscuits separate when possible: Storing leftover biscuits away from the filling helps them hold onto more of their soft, fluffy texture.
- Reheat gently: Warm individual servings in the microwave, or place them in a 350°F oven until heated through.
- Freeze the filling only: The sloppy joe filling can be frozen for up to two months in a sealed container.
- Make fresh biscuits after freezing: Thaw and reheat the filling, then prepare new biscuit dough so the topping tastes soft and freshly cooked.
- Prep vegetables early: Dice the onion and bell pepper a day ahead and refrigerate them in a covered container to make the morning setup faster.
- Brown the beef ahead: Cook and drain the ground beef the night before, then refrigerate it until you are ready to assemble the filling.
- Cool before covering: Let leftovers cool briefly before sealing the container so extra steam does not make the biscuits soggy.
- Thaw filling safely: Move frozen filling to the refrigerator the night before you plan to serve it, then reheat it until steaming hot.
- Add garnish after reheating: Fresh parsley looks and tastes best when sprinkled on just before the meal reaches the table.
Private Notes
Servings: 4 servings
