Slow Cooker Chili Cheese Enchilada Bake
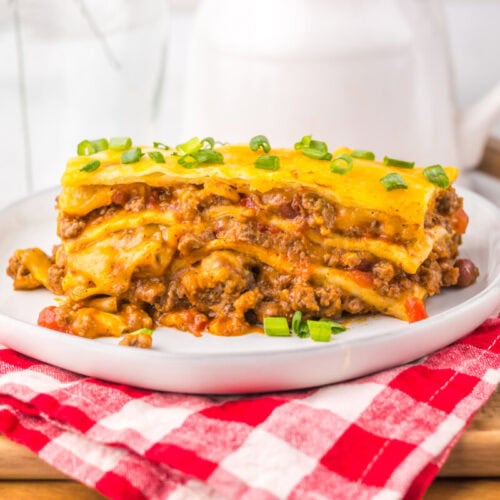
This Slow Cooker Chili Cheese Enchilada Bake is a cozy family dinner with layers of seasoned beef, chili, enchilada sauce, tortillas, and melty cheese. It is hearty, simple to prep, and perfect for busy nights when you want something warm and filling without a lot of fuss.
Print Recipe
Ingredients
- 2 pounds lean ground beef browned and drained
- 1 teaspoon salt
- 1 teaspoon black pepper
- 1 tablespoon chili powder
- 1 teaspoon cumin
- 1 small onion diced
- 1 tablespoon minced garlic
- 1 15 ounce can chili with beans
- 1 10 ounce can red enchilada sauce
- 1 10 ounce can Rotel, undrained
- 6 flour tortillas
- 4 cups shredded Mexican blend cheese
- 2 tablespoons sliced green onions
Instructions
- Step 1: Season the Browned Beef - Start with your lean ground beef already browned and drained. Add it to a large bowl, then stir in the salt, black pepper, cumin, chili powder, diced onion, and minced garlic. I like doing this in a bowl because it gives you room to mix everything evenly instead of chasing bits of onion around a skillet. The warm beef helps the seasonings bloom a little, and you want every spoonful to have that same chili style flavor.
- Step 2: Stir in the Saucy Filling - Add the chili with beans, red enchilada sauce, and undrained Rotel to the seasoned beef mixture. Stir until everything looks well combined and saucy. This is where the recipe starts to smell like dinner instead of separate ingredients. The chili makes it hearty, the enchilada sauce gives it that familiar red sauce comfort, and the Rotel adds just enough tang and chile flavor to keep the richness balanced.
- Step 3: Prep the Slow Cooker - Lightly spray the inside of a 6 quart slow cooker with nonstick cooking spray. This small step saves you from scraping stuck cheese off the sides later, and as a dad who has washed plenty of slow cooker inserts after bedtime, I promise it is worth the five seconds. Make sure you get the bottom and up the sides where the cheese will bubble.
- Step 4: Add the First Meat Layer - Spread a thin layer of the meat mixture into the bottom of the slow cooker. This does not need to be perfect. You are just creating a saucy base so the tortillas do not sit directly on the bottom. That little layer helps keep everything moist and gives the first tortilla layer something to settle into as it cooks.
- Step 5: Layer the Tortillas - Place 2 flour tortillas over the meat mixture. Depending on the shape of your slow cooker, you may need to overlap them or tear one to fit the edges. Do not worry about making it pretty. Once it cooks, nobody will see the exact shape of the layers. What matters is that the tortillas cover most of the filling so they can soften into that enchilada bake texture.
- Step 6: Add Filling and Cheese - Spoon about one third of the chili mixture over the tortillas, then sprinkle about 1 cup of shredded Mexican blend cheese on top. Spread the filling gently so the tortillas stay in place. The cheese melts into the meat mixture as it cooks, which helps bind the layers together and gives every scoop that creamy, cheesy pull.
- Step 7: Repeat the Layers - Repeat the layers two more times with tortillas, chili mixture, and cheese. End with tortillas and cheese on top so the surface gets nice and melty. I like to press the layers down very gently with the back of a spoon, not enough to smash them, just enough to help everything settle into the slow cooker. Think cozy stack, not perfect architecture.
- Step 8: Cook Until Hot and Melted - Cover and cook on low for 4 to 5 hours or on high for 2 to 3 hours. Low gives the layers more time to soften and mingle, which is my favorite if I have planned ahead. High works well when the afternoon got away from you. You are looking for a hot, bubbling casserole with melted cheese and tender tortilla layers.
- Step 9: Let It Rest Before Serving - Turn off the slow cooker and let the casserole rest for 10 minutes before serving. This is the hardest step because it smells so good, but it helps the bake set up so you can scoop it without everything sliding apart. It will still be soft and saucy, just a little more settled.
- Step 10: Finish with Green Onions - Sprinkle sliced green onions over the top right before serving. That fresh pop at the end makes the rich chili cheese layers feel brighter. Scoop generous portions into bowls or onto plates, then let everyone add the toppings they love.
Notes
Substitutions
- Ground turkey: Use ground turkey instead of beef for a lighter filling that still works beautifully with the chili and enchilada sauce.
- Green enchilada sauce: Swap red enchilada sauce for green if your family likes a tangier, brighter flavor.
- Pepper Jack cheese: Replace part of the Mexican blend with Pepper Jack when you want a little extra heat.
- Corn tortillas: Use corn tortillas instead of flour tortillas for a more traditional enchilada flavor and a slightly firmer texture.
- Mild Rotel: Choose mild Rotel if you are feeding younger kids or anyone who prefers less heat.
- No bean chili: Use chili without beans if that is what your family likes best.
Variations
- Frito chili cheese version: Add a layer of crushed Fritos between the casserole layers and sprinkle more on top right before serving for salty crunch.
- Chili cheese burrito style: Stir a can of refried beans into the meat mixture for a thicker, creamier filling.
- Spicy version: Add diced jalapeños and use hot Rotel for a bake with more kick.
- Walking taco style: Top each serving with shredded lettuce, diced tomatoes, and crushed tortilla chips.
- Loaded version: Serve with sour cream, diced avocado, extra green onions, and a spoonful of salsa.
- Extra cheesy version: Add another half cup of cheese to the top layer when the day calls for it.
Tips and Tricks
- Use thicker chili: A thicker canned chili helps the casserole slice and scoop more neatly.
- Let it rest: Giving the bake 10 minutes to sit before serving helps the layers settle.
- Shred cheese fresh: Freshly shredded cheese melts smoother and creamier than many bagged blends.
- Fit tortillas to the cooker: Tear or overlap the tortillas as needed so the layers cover the filling.
- Drain the beef well: Removing extra grease keeps the finished casserole rich but not oily.
- Keep toppings fresh: Add green onions and other toppings after cooking so they stay bright and crisp.
Serving Ideas
- Sour cream and salsa: A spoonful of sour cream and your favorite salsa make each serving creamy and bright.
- Simple salad: Serve it with a crisp green salad when you want something fresh next to the rich casserole.
- Mexican rice: Add rice on the side if you are feeding extra hungry people.
- Corn on the cob: Sweet corn is a great family friendly side that works well with chili cheese flavors.
- Tortilla chips: Use chips for scooping around the edges, especially if you like a little crunch.
- Avocado topping: Diced avocado adds cool creaminess that tastes great with the warm filling.
Storage and Make Ahead Tips
- Refrigerator storage: Store leftovers covered in the refrigerator for up to 4 days.
- Microwave reheating: Reheat individual portions in the microwave until heated through.
- Freezer storage: Freeze cooled portions in airtight containers for up to 2 months.
- Thawing tip: Thaw frozen portions overnight in the refrigerator before reheating.
- Make ahead filling: Brown the beef and stir together the chili mixture up to a day ahead, then layer when ready to cook.
- Leftover lunch: Scoop leftovers into a bowl with lettuce, chips, and sour cream for an easy next day taco bowl.
Private Notes
Servings: 6 servings
