Slow Cooker Copycat Panda Express Mushroom Chicken
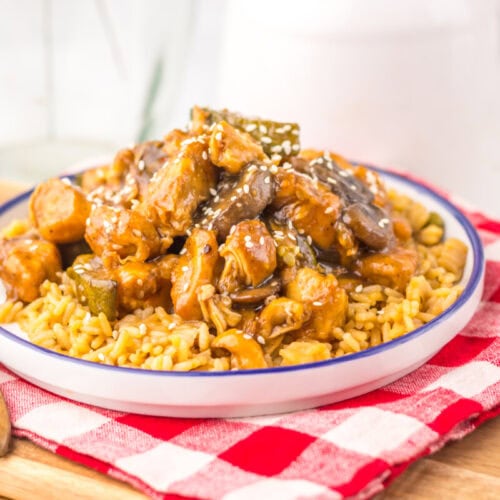
Slow Cooker Copycat Panda Express Mushroom Chicken brings tender chicken, mushrooms, zucchini, and red bell pepper together in a savory soy garlic sauce that slowly cooks until rich and comforting. Serve it over steamed rice or chow mein for a family dinner that gives you the takeout flavors everyone loves with the convenience of the slow cooker.
Print Recipe
Ingredients
Chicken
- 2 pounds boneless skinless chicken breasts, cut into 1½-inch pieces
- 1 teaspoon kosher salt
- ½ teaspoon black pepper
- 2 tablespoons cornstarch
- 1 tablespoon vegetable oil
Sauce
- ½ cup low-sodium soy sauce
- ½ cup chicken broth
- 2 tablespoons oyster sauce
- 1 tablespoon hoisin sauce
- 1 tablespoon rice vinegar
- 2 tablespoons light brown sugar
- 1 teaspoon sesame oil
- 4 cloves garlic minced
- 1 teaspoon ground ginger
- ½ teaspoon crushed red pepper flakes optional
Vegetables
- 8 ounces fresh white mushrooms sliced
- 2 medium zucchini cut into thick half-moons
To Finish
- 2 tablespoons cornstarch
- 2 tablespoons cold water
- Sesame seeds for garnish (optional)
Instructions
- Step 1: Season the Chicken - Put the chicken pieces in a large bowl and sprinkle them evenly with the kosher salt and black pepper. Give everything a good toss so the seasoning reaches more than just the pieces sitting on top. This first layer of seasoning may seem simple, but it makes a difference because you are flavoring the chicken itself instead of asking the sauce to do all the work later.
- Step 2: Coat the Chicken - Sprinkle 2 tablespoons of cornstarch over the seasoned chicken and toss until every piece has a light coating. You are not trying to create a thick breading here. A thin, dusty layer is exactly what you want. It helps the outside of the chicken brown in the skillet and gives the pieces a little more structure as they cook slowly in the sauce.
- Step 3: Sear the Chicken - Heat the vegetable oil in a large skillet over medium high heat. Once the oil is hot, add the chicken in a single layer and cook for about 2 to 3 minutes, turning the pieces so they pick up a little color. You are not cooking the chicken through at this point. The goal is simply to get some browning on the outside. If your skillet feels crowded, work in two batches so the chicken sears instead of steaming.
- Step 4: Move the Chicken to the Slow Cooker - Transfer the lightly browned chicken to a 6 quart slow cooker. If there are flavorful juices left in the skillet, you can add those too. I try not to leave good flavor behind when it could be heading straight into dinner. Spread the chicken into a fairly even layer so the sauce can surround the pieces once you pour it in.
- Step 5: Whisk the Savory Sauce - In a medium bowl, whisk together the low sodium soy sauce, chicken broth, oyster sauce, hoisin sauce, rice vinegar, light brown sugar, sesame oil, minced garlic, ground ginger, and crushed red pepper flakes if you are using them. Keep whisking until the brown sugar is mostly dissolved and everything looks evenly combined. The sauce will seem fairly thin right now, and that is normal. It thickens later.
- Step 6: Add the Sauce and Vegetables - Pour the sauce over the chicken and stir gently so the pieces are coated. Add the sliced mushrooms, zucchini, and red bell pepper. If your family likes vegetables with a firmer bite, you can add the mushrooms now and hold the zucchini and bell pepper until the last 45 minutes or so. I usually make that call based on who is sitting at the table because some nights soft vegetables go over better than crisp ones.
- Step 7: Slow Cook Until Tender - Cover the slow cooker and cook on LOW for 4 to 5 hours, or until the chicken is fully cooked and tender. Chicken should reach 165°F in the center. Slow cookers can vary, so start checking closer to the 4 hour mark if yours tends to run hot. You want juicy pieces that are easy to bite through, not chicken that has cooked so long it starts drying out around the edges.
- Step 8: Mix the Cornstarch Slurry - When the chicken is cooked, whisk the remaining 2 tablespoons of cornstarch with 2 tablespoons of cold water in a small bowl. Stir until the mixture is completely smooth. Cold water matters here because cornstarch can clump when it is added straight to hot liquid. Taking ten seconds to mix the slurry separately gives you a smoother sauce with much less fuss.
- Step 9: Thicken the Sauce - Pour the slurry into the slow cooker and stir gently to distribute it throughout the cooking liquid. Cover again and cook for another 20 to 30 minutes. When you come back, the sauce should look thicker, shinier, and much more like something that wants to cling to a scoop of rice. If it still seems a little loose, give it a few more minutes with the lid on.
- Step 10: Garnish and Serve - Give everything one final gentle stir, then sprinkle sliced green onions and sesame seeds over the top if you are using them. Spoon the mushroom chicken over hot steamed white rice or chow mein noodles, making sure everybody gets plenty of sauce. Around my table, the sauce is the part people chase around the bowl with the last few bites of rice, so I never mind being generous with it.
Notes
Substitutions
- Chicken thighs: Boneless, skinless chicken thighs can replace the chicken breasts and will give you slightly richer, very tender pieces of chicken.
- Cremini mushrooms: Use sliced cremini mushrooms in place of white mushrooms for a slightly deeper mushroom flavor.
- Yellow squash: Yellow squash can replace the zucchini in the same amount and gives you a similar soft, mild vegetable.
- Tamari: Tamari can replace soy sauce when you need a gluten friendly option, but make sure the oyster sauce and other bottled sauces you use also meet your dietary needs.
- Honey: Honey can replace the brown sugar if that is what you have in the pantry, though the sauce will have a slightly different sweetness.
Variations
- Spicy Mushroom Chicken: Stir 1 teaspoon of sriracha into the sauce and increase the crushed red pepper flakes for a dinner with more heat.
- Mushroom Chicken and Broccoli: Replace the zucchini with broccoli florets and add them during the final 30 minutes so they stay pleasantly tender.
- Mushroom Chicken Chow Mein: Spoon the finished chicken and plenty of sauce over chow mein noodles instead of steamed rice.
- Extra Veggie Mushroom Chicken: Add sliced onion and snow peas during the final 45 minutes for more vegetables and a little extra crunch.
- Mushroom Steak Style: Replace the chicken with cubed sirloin steak and reduce the cooking time to about 3 to 4 hours on LOW, checking for your preferred tenderness.
Tips and Tricks
- Do not skip the quick sear: Browning the chicken only takes a few minutes and helps the pieces keep a better texture during slow cooking.
- Add delicate vegetables later: If you like zucchini and bell pepper with more bite, wait until the final 45 minutes before stirring them into the slow cooker.
- Use fresh garlic when possible: Fresh minced garlic gives the sauce a fuller aroma and gets wonderfully mellow as it cooks.
- Stick with low sodium soy sauce: Oyster sauce and hoisin sauce already bring saltiness, so using low sodium soy sauce helps you stay in control of the final seasoning.
- Double the sauce for rice lovers: If your family always wants extra sauce soaking into their rice or noodles, doubling the sauce ingredients is a very reasonable move.
- Cut the chicken evenly: Pieces that are close to the same size cook more consistently, which means fewer dry pieces hiding among tender ones.
Serving Ideas
- Steamed white rice: A warm bowl of fluffy rice is my favorite choice because it catches every bit of that glossy soy garlic sauce.
- Chow mein noodles: Serve the chicken and vegetables over noodles when you want the whole meal to feel even closer to takeout night.
- Brown rice: Brown rice adds a little more chew and makes a hearty base for the tender chicken and vegetables.
- Steamed broccoli: Add a simple bowl of broccoli on the side if you want more vegetables without adding another complicated recipe to dinner.
- Egg rolls: A few crisp egg rolls make this feel like a full restaurant inspired family spread, especially on a Friday night when everyone wants something fun.
Storage and Make Ahead Tips
- Refrigerate leftovers promptly: Store cooled leftovers in an airtight container in the refrigerator for up to 4 days.
- Reheat gently: Warm individual portions in the microwave or reheat a larger amount on the stovetop over gentle heat until hot throughout.
- Loosen thick sauce: Add a small splash of chicken broth if the sauce becomes thicker than you like after sitting in the refrigerator.
- Freeze for later: Freeze cooled mushroom chicken in a freezer safe container for up to 2 months, keeping in mind that zucchini may be softer after thawing.
- Thaw overnight: Move frozen leftovers to the refrigerator the night before you plan to reheat them for the best, most even results.
- Prep ingredients ahead: You can cut the chicken and vegetables and whisk the sauce ingredients ahead of time, storing everything separately in the refrigerator until you are ready to cook.
Private Notes
Servings: 4 servings
