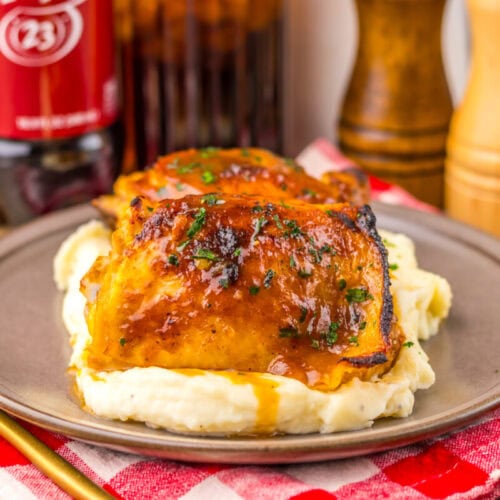
Slow Cooker Dr Pepper BBQ Chicken Thighs
These slow cooker Dr Pepper BBQ chicken thighs are tender, saucy, and packed with deep, sweet smoky flavor. A cozy set it and forget it dinner that feels like comfort food with a little backyard barbecue attitude.
Print Recipe
Ingredients
- 6 bone-in skin-on chicken thighs
- 1 teaspoon salt
- ½ teaspoon black pepper
- ½ teaspoon smoked paprika
- ½ teaspoon garlic powder
- 1 tablespoon oil
- 1 cup barbecue sauce
- ¾ cup Dr Pepper
- ¼ cup brown sugar
- 2 tablespoons Worcestershire sauce
- 1 tablespoon apple cider vinegar
- 1 teaspoon Dijon mustard
Instructions
- Step 1 - Season the Chicken for Full Flavor: Pat the chicken thighs dry with paper towels and season them all over with salt, black pepper, smoked paprika, and garlic powder. Take a second to really rub the seasoning into the skin and meat. This little bit of attention makes a big difference in flavor later.
- Step 2 - Sear the Chicken for Color and Depth: Heat the oil in a large skillet over medium high heat. Once hot, place the chicken thighs skin side down in the pan. Let them sear until the skin is deeply golden and a little crisp at the edges. This step builds flavor and keeps the skin from tasting greasy later.
- Step 3 - Transfer to the Slow Cooker for Gentle Cooking: Move the seared chicken thighs into your slow cooker, placing them skin side up. Try to keep them in a single layer so they cook evenly and stay tender.
- Step 4 - Whisk the Sauce for Balanced Flavor: In a medium bowl, whisk together the barbecue sauce, Dr Pepper, brown sugar, Worcestershire sauce, apple cider vinegar, and Dijon mustard until smooth and glossy. This sauce is the heart of the recipe so give it a good stir.
- Step 5 - Pour Sauce Around the Chicken to Protect the Skin: Carefully pour the sauce around the chicken in the slow cooker, not directly over the skin. This helps the skin keep some texture while still letting the chicken soak up all that flavor as it cooks.
- Step 6 - Slow Cook Until Tender and Juicy: Cover and cook on low for 5 to 6 hours, until the chicken is tender and cooked through. You will know it is ready when the meat pulls easily from the bone.
- Step 7 - Thicken the Sauce for a Glossy Finish: Remove the lid during the last 30 to 45 minutes of cooking to allow the sauce to reduce and become thick and glossy. This step turns the sauce into something you will want to spoon over everything on your plate.
- Step 8 - Broil for Extra Texture if You Like Crisp Skin: If you want a little extra texture on the skin, place the chicken thighs under the broiler for a few minutes just to caramelize the skin slightly. Stay close to the oven because this step happens fast.
- Step 9 - Spoon Sauce Over the Chicken for Maximum Flavor: Right before serving, spoon the thickened sauce over each piece of chicken. This makes sure every bite gets coated in that sweet smoky goodness.
Notes
Substitutions
- Boneless chicken thighs: Boneless thighs work but will cook faster and be a bit less juicy than bone in.
- Coke instead of Dr Pepper: Coke can replace Dr Pepper, though the sauce will be slightly less spiced and more straightforward sweet.
- Honey instead of brown sugar: Honey can replace brown sugar for a smoother sweetness and a slightly lighter glaze.
Variations
- Add heat: Stir in cayenne pepper or crushed red pepper flakes if your family likes a little spice.
- Extra caramelized finish: Always finish under the broiler for a stickier glaze and deeper flavor.
- Shredded chicken option: Shred the cooked chicken and toss it with extra sauce for sandwiches or sliders.
Tips and Tricks
- Sear for flavor: Browning the chicken first builds depth and prevents the skin from tasting greasy.
- Let the sauce reduce: Leaving the lid off near the end thickens the sauce into a glaze.
- Pour around the skin: Keeping sauce off the skin at first helps maintain better texture.
- Extra sticky sauce: Simmer the sauce separately if you want an even thicker glaze.
- Glossy finish: A small cornstarch slurry stirred in at the end creates a shiny, clingy sauce.
Serving Ideas
- Mashed potatoes: The sauce is perfect for spooning over fluffy mashed potatoes.
- Buttery rice: Serve the chicken over rice to soak up all the extra sauce.
- Roasted vegetables: Pair with roasted green beans, carrots, or broccoli for a balanced plate.
- Corn on the cob: A classic barbecue side that fits perfectly with these flavors.
Storage and Make Ahead Tips
- Refrigerate leftovers: Store in an airtight container in the fridge for up to 4 days.
- Freeze for later: Freeze cooled chicken and sauce for up to 2 months.
- Reheat gently: Warm slowly and spoon extra sauce over the chicken to keep it moist.
- Meal prep friendly: This recipe is great for cooking ahead and enjoying throughout the week.
Private Notes
Servings: 6 servings
