Mustard Chicken Thighs
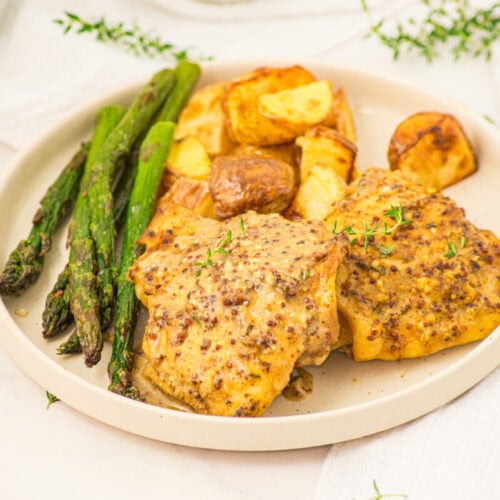
Mustard Chicken Thighs are a cozy family dinner made with juicy chicken coated in Dijon mustard, whole grain mustard, garlic, and olive oil, then baked until tender and savory. With just 10 minutes of prep and a handful of everyday ingredients, this is the kind of dependable oven dinner that works beautifully with mashed potatoes, rice, roasted vegetables, or a simple salad.
Print Recipe
Ingredients
- 3 tablespoons Dijon mustard
- 1 tablespoon whole grain Dijon mustard (regular Dijon mustard can be substituted)
- 1 teaspoon olive oil
- 1 teaspoon garlic (minced)
- ¼ teaspoon salt
- ¼ teaspoon black pepper
- 2 pounds skinless chicken thighs (about 6 chicken thighs)
- fresh thyme (for garnish)
Instructions
- Step 1: Preheat the Oven - Set your oven to 350°F before you start mixing anything. Giving the oven time to heat fully matters because you want the chicken to begin cooking evenly as soon as the casserole dish goes inside. While the oven warms, grab a large mixing bowl and a casserole dish big enough to hold all six thighs in one layer. Having everything ready now keeps the rest of the process calm, which I appreciate when dinner hour already feels a little noisy.
- Step 2: Mix the Mustard Coating - Add the Dijon mustard, whole grain Dijon mustard, olive oil, minced garlic, salt, and black pepper to the large bowl. Stir everything together until the olive oil and seasonings are evenly worked into the mustard. You are looking for a thick, spoonable mixture with mustard seeds scattered throughout. Take a few extra seconds here to mix thoroughly because an even coating now means every piece of chicken gets the same tangy, garlicky flavor later.
- Step 3: Coat the Chicken Thoroughly - Add the skinless chicken thighs to the bowl with the mustard mixture. Use tongs or clean hands to turn each thigh through the mixture until the chicken is coated on every side. Do not just spoon mustard over the top and call it done. Getting the coating around the edges and underneath the chicken helps the flavor stay with each bite instead of sitting only on the surface. If the thighs are different sizes, that is completely normal.
- Step 4: Arrange the Chicken in the Dish - Transfer the coated chicken thighs to your casserole dish and arrange them in a single layer with the smoother side facing down. Give each thigh a little room instead of piling or overlapping the pieces. That space lets hot air move around the chicken and helps it roast instead of steaming. Scrape any useful mustard mixture toward one side of the bowl so you can use a little more after the chicken is flipped.
- Step 5: Bake the First Side - Place the casserole dish in the preheated oven and bake the chicken at 350°F for 20 minutes. During this first stretch, the thighs begin releasing their juices and the mustard coating starts settling onto the meat. The kitchen will gradually pick up that warm garlic and mustard smell, which is usually the moment somebody in my house wanders in to ask when dinner will be ready.
- Step 6: Flip and Brush the Chicken - After 20 minutes, carefully pull the casserole dish from the oven and place it on a heat safe surface. Use clean tongs to turn each chicken thigh so the smoother side is now facing up. Brush the tops with additional mustard mixture. For food safety, only use mixture that has not been saved for serving raw or that will continue cooking with the chicken. The goal is simply to refresh that coating so the top develops plenty of savory mustard flavor during the final bake.
- Step 7: Finish Baking Until Juicy - Return the casserole dish to the oven and bake for about 25 minutes more. Chicken thigh sizes vary, so begin checking the thickest piece near the end of the cooking time. Insert an instant read thermometer into the thickest part without pressing it against the dish. The chicken is ready when it reaches 165°F. Once it is cooked through, the meat should look juicy and tender, with the mustard coating clinging to the surface.
- Step 8: Garnish and Serve - Remove the casserole dish from the oven and let the chicken rest for a few minutes before serving. That short rest gives the juices inside the meat a chance to settle rather than immediately running onto the plate. Sprinkle fresh thyme over the top just before bringing it to the table. I like serving the chicken straight from the casserole dish on busy nights because those golden mustard coated thighs already look inviting without any extra fuss.
Notes
Substitutions
- Regular Dijon mustard: If you do not have whole grain mustard, use an extra tablespoon of smooth Dijon and the chicken will still have plenty of tangy mustard flavor.
- Yellow mustard: You can replace a small portion of the Dijon with yellow mustard for a milder, more familiar mustard taste, though the final flavor will be less complex.
- Boneless chicken thighs: Boneless thighs can work well, but they may cook faster, so begin checking their internal temperature earlier.
- Chicken breasts: Skinless chicken breasts can be used, although they are leaner and may need a shorter cooking time depending on thickness.
- Dried thyme: If fresh thyme is not available, a light sprinkle of dried thyme can be added to the mustard mixture before baking.
- Avocado oil: Avocado oil can replace the olive oil in the same amount if that is what you normally keep in your pantry.
Variations
- Honey mustard chicken: Stir a tablespoon of honey into the mustard mixture for a sweeter coating that still keeps the tangy Dijon character.
- Herb mustard chicken: Add chopped fresh rosemary or thyme to the mustard mixture before coating the chicken for a more aromatic dinner.
- Garlic lover's version: Increase the minced garlic to 2 teaspoons if your family enjoys a stronger roasted garlic flavor.
- Smoky mustard chicken: Add a small pinch of smoked paprika to the coating for gentle smokiness and a warmer color.
- Lemon mustard chicken: Add a teaspoon of fresh lemon juice to brighten the coating and give the finished chicken a fresh, lightly citrusy edge.
- Creamy mustard serving sauce: Stir a spoonful of Dijon into warm cream in a separate saucepan and serve a little alongside the cooked chicken for an extra rich dinner.
Tips and Tricks
- Use a roomy casserole dish: Keeping the thighs in one layer helps them roast evenly and keeps them from sitting in too much trapped steam.
- Coat every surface: Turn the chicken thoroughly in the mustard mixture so the seasoning reaches more than just the tops.
- Watch the thermometer: Chicken thigh thickness can vary quite a bit, so internal temperature is more dependable than cooking time alone.
- Check the thickest thigh: The largest piece usually takes the longest, making it the best one to test when you think dinner is ready.
- Give the chicken a brief rest: A few minutes on the counter after baking helps the meat stay juicy when you cut into it.
- Do not crowd the dish: Space between the thighs promotes better roasting and keeps the coating from becoming watery.
- Use clean utensils after handling raw chicken: Wash or replace tongs, brushes, and utensils that touched uncooked chicken before using them with the finished meal.
- Save the pan juices: Spoon a little of the warm juice from the casserole dish over rice or mashed potatoes because there is plenty of mustard and chicken flavor hiding there.
Serving Ideas
- Mashed potatoes: Spoon a little of the mustard scented pan juice over fluffy mashed potatoes and serve the chicken right beside them.
- Roasted vegetables: Carrots, broccoli, green beans, Brussels sprouts, or cauliflower make an easy vegetable side while keeping dinner simple.
- Steamed rice: A bowl of warm rice catches the savory juices from the chicken and turns a handful of ingredients into a filling family meal.
- Simple green salad: Crisp lettuce, cucumber, tomatoes, and a light vinaigrette make a fresh contrast to the rich chicken thighs.
- Buttered noodles: Plain noodles with a little butter give picky eaters something familiar and pair nicely with the mustard coated chicken.
- Roasted potatoes: Crispy roasted potatoes are especially good here because their browned edges play nicely with the tangy mustard coating.
- Crusty bread: A warm piece of bread is useful for soaking up every last spoonful of juice left in the casserole dish.
Storage and Make Ahead Tips
- Refrigerator storage: Let the cooked chicken cool, then store it in an airtight container in the refrigerator for 3 to 4 days.
- Make ahead preparation: Mix the mustard coating and toss it with the chicken several hours before dinner, then keep everything covered in the refrigerator until you are ready to bake.
- Reheating in the oven: Place the chicken in a covered baking dish and warm it at 350°F until heated through, adding a small spoonful of water or pan juices if it looks dry.
- Microwave reheating: Warm individual portions in short intervals and cover the chicken loosely so it retains more moisture.
- Lunch preparation: Slice leftover chicken and pack it with rice, greens, roasted vegetables, or potatoes for an easy next day lunch.
- Freezer option: Cooked chicken can be frozen in a tightly sealed freezer container, although the mustard coating may be slightly softer after thawing and reheating.
Private Notes
Servings: 6 chicken thighs
