Slow Cooker Beef Pot Roast
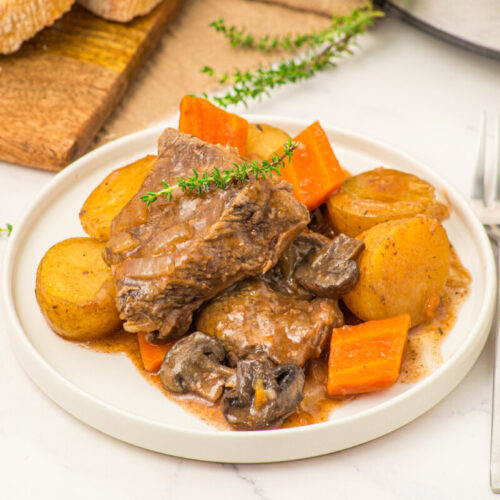
Slow Cooker Beef Pot Roast brings tender chuck roast, buttery potatoes, carrots, mushrooms, onion, garlic, and rich homemade gravy together in one comforting family dinner. With about 10 minutes of prep and the slow cooker doing most of the work, it is the kind of hearty meal that fits busy weekdays just as easily as a relaxed Sunday supper.
Print Recipe
Ingredients
- 1 large onion diced
- 1 lb carrots cut into chunks
- 7 oz mushrooms halved
- 1 lb baby potatoes halved
- 2 lb beef chuck roast
- 1 tsp salt plus more to taste if needed
- ½ tsp black pepper plus more to taste if needed
- 2 cloves garlic minced
- 2 tbsp tomato paste
- 1 cup beef broth
- fresh thyme a few sprigs, plus more for serving
- 3 tbsp cornstarch
- 2 tbsp cold water for mixing with the cornstarch
Instructions
- Step 1: Build the Vegetable Base - Add the diced onion, carrot chunks, halved mushrooms, and halved baby potatoes to the bottom of your slow cooker. I like putting the vegetables underneath the roast because they sit right in the cooking liquid and collect all those wonderful beef juices as everything cooks. Try to keep your potato and carrot pieces reasonably similar in size so they finish cooking at about the same time. There is no need to arrange everything neatly. This is one of those dinners where a good rough chop and a quick toss into the pot are exactly what you want.
- Step 2: Add and Season the Beef - Place the beef chuck roast on top of the vegetables. You can leave the roast whole or cut it into a few large pieces if that fits your slow cooker better. Sprinkle the salt and black pepper evenly over the beef, then add the minced garlic and tomato paste. I like to spread the tomato paste over the top of the meat a little so it does not remain in one big spoonful. As the roast cooks, the garlic and tomato paste will work their way into the broth and help create that rich, dark gravy you want with pot roast.
- Step 3: Pour in the Broth and Thyme - Pour the beef broth over and around the roast, then tuck a few sprigs of fresh thyme into the slow cooker. Do not worry if the broth does not completely cover the beef. A slow cooker traps moisture extremely well, and the roast itself will release additional juices as it cooks. The vegetables underneath also soften and contribute liquid. At this point, you should already have everything you need for that familiar pot roast smell that eventually starts drifting out of the kitchen and making everybody suddenly very interested in when dinner will be ready.
- Step 4: Let the Slow Cooker Do the Work - Cover the slow cooker and cook on Low for about 7 hours or on High for about 4 hours. If you have the time, I prefer the Low setting because the longer gentle cooking gives the chuck roast plenty of time to become tender. Try not to keep lifting the lid to check on it. Every peek lets heat escape and can stretch out the cooking time. You can give everything a gentle stir around the halfway point if you want, but it is not necessary. I usually leave it alone and let the cooker earn its counter space.
- Step 5: Check the Beef for Tenderness - When the cooking time is nearly finished, test the beef with a fork. You are looking for meat that gives easily and pulls apart without a fight. If you cooked it on High for 4 hours and the roast still feels firm, give it more time. Pot roast can be funny that way. A tough roast often does not mean it has cooked too long. It usually means the connective tissue has not had enough time to soften yet. Depending on the thickness of your roast and your particular slow cooker, another 30 to 60 minutes can make a big difference.
- Step 6: Thicken the Gravy - In a small bowl, whisk the cornstarch with the cold water until completely smooth. Pour that mixture into the slow cooker and gently stir it into the cooking liquid. Try not to break up the potatoes too aggressively while you stir. Cover the slow cooker again and let everything cook for several more minutes, until the broth thickens into a glossy gravy that coats the beef and vegetables. This final little step is worth doing because it changes the liquid from a flavorful broth into the kind of sauce you want to drag a piece of potato through before taking a bite.
- Step 7: Finish With Fresh Thyme and Serve - Taste the gravy and adjust the salt and black pepper if needed. Remove any woody thyme stems you can easily see, then sprinkle a little fresh thyme over the pot before serving. I like to break the beef into generous chunks rather than shredding it completely because those tender pieces look and feel more like a classic pot roast dinner. Spoon the beef into bowls or onto plates with plenty of potatoes, carrots, mushrooms, and onion, then ladle that thick gravy right over everything. This is the point where my family usually gets noticeably quieter for a few minutes, which I take as a very good review.
Notes
Substitutions
- Regular potatoes for baby potatoes: Yukon Gold or red potatoes work nicely as long as you cut them into evenly sized chunks so they cook at the same rate.
- Dried thyme for fresh thyme: If fresh thyme is not available, use about 1 teaspoon dried thyme and stir it into the broth before cooking.
- Extra carrots for mushrooms: If your family does not care for mushrooms, leave them out and add a little more carrot or potato instead.
- Low sodium beef broth for regular broth: This is a good option if you prefer to have more control over the salt level at the end of cooking.
- Arrowroot for cornstarch: Arrowroot can also thicken the gravy, although the texture may be slightly different, so add it gradually until the sauce reaches the consistency you like.
Variations
- Add celery: Cut two or three celery stalks into chunks and add them with the onion for another traditional pot roast flavor.
- Make it extra garlicky: Add one or two additional cloves of minced garlic if your family likes a stronger garlic presence.
- Use pearl onions: Small pearl onions make the finished dish feel a little special and turn sweet and tender as they cook.
- Add peas at the end: Stir in a cup of frozen peas during the final few minutes for a pop of color and a little extra sweetness.
- Give the gravy more herb flavor: Add rosemary along with the thyme for a woodsy flavor that pairs beautifully with beef and potatoes.
Tips and Tricks
- Choose chuck roast: A lean beef cut may sound appealing, but chuck roast is much more forgiving in a slow cooker because the marbling helps the meat stay juicy and tender.
- Cut vegetables generously: Small pieces can become too soft during several hours of cooking, so give your potatoes and carrots enough size to hold up.
- Keep the lid closed: I know that smell makes it tempting to check dinner every hour, but every time you lift the lid you lose heat and moisture.
- Cook until tender, not just until the timer rings: Slow cookers and roasts vary, so use the suggested cooking time as a guide and let the texture of the beef tell you when dinner is really ready.
- Use cold water for the slurry: Cornstarch mixes much more smoothly with cold water, which helps you avoid little white lumps floating through the gravy.
- Season again before serving: Potatoes and carrots absorb seasoning as they cook, so always taste the gravy at the end and add another pinch of salt or pepper if it needs it.
- Keep the beef with the gravy: Whether you are refrigerating leftovers or freezing them, storing the meat in some of its sauce helps keep it moist when you warm it again.
Serving Ideas
- Warm dinner rolls: A soft roll is excellent for wiping up the last bit of gravy left on the plate.
- Crusty bread: Thick slices of bread give everyone something sturdy to dip into the beef gravy.
- Simple green salad: A crisp salad with a bright vinaigrette gives you a fresh contrast to the rich roast and potatoes.
- Green beans: Steamed or roasted green beans are an easy vegetable side that feels right at home next to pot roast.
- Mashed potatoes: There are already potatoes in the slow cooker, but if your family believes there is no such thing as too many potatoes, mashed potatoes underneath the beef and gravy are hard to beat.
Storage and Make Ahead Tips
- Refrigerate leftovers promptly: Let the pot roast cool, then transfer the beef, vegetables, and gravy to an airtight container and refrigerate for up to 4 days.
- Store meat in the sauce: Keep leftover beef surrounded by some gravy so it stays moist instead of drying out in the refrigerator.
- Reheat gently: Warm leftovers on the stove over medium low heat or in the microwave until hot throughout, adding a small splash of beef broth if the gravy has become too thick.
- Freeze for longer storage: The cooked beef and gravy can be frozen for about 2 to 3 months in a freezer safe container.
- Freeze in useful portions: I like dividing leftovers into meal sized containers before freezing so I can thaw only what the family needs.
- Prepare vegetables ahead: If mornings are hectic, chop the onion, carrots, mushrooms, and potatoes the night before and refrigerate them so loading the slow cooker takes only a few minutes the next day.
Private Notes
Servings: 6 servings
